Difference between revisions of "Cross Vendor Migration"
From Tranzman Documentation
| (One intermediate revision by the same user not shown) | |||
| Line 1: | Line 1: | ||
| + | __TOC__ | ||
| + | <br> | ||
| + | <br> | ||
| + | <div style="background-color:#edf7ff; padding: 1.5rem; border-radius:8px; max-width:80%; margin: 0 auto; margin-bottom:2rem;"> | ||
| + | <h1 style="border-bottom:none; font-size:2.5em; font-weight:bold; text-align:center;">Agent Deployment for Tranzman Appliance</h1> | ||
| + | <p style="font-size:1.2em; text-align:left;"> | ||
| + | Ensure the Tranzman appliance is configured for <b>Cross Vendor Transitioning</b>.<br> | ||
| + | Refer to <b>[[Configure_Personality|Configuring personality]]</b> for more details. | ||
| + | </p> | ||
| + | </div> | ||
| − | == | + | <div style="max-width:80%; margin: 0 auto;"> |
| + | <div style="background-color:#fffbf4; padding:1.5rem; border-radius:8px; box-shadow:0 2px 4px rgba(0,0,0,0.06); margin-bottom:2rem;"> | ||
| + | <h2 style="border-bottom:2px solid #ffe0b2; padding-bottom:0.5rem; font-size:1.5em;">Adding Agents</h2> | ||
| + | <ol style="font-size:1.1em; margin-left:2em;"> | ||
| + | <li> | ||
| + | Add the backup servers involved in migration to the Tranzman appliance.<br> | ||
| + | This allows Tranzman to generate an agent package.<br> | ||
| + | To add the agent, click <b>+</b> from the <b>Environments</b> section.<br> | ||
| + | Provide the server IP address and platform (specify the correct platform to build the agent package).<br> | ||
| + | Click <b>Commit</b> to add the server to Tranzman.<br> | ||
| + | <div style="display:inline-block; box-shadow:5px 5px 10px grey;">[[File:EnvironmentAdd.jpg|700px]]</div> | ||
| + | </li> | ||
| + | </ol> | ||
| + | </div> | ||
| − | + | <div style="background-color:#fef3f7; padding:1.5rem; border-radius:8px; box-shadow:0 2px 4px rgba(0,0,0,0.06); margin-bottom:2rem;"> | |
| + | <h2 style="border-bottom:2px solid #f8bbd0; padding-bottom:0.5rem; font-size:1.5em;">Download Agent Package</h2> | ||
| + | <ul style="font-size:1.1em; margin-left:2em;"> | ||
| + | <li> | ||
| + | In a few minutes, Tranzman will build an agent package specific for the added server.<br> | ||
| + | This package works only with the added server and cannot be used on other similar servers.<br> | ||
| + | Click on the [[File:Agent.jpg|border]] icon to download the agent package.<br> | ||
| + | <div style="display:inline-block; box-shadow:5px 5px 10px grey;">[[File:EnvironmentAdd.jpg|700px]]</div> | ||
| + | </li> | ||
| + | </ul> | ||
| + | </div> | ||
| − | === | + | <div style="background-color:#eff8f0; padding:1.5rem; border-radius:8px; box-shadow:0 2px 4px rgba(0,0,0,0.06); margin-bottom:2rem;"> |
| + | <h2 style="border-bottom:2px solid #c8e6c9; padding-bottom:0.5rem; font-size:1.5em;">Installing Agent</h2> | ||
| + | <ul style="font-size:1.1em; margin-left:2em;"> | ||
| + | <li> | ||
| + | After downloading, copy the agent to the server and install it.<br> | ||
| + | The Tranzman Dashboard will list the added server as <b>Querying instances...</b>.<br> | ||
| + | Once installed, Tranzman will query the instance and discover the server's configuration. | ||
| + | </li> | ||
| + | </ul> | ||
| + | </div> | ||
| − | + | <div style="background-color:#fffbf4; padding:1.5rem; border-radius:8px; box-shadow:0 2px 4px rgba(0,0,0,0.06); margin-bottom:2rem;"> | |
| − | + | <h2 style="border-bottom:2px solid #ffe0b2; padding-bottom:0.5rem; font-size:1.5em;">Agent Installation Steps</h2> | |
| − | + | <ul style="font-size:1.1em; margin-left:2em;"> | |
| − | + | <li> | |
| − | [[File: | + | <b>Windows:</b><br> |
| + | Copy the agent package to the backup server and execute it from any directory.<br> | ||
| + | Run as administrator.<br> | ||
| + | Follow the prompts to complete installation.<br> | ||
| + | Default installation path: <b>C:\Program Files\SRL</b><br> | ||
| + | <div style="display:inline-block; box-shadow:5px 5px 10px grey;">[[File:AgentInstall_windows.jpg|700px]]</div> | ||
| + | </li> | ||
| + | <li> | ||
| + | <b>*NIX/Linux:</b><br> | ||
| + | Copy the agent package to any directory and run it as root.<br> | ||
| + | Default installation path: <b>/opt/SRL</b><br> | ||
| + | <div style="display:inline-block; box-shadow:5px 5px 10px grey;">[[File:AgentInstall_linux.jpg|700px]]</div> | ||
| + | </li> | ||
| + | <li> | ||
| + | <b>NetBackup Flex/FlexScale Appliance:</b><br> | ||
| + | Default installation path is the persistent storage path: <b>/mnt/nbdata/usr/openv/SRL</b> | ||
| + | </li> | ||
| + | </ul> | ||
| + | <div style="background-color:#fde9e9; padding:0.8rem; border-radius:8px; box-shadow:0 2px 4px rgba(117,0,0,0.10); font-size:1em; margin: 1em auto;"> | ||
| + | <p>[[File:Note.png|30px]] For NetBackup Flex or FlexScale appliance, use the persistent storage path for installation: <b>/mnt/nbdata/usr/openv/SRL</b></p> | ||
| + | </div> | ||
| + | </div> | ||
| + | </div> | ||
| − | + | <div style="display:flex; justify-content:space-between; margin-top:2rem; padding:1rem; background-color:#ffffff; max-width:90%; margin: 2rem auto 0;"> | |
| − | + | <div style="text-align:left;"> | |
| − | + | [[Image:prev_icon.jpg|30px|link=Same_Vendor_Migration]] [[Same_Vendor_Migration|Previous]] | |
| − | + | </div> | |
| − | + | <div style="text-align:right;"> | |
| − | + | [[Image:next_icon.jpg|30px|link=Recovery_to_Files]] [[Recovery_to_Files|Next]] | |
| − | + | </div> | |
| − | + | </div> | |
| − | |||
| − | |||
| − | |||
| − | |||
| − | |||
| − | |||
| − | |||
| − | |||
| − | |||
| − | |||
| − | |||
| − | |||
| − | |||
| − | |||
| − | |||
| − | |||
| − | |||
| − | |||
| − | |||
| − | |||
| − | |||
| − | |||
| − | |||
| − | |||
| − | |||
| − | |||
| − | |||
| − | |||
| − | |||
| − | |||
Latest revision as of 04:09, 12 September 2025
Contents
Agent Deployment for Tranzman Appliance
Ensure the Tranzman appliance is configured for Cross Vendor Transitioning.
Refer to Configuring personality for more details.
Adding Agents
-
Add the backup servers involved in migration to the Tranzman appliance.
This allows Tranzman to generate an agent package.
To add the agent, click + from the Environments section.
Provide the server IP address and platform (specify the correct platform to build the agent package).
Click Commit to add the server to Tranzman.
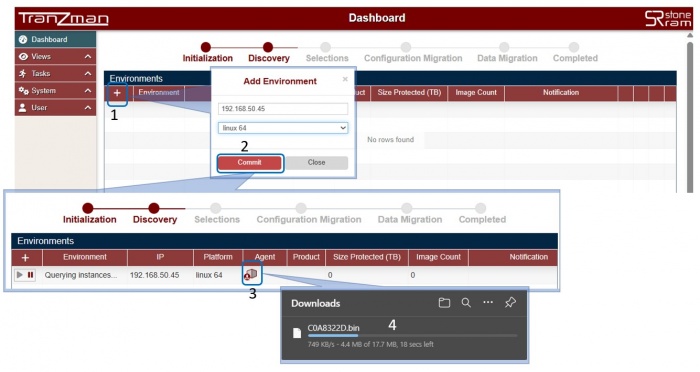

Download Agent Package
-
In a few minutes, Tranzman will build an agent package specific for the added server.
This package works only with the added server and cannot be used on other similar servers.
Click on the icon to download the agent package.
Installing Agent
-
After downloading, copy the agent to the server and install it.
The Tranzman Dashboard will list the added server as Querying instances....
Once installed, Tranzman will query the instance and discover the server's configuration.
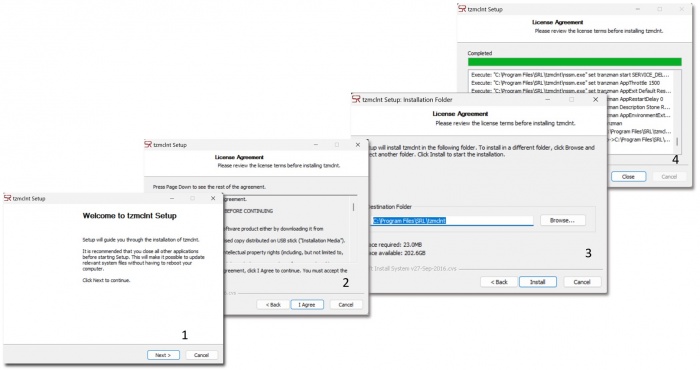
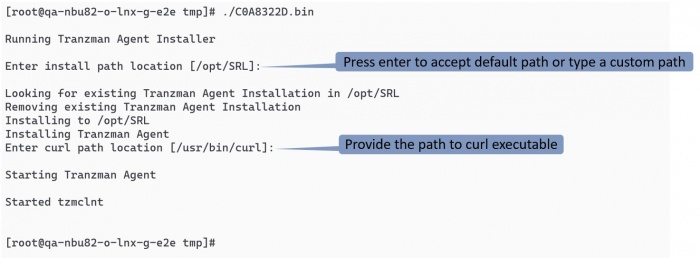
Agent Installation Steps
-
Windows:
Copy the agent package to the backup server and execute it from any directory.
Run as administrator.
Follow the prompts to complete installation.
Default installation path: C:\Program Files\SRL
-
*NIX/Linux:
Copy the agent package to any directory and run it as root.
Default installation path: /opt/SRL
-
NetBackup Flex/FlexScale Appliance:
Default installation path is the persistent storage path: /mnt/nbdata/usr/openv/SRL


![]() For NetBackup Flex or FlexScale appliance, use the persistent storage path for installation: /mnt/nbdata/usr/openv/SRL
For NetBackup Flex or FlexScale appliance, use the persistent storage path for installation: /mnt/nbdata/usr/openv/SRL