Difference between revisions of "Selections"
| (2 intermediate revisions by the same user not shown) | |||
| Line 2: | Line 2: | ||
== Headline == | == Headline == | ||
| − | |||
Selections enables granularity for including objects for migration , this feature lets you select specific components for migration.Click on Actions on sidebar and you will find Selections under Actions. | Selections enables granularity for including objects for migration , this feature lets you select specific components for migration.Click on Actions on sidebar and you will find Selections under Actions. | ||
| Line 21: | Line 20: | ||
Note:- Selections should be modified only before the transition is started.Changes to selections after transition will invalidate the existing license. | Note:- Selections should be modified only before the transition is started.Changes to selections after transition will invalidate the existing license. | ||
Similar warning can be seen on the selections page. | Similar warning can be seen on the selections page. | ||
| − | |||
===Step 1=== | ===Step 1=== | ||
| Line 35: | Line 33: | ||
<b>Default Selections (Migrate Everything)</b> :- | <b>Default Selections (Migrate Everything)</b> :- | ||
| − | + | ||
Follow below steps for selecting everything for a migration.By everything we means all images in catalog and all config objects. | Follow below steps for selecting everything for a migration.By everything we means all images in catalog and all config objects. | ||
| Line 41: | Line 39: | ||
<b>Step 2</b>:- Toggle the Rules button towards complex for selecting all config objects. | <b>Step 2</b>:- Toggle the Rules button towards complex for selecting all config objects. | ||
| − | + | ||
<b>Granular Selections (Migrate Specific Data)</b> :- | <b>Granular Selections (Migrate Specific Data)</b> :- | ||
| − | + | ||
<b>Step 1</b>:- Click on the Image Rules and select Images based on different properties. | <b>Step 1</b>:- Click on the Image Rules and select Images based on different properties. | ||
| − | + | ||
<b>Step 2</b>:- Click on the Config Object Rules and select Config objects based on different properties. | <b>Step 2</b>:- Click on the Config Object Rules and select Config objects based on different properties. | ||
Latest revision as of 10:44, 7 August 2020
Contents
Headline
Selections enables granularity for including objects for migration , this feature lets you select specific components for migration.Click on Actions on sidebar and you will find Selections under Actions.
Some Key Points about selections are :-
Image Rules - You can either select all images in the catalog to migrate or you can select images based on different image properties like Backup Time,Expire Time,Policy etc.
Config Object Rules - Again same like Image Rules either you choose to migrate everything or make granular selections for different configuration objects like specific Workloads,Residencies etc.
Rename Rules -
Pre-Duplication Rules -
Duplication Rules -
Note:- Selections should be modified only before the transition is started.Changes to selections after transition will invalidate the existing license.
Similar warning can be seen on the selections page.
Step 1
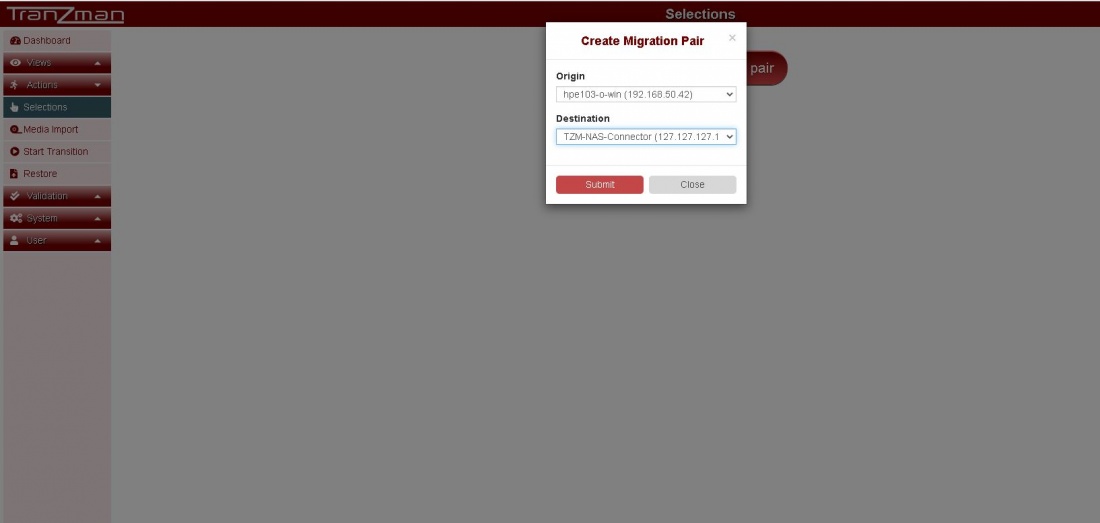
Click on Selections under Actions->Selections and click on Create Migration Pair
Select the Origin i.e. Source backup server and Destination i.e. TZM-NAS-Connector(127.127.127.127)
Step 2
Default Selections (Migrate Everything) :-
Follow below steps for selecting everything for a migration.By everything we means all images in catalog and all config objects.
Step 1:- Click on the Image Rules and select Migrate everything and hit Apply rules.You will see the notification of Applying Rules , wait for that notification to clear and close the tab.
Step 2:- Toggle the Rules button towards complex for selecting all config objects.
Granular Selections (Migrate Specific Data) :-
Step 1:- Click on the Image Rules and select Images based on different properties.
Step 2:- Click on the Config Object Rules and select Config objects based on different properties.
Note :- Below steps are applied only for Cross Vendor Migrations , for same vendor migration you can break and move to Jump to Pre-Assessment .
Step 3
Click on Pre-Duplication
