Pre-Assessment
From Tranzman Documentation
Contents
Pre-Assessment Report Overview
The Tranzman Appliance streamlines pre-validation and site surveys using automated checks in the TZM Pre-Assessment.
This process helps consultants identify and resolve pre-existing issues in the backup environment before migration begins.
Assessment Checks & Usage
- The number of checks depends on the migration personality and the origin/destination environments.
- Same Vendor Migration includes additional checks. Always use the latest patch for new checks.
- For SPLITS or MERGERS, verify results for each migration pair. Take care when merging objects with the same name.
- If no immediate fix is available for an issue, Stone Ram Support will add new checks to notify in advance as part of Pre-Assessment.
🛈 Always run the latest patch to benefit from the newest checks and notifications.
Running Pre-Assessment
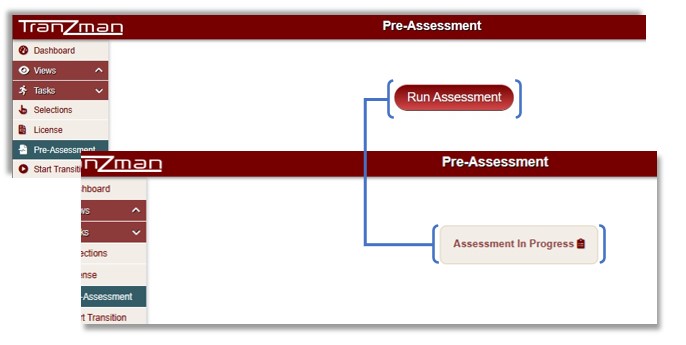
- Navigate to Tasks → Pre-Assessment in the TZM web UI and click Start Pre-Assessment.
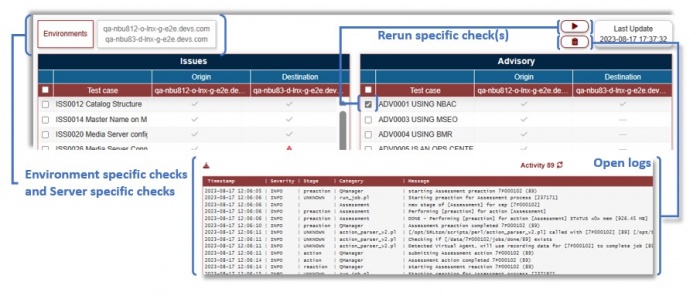
- Multiple checks are run; tests can be rerun to verify failed tests.
- The Logs icon provides the latest assessment activity logs.
NetBackup-to-NetBackup Migration Checks
- 28 Individual Checks for pre-existing issues in origin or destination.
- 17 Comparison Checks for migration component issues between origin and destination.
- 17 Advisory Checks for environment limitations (may require manual actions).
- 9 Advisory comparison checks for limitations/manual actions that may need addressing.
Analysing Pre-Assessment Report
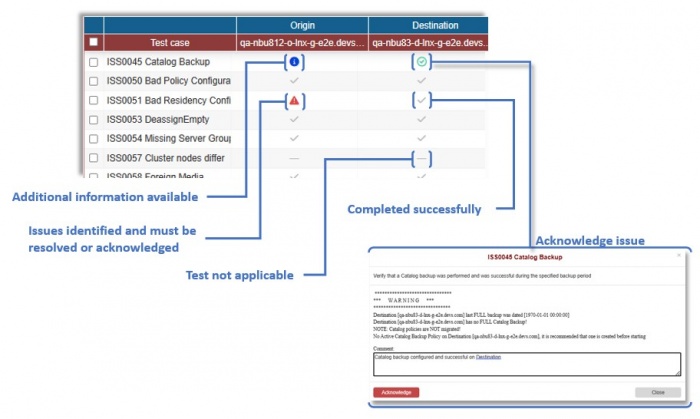
- Red triangle: Issue to resolve or acknowledge (click for details).
- Grey check: Test ran without issue.
- Grey dash: Test not applicable/skipped.
- Blue info: More information, not critical.
- Green check: Test acknowledged.
Note: All Red triangle issues must be resolved, retested, or acknowledged before starting migration.
Generating & Downloading Pre-Assessment Report
- Go to Tasks → Download and click Generate documents to create the Pre-Assessment report.
- Report is generated only during the Selections phase.
- An evidence file is created with all test data from the Pre-Assessment.
- Three documents per selection pair are available for download:
- tranzman_Assessment_XXXXXXXXXX_origin-name_destination-name.odt
- tranzman_Engagement_Plan_XXXXXXXXXX_origin-name_destination-name.odt
- tranzman_Environments_XXXXXXXXXX_origin-name_destination-name.odt
These .odt files can be viewed/edited using MS Word or LibreOffice.
Editing & Working on Issues
- Edit the document only to add info on highlighted issues.
- For merges, combine multiple documents into one.
- Customer is responsible for resolving issues identified in the report.
- Unresolved issues before migration: deselect affected components (Tranzman cannot migrate invalid/inconsistent components).
- Multiple issues may impact project dates; consider change control procedures.


