Difference between revisions of "RecoverSAP/R3"
| Line 25: | Line 25: | ||
Modify the '''#SAVED''' path in the Backup ID file pointing to the location where your restored files are. | Modify the '''#SAVED''' path in the Backup ID file pointing to the location where your restored files are. | ||
| − | '''Example:''' If you are restoring a data file and your data file is under location '''"/oracle/TS2/sapbackup/bezmwlru/sr3.data6"''' then replace the #SAVED parameters in Backup ID file with the above location. | + | '''Example:''' If you are restoring a data file and your data file is under location '''"/oracle/TS2/sapbackup/bezmwlru/sr3.data6"''' then replace the '''#SAVED''' parameters in Backup ID file with the above location. |
===Step 4=== | ===Step 4=== | ||
| Line 31: | Line 31: | ||
'''Example:''' brrestore to Backup ID file bezmwlru will be run as '''/sapmnt/TS2/exe/uc/linuxx86_64/ brrestore -b bezmwlru.pff'''. | '''Example:''' brrestore to Backup ID file bezmwlru will be run as '''/sapmnt/TS2/exe/uc/linuxx86_64/ brrestore -b bezmwlru.pff'''. | ||
| + | |||
| + | ===Step 5=== | ||
| + | Edit the file with extension ".pff" and make sure that the settings for '''backup_dev_type''' is set to '''disk''' as we are restoring the imaged from this location. | ||
| + | |||
| + | The relevant section of the file should look similar to the one below. | ||
| + | |||
| + | {| class="wikitable" style="padding-left: auto; color:#FFFFFF; background-color: black; width: 600px; FONT-FAMILY:monospace,monospace; LINE-HEIGHT:15px; white-space: pre-wrap; | ||
| + | | | ||
| + | Name Value | ||
| + | |||
| + | oracle_sid TS2 | ||
| + | oracle_home /oracle/TS2/112_64 | ||
| + | oracle_profile /oracle/TS2/112_64/dbs/initTS2.ora | ||
| + | sapdata_home /oracle/TS2 | ||
| + | sap_profile /oracle/TS2/112_64/dbs/initTS2.sap | ||
| + | backup_mode PSAPSR3 | ||
| + | backup_type offline | ||
| + | backup_dev_type disk | ||
| + | system_info orats2/orats2 sap-ora Linux 3.12.49-11-default #1 SMP Wed Nov 11 20:52:43 UTC 2015 (8d714a0) x86_64 | ||
| + | oracle_info TS2 11.2.0.3.0 8192 32 1836601 sap-ora UTF8 UTF8 1850097416 &TS2 | ||
| + | sap_info 740 SAPSR3 | ||
| + | make_info linuxx86_64 OCI_112 Apr 10 2013 | ||
| + | command_line /sapmnt/TS2/exe/uc/linuxx86_64/brbackup -t offline -d util_file -c -m PSAPSR3 -u | ||
| + | |} | ||
| + | |||
| + | ===Step 6=== | ||
| + | Make the same change as in '''Step 5''' to the '''initTS2.sap''' file. The location to this file can be found from the ".pff" file. | ||
| + | |||
---- | ---- | ||
Use this link to go back to the main [[recoverydocs]] Page. | Use this link to go back to the main [[recoverydocs]] Page. | ||
Revision as of 15:51, 26 November 2018
Follow the steps below to recover SAP R/3 data.
Step 1
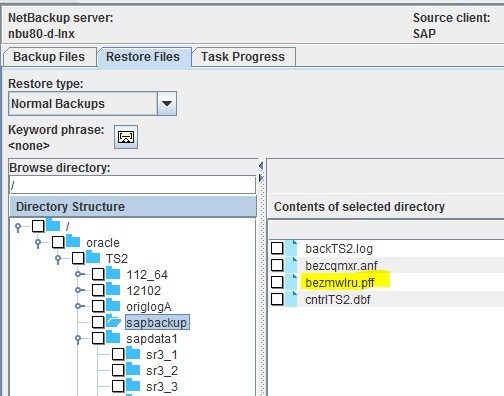
Restore the backup id file (the file with an extension of .anf or .pff) from NBU to the default SAP backup location.
i.e. /oracle/<SID>/sapbackup
Example: We have the file bezmwlru.pff from NBU which needs to be restored to the SAP Oracle TS2 instance. So we restore it to the required location of /oracle/TS2/sapbackup/bezmwlru.pff
Step 2
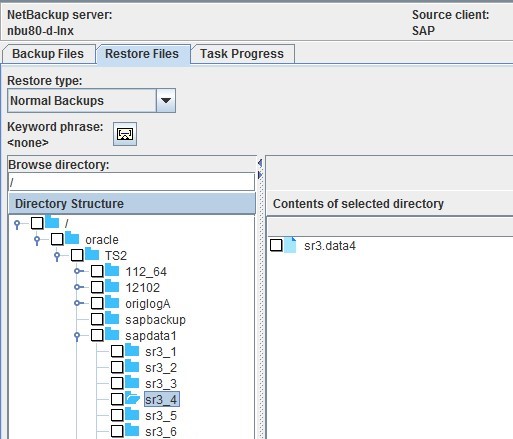
Restore the data and control files from NBU to the SAP Oracle client under a folder with the name of the Backup ID (create the folder under "/oracle/<SID>/sapbackup" directory. Make sure to name it without using the extension type from the Backup ID.
Take for example Step 1, were we restore all data files and control file to a folder on a SAP Oracle client named bezmwlru.
Step 3
Modify the #SAVED path in the Backup ID file pointing to the location where your restored files are.
Example: If you are restoring a data file and your data file is under location "/oracle/TS2/sapbackup/bezmwlru/sr3.data6" then replace the #SAVED parameters in Backup ID file with the above location.
Step 4
Run "brrestore" on the SAP Oracle Client and feed it the Backup ID file.
Example: brrestore to Backup ID file bezmwlru will be run as /sapmnt/TS2/exe/uc/linuxx86_64/ brrestore -b bezmwlru.pff.
Step 5
Edit the file with extension ".pff" and make sure that the settings for backup_dev_type is set to disk as we are restoring the imaged from this location.
The relevant section of the file should look similar to the one below.
|
Name Value oracle_sid TS2 oracle_home /oracle/TS2/112_64 oracle_profile /oracle/TS2/112_64/dbs/initTS2.ora sapdata_home /oracle/TS2 sap_profile /oracle/TS2/112_64/dbs/initTS2.sap backup_mode PSAPSR3 backup_type offline backup_dev_type disk system_info orats2/orats2 sap-ora Linux 3.12.49-11-default #1 SMP Wed Nov 11 20:52:43 UTC 2015 (8d714a0) x86_64 oracle_info TS2 11.2.0.3.0 8192 32 1836601 sap-ora UTF8 UTF8 1850097416 &TS2 sap_info 740 SAPSR3 make_info linuxx86_64 OCI_112 Apr 10 2013 command_line /sapmnt/TS2/exe/uc/linuxx86_64/brbackup -t offline -d util_file -c -m PSAPSR3 -u |
Step 6
Make the same change as in Step 5 to the initTS2.sap file. The location to this file can be found from the ".pff" file.
Use this link to go back to the main recoverydocs Page.

