Difference between revisions of "RecoverHANA"
| Line 5: | Line 5: | ||
|} | |} | ||
__NOTOC__ | __NOTOC__ | ||
| − | === Step 1 === | + | ===Step 1=== |
Import the converted images to NetBackup. | Import the converted images to NetBackup. | ||
| − | === Step 2 === | + | ===Step 2=== |
Log in to SAP HANA Studio and navigate to Backup and Recovery>Recover System. | Log in to SAP HANA Studio and navigate to Backup and Recovery>Recover System. | ||
[[File:Hana_Restore_01.jpg]] | [[File:Hana_Restore_01.jpg]] | ||
| − | === Step 3 === | + | ===Step 3=== |
Select the option to recover the database to a specific data backup or storage group. | Select the option to recover the database to a specific data backup or storage group. | ||
[[File:Hana_Restore_02.jpg]] | [[File:Hana_Restore_02.jpg]] | ||
| − | === Step 4 === | + | ===Step 4=== |
Choose to recover the database without the backup catalog. | Choose to recover the database without the backup catalog. | ||
[[File:Hana_Restore_03.jpg]] | [[File:Hana_Restore_03.jpg]] | ||
| − | === Step 5 === | + | ===Step 5=== |
To extract the backup prefix run the NetBackup command "bplist" as shown below. This can be run from the NetBackup client install location or from the Master Server. | To extract the backup prefix run the NetBackup command "bplist" as shown below. This can be run from the NetBackup client install location or from the Master Server. | ||
| Line 38: | Line 38: | ||
In this example our prefix is '''COMPLETE_DATA_BACKUP'''. | In this example our prefix is '''COMPLETE_DATA_BACKUP'''. | ||
| − | === Step 6 === | + | ===Step 6=== |
Specify the destination type as "Backint" and add the backup prefix. | Specify the destination type as "Backint" and add the backup prefix. | ||
[[File:Hana_Restore_04.jpg]] | [[File:Hana_Restore_04.jpg]] | ||
| − | === Step 7 === | + | ===Step 7=== |
Proceed to the review recovery setting and click on Finish. The recovery of HANA should begin. | Proceed to the review recovery setting and click on Finish. The recovery of HANA should begin. | ||
Revision as of 12:58, 15 November 2018
Follow the steps on this page to recover HANA databases.
| Note: The SAP HANA instance needs to be offline for the restore to work. |
Step 1
Import the converted images to NetBackup.
Step 2
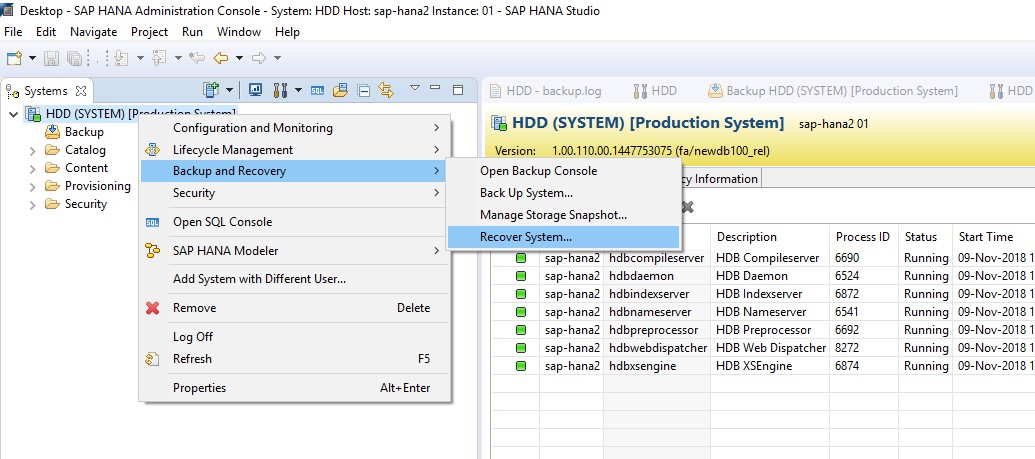
Log in to SAP HANA Studio and navigate to Backup and Recovery>Recover System.
Step 3
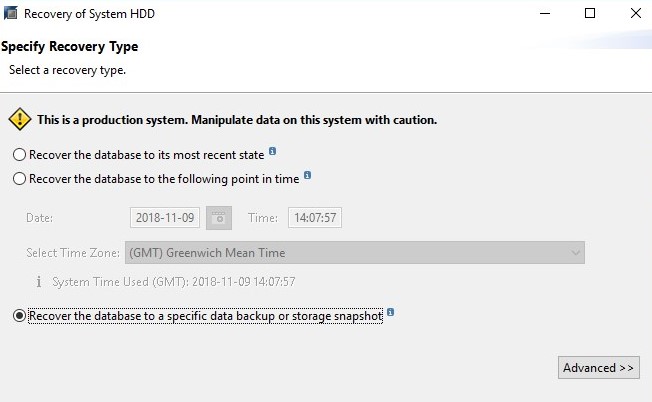
Select the option to recover the database to a specific data backup or storage group.
Step 4
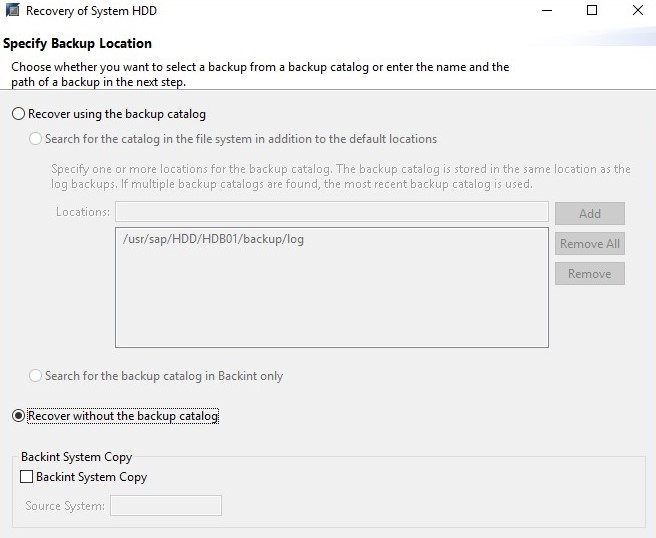
Choose to recover the database without the backup catalog.
Step 5
To extract the backup prefix run the NetBackup command "bplist" as shown below. This can be run from the NetBackup client install location or from the Master Server.
|
C:>bplist -C sap-hana2 -t 17 -R / usr:\sap\HDD\SYS\global\hdb\backint\log_backup_0_0_0_0 usr:\sap\HDD\SYS\global\hdb\backint\COMPLETE_DATA_BACKUP_databackup_1_1 usr:\sap\HDD\SYS\global\hdb\backint\COMPLETE_DATA_BACKUP_databackup_2_1 usr:\sap\HDD\SYS\global\hdb\backint\COMPLETE_DATA_BACKUP_databackup_3_1 usr:\sap\HDD\SYS\global\hdb\backint\COMPLETE_DATA_BACKUP_databackup_0_1 |
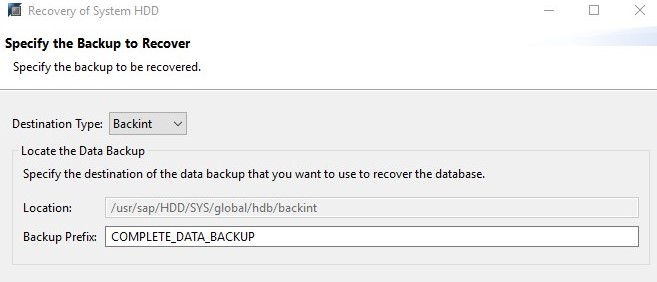
In this example our prefix is COMPLETE_DATA_BACKUP.
Step 6
Specify the destination type as "Backint" and add the backup prefix.
Step 7
Proceed to the review recovery setting and click on Finish. The recovery of HANA should begin.
Use this link to go back to the main recoverydocs Page.


