Difference between revisions of "Devices"
From Tranzman Documentation
| Line 1: | Line 1: | ||
| − | === | + | __TOC__ |
| + | <br> | ||
| + | <br> | ||
| + | <div style="background-color:#edf7ff; padding: 1.5rem; border-radius:8px; max-width:80%; margin: 0 auto; margin-bottom:2rem;"> | ||
| + | <h1 style="border-bottom:none; font-size:2.5em; font-weight:bold; text-align:center;">Device Management in Tranzman Appliance</h1> | ||
| + | <p style="font-size:1.2em; text-align:left;"> | ||
| + | Tranzman categorises devices into three types for migration and recovery operations.<br> | ||
| + | Use the <b>System → Devices</b> section in the web console to manage Tape Libraries, Disk Libraries, and NAS Connectors. | ||
| + | </p> | ||
| + | </div> | ||
| − | Tranzman | + | <div style="max-width:80%; margin: 0 auto;"> |
| + | <div style="background-color:#fffbf4; padding:1.5rem; border-radius:8px; box-shadow:0 2px 4px rgba(0,0,0,0.06); margin-bottom:2rem;"> | ||
| + | <h2 style="border-bottom:2px solid #ffe0b2; padding-bottom:0.5rem; font-size:1.5em;">Device Types</h2> | ||
| + | <ul style="font-size:1.1em; margin-left:2em;"> | ||
| + | <li><b>Tape Library</b>: Shares backup server tape library with Tranzman Server.</li> | ||
| + | <li><b>Disk Library</b>: Used for cross vendor migrations.</li> | ||
| + | <li><b>NAS Connectors</b>: Mount NFS/CFS shares for data recovery to files.</li> | ||
| + | </ul> | ||
| + | </div> | ||
| − | + | <div style="background-color:#fef3f7; padding:1.5rem; border-radius:8px; box-shadow:0 2px 4px rgba(0,0,0,0.06); margin-bottom:2rem;"> | |
| + | <h2 style="border-bottom:2px solid #f8bbd0; padding-bottom:0.5rem; font-size:1.5em;">Adding Tape Devices</h2> | ||
| + | <ol style="font-size:1.1em; margin-left:2em;"> | ||
| + | <li> | ||
| + | In the Tranzman web console, go to <b>System → Devices</b>. The Tape Library section is listed by default.<br> | ||
| + | Click on [[File:Devices_add_tape_library.jpg | 25x25px]]<br> | ||
| + | <div style="display:inline-block; box-shadow:5px 5px 10px grey;">[[File:Devices_view.JPG |700px]]</div> | ||
| + | </li> | ||
| + | <li> | ||
| + | Click <b>+</b> and add the IP address and port number of the iSCSI Target.<br> | ||
| + | Click the <b>Scan</b> icon.<br> | ||
| + | <div style="display:inline-block; box-shadow:5px 5px 10px grey;">[[File:Devices_add_iscsi.jpg | 700px]]</div> | ||
| + | </li> | ||
| + | <li> | ||
| + | After scanning, perform an inventory of the Tape Library by clicking the <b>Inventory</b> button [[File:InventoryButton.JPG |25x25px]].<br> | ||
| + | View results under <i>Views</i> [[File:ContentsButton.JPG|25x25px]].<br> | ||
| + | <div style="display:inline-block; box-shadow:5px 5px 10px grey;">[[File:Devices_ContentsOfLibrary.jpg | 700px]]</div> | ||
| + | </li> | ||
| + | <li> | ||
| + | Device information is displayed in a separate section, showing drive status, loaded media ID, drive name, etc.<br> | ||
| + | <div style="display:inline-block; box-shadow:5px 5px 10px grey;">[[File:Devices_device_info.jpg | 700px]]</div> | ||
| + | </li> | ||
| + | </ol> | ||
| + | </div> | ||
| − | + | <div style="background-color:#eff8f0; padding:1.5rem; border-radius:8px; box-shadow:0 2px 4px rgba(0,0,0,0.06); margin-bottom:2rem;"> | |
| + | <h2 style="border-bottom:2px solid #c8e6c9; padding-bottom:0.5rem; font-size:1.5em;">Adding Disk Libraries</h2> | ||
| + | <ol style="font-size:1.1em; margin-left:2em;"> | ||
| + | <li> | ||
| + | In the Tranzman web console, navigate to <b>System → Devices</b>. | ||
| + | </li> | ||
| + | <li> | ||
| + | Click the <b>Disk Library</b> section and then the <b>+</b> icon to add a disk share (supports NFS, SMB, and local shares).<br> | ||
| + | <div style="display:inline-block; box-shadow:5px 5px 10px grey;">[[File:Devices_DiskLibraryPage.JPG | 700px]]</div> | ||
| + | </li> | ||
| + | <li> | ||
| + | After adding, the disk share will be listed.<br> | ||
| + | <div style="display:inline-block; box-shadow:5px 5px 10px grey;">[[File:Devices_diskshare_added.jpg | 700px]]</div> | ||
| + | </li> | ||
| + | </ol> | ||
| + | </div> | ||
| + | </div> | ||
| − | + | <div style="display:flex; justify-content:space-between; margin-top:2rem; padding:1rem; background-color:#ffffff; max-width:90%; margin: 2rem auto 0;"> | |
| − | + | <div style="text-align:left;"> | |
| − | + | [[Image:prev_icon.jpg|30px|link=Pre-Assessment]] [[Pre-Assessment|Previous]] | |
| − | + | </div> | |
| − | + | <div style="text-align:right;"> | |
| − | + | [[Image:next_icon.jpg|30px|link=Transition_Readiness]] [[Transition_Readiness|Next]] | |
| − | + | </div> | |
| − | + | </div> | |
| − | |||
| − | |||
| − | |||
| − | |||
| − | |||
| − | |||
| − | |||
| − | |||
| − | |||
| − | [[ | ||
| − | |||
| − | |||
| − | = | ||
| − | |||
| − | |||
| − | |||
| − | |||
| − | |||
| − | [[ | ||
| − | |||
| − | |||
| − | |||
| − | |||
| − | |||
| − | |||
| − | |||
| − | |||
| − | |||
| − | |||
Latest revision as of 06:13, 12 September 2025
Contents
Device Management in Tranzman Appliance
Tranzman categorises devices into three types for migration and recovery operations.
Use the System → Devices section in the web console to manage Tape Libraries, Disk Libraries, and NAS Connectors.
Device Types
- Tape Library: Shares backup server tape library with Tranzman Server.
- Disk Library: Used for cross vendor migrations.
- NAS Connectors: Mount NFS/CFS shares for data recovery to files.
Adding Tape Devices
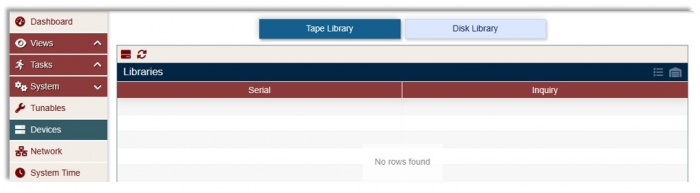
-
In the Tranzman web console, go to System → Devices. The Tape Library section is listed by default.
Click on
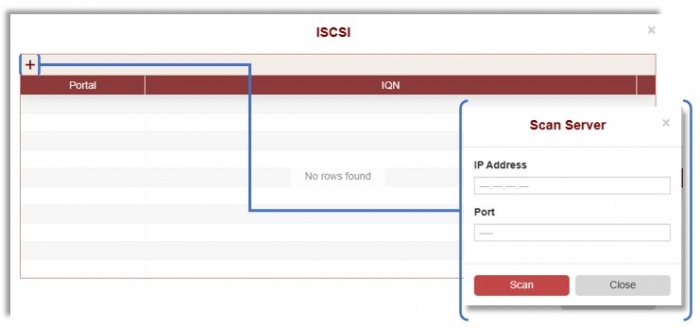
-
Click + and add the IP address and port number of the iSCSI Target.
Click the Scan icon.
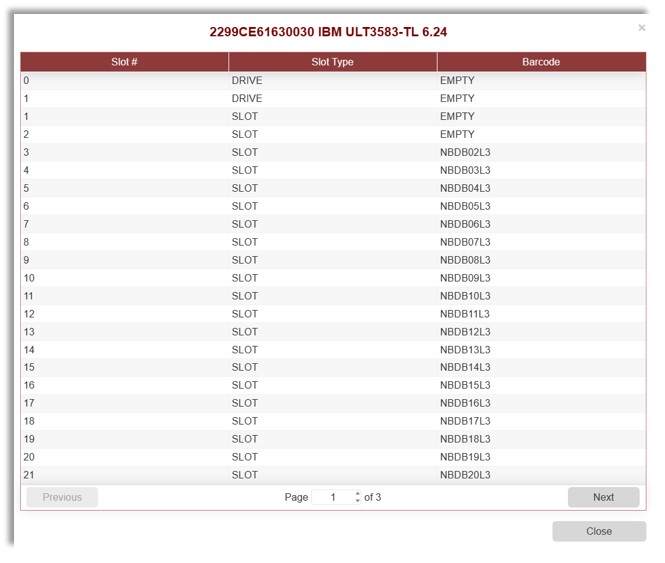
-
After scanning, perform an inventory of the Tape Library by clicking the Inventory button
 .
.
View results under Views .
.
-
Device information is displayed in a separate section, showing drive status, loaded media ID, drive name, etc.


Adding Disk Libraries
- In the Tranzman web console, navigate to System → Devices.
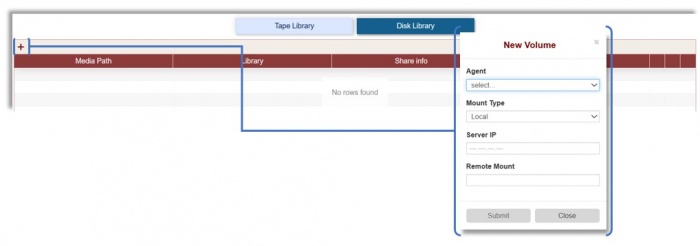
-
Click the Disk Library section and then the + icon to add a disk share (supports NFS, SMB, and local shares).
-
After adding, the disk share will be listed.


