Difference between revisions of "Recovery to Files"
From Tranzman Documentation
| Line 1: | Line 1: | ||
| + | __NOTOC__ | ||
| + | <br> | ||
| + | <br> | ||
| + | <div style="background-color:#edf7ff; padding: 1.5rem; border-radius:8px; max-width:80%; margin: 0 auto; margin-bottom:2rem;"> | ||
| + | <h1 style="border-bottom:none; font-size:2.5em; font-weight:bold; text-align:center;">Recovery Files with Tranzman Appliance</h1> | ||
| + | <p style="font-size:1.2em; text-align:left;"> | ||
| + | To set up the migration type ("Personality"), switch to the Tranzman Appliance WebGUI.<br> | ||
| + | Follow these steps to add backup environments and deploy agents for migration. | ||
| + | </p> | ||
| + | </div> | ||
| − | == | + | <div style="max-width:80%; margin: 0 auto;"> |
| + | <div style="background-color:#fffbf4; padding:1.5rem; border-radius:8px; box-shadow:0 2px 4px rgba(0,0,0,0.06); margin-bottom:2rem;"> | ||
| + | <h2 style="border-bottom:2px solid #ffe0b2; padding-bottom:0.5rem; font-size:1.5em;">Agent Deployment Steps</h2> | ||
| + | <ol style="font-size:1.1em; margin-left:2em;"> | ||
| + | <li> | ||
| + | Verify the Dashboard has an environment named <b>TZM-NAS-Connector</b>.<br> | ||
| + | The Dashboard enables you to monitor appliance resources, migration state, service status, progress, and environment states.<br> | ||
| + | <div style="display:inline-block; box-shadow:5px 5px 10px grey;">[[File:Discovery.jpg|700px]]</div> | ||
| + | </li> | ||
| + | <li> | ||
| + | Click the <b>+</b> button to add the origin backup environment.<br> | ||
| + | Enter the IP, select the platform of the backup server, and click <b>Commit</b>.<br> | ||
| + | <div style="display:inline-block; box-shadow:5px 5px 10px grey;">[[File:AddEnvironment.jpg|700px]]</div> | ||
| + | </li> | ||
| + | <li> | ||
| + | The Dashboard will show the new environment as <b>Querying instances...</b> with the backup server IP.<br> | ||
| + | Under the Agent column, click the [[File:Agent.jpg|border]] button to download the agent package (.bin for Linux, .exe for Windows).<br> | ||
| + | <div style="display:inline-block; box-shadow:5px 5px 10px grey;">[[File:AgentDownload.jpg|700px]]</div> | ||
| + | </li> | ||
| + | <li> | ||
| + | Copy the agent file to the backup server and install it.<br> | ||
| + | Run the setup as administrator/root or as the user used for backup services.<br> | ||
| + | Follow the on-screen instructions during installation.<br> | ||
| + | <p>Install of Agent on a Windows Server</p> | ||
| + | <div style="display:inline-block; box-shadow:5px 5px 10px grey;">[[File:AgentInstall.jpg|700px]]</div> | ||
| − | + | <p>Install of Agent on a Linux Server</p> | |
| − | + | <div style="background-color:#212121; color:#fff; font-family:monospace; border-radius:5px; padding:1em; margin:1em 0; width:600px;"> | |
| − | + | <pre> | |
| − | |||
| − | |||
| − | |||
| − | |||
| − | |||
| − | |||
| − | |||
| − | |||
| − | |||
| − | |||
| − | |||
| − | |||
| − | |||
| − | |||
| − | |||
| − | |||
| − | |||
| − | |||
| − | |||
| − | |||
| − | |||
| − | |||
| − | |||
| − | |||
| − | |||
| − | |||
| − | |||
| − | |||
| − | |||
| − | |||
| − | |||
| − | |||
| − | |||
[root@NBUNewMaster tmp]# chmod 755 ./C0A80591.bin | [root@NBUNewMaster tmp]# chmod 755 ./C0A80591.bin | ||
[root@NBUNewMaster tmp]# ls -ltr ./C0A80591.bin | [root@NBUNewMaster tmp]# ls -ltr ./C0A80591.bin | ||
-rwxr-xr-x. 1 root root 14102251 Aug 6 15:08 ./C0A80591.bin | -rwxr-xr-x. 1 root root 14102251 Aug 6 15:08 ./C0A80591.bin | ||
| − | |||
[root@NBUNewMaster tmp]# | [root@NBUNewMaster tmp]# | ||
[root@NBUNewMaster tmp]# ./C0A80591.bin | [root@NBUNewMaster tmp]# ./C0A80591.bin | ||
| Line 53: | Line 53: | ||
Starting Tranzman Agent | Starting Tranzman Agent | ||
[root@NBUNewMaster tmp]# | [root@NBUNewMaster tmp]# | ||
| − | + | </pre> | |
| − | + | </div> | |
| − | + | </li> | |
| − | + | <li> | |
| − | Upon | + | Upon successful installation, all columns for the newly added environment will be populated.<br> |
| − | + | <div style="display:inline-block; box-shadow:5px 5px 10px grey;">[[File:PopulateDetails.jpg|700px]]</div> | |
| − | [[File:PopulateDetails.jpg| | + | <p>Repeat these steps for all environments to be added.</p> |
| − | + | </li> | |
| − | < | + | </ol> |
| − | + | <div style="background-color:#f8e2b3; padding:0.2rem; border-radius:8px; box-shadow:0 2px 4px rgba(0,0,0,0.06); font-size:1em; margin: 0 auto;"> | |
| − | + | <p>🛈 <i>After agent installation, the environment details will be automatically discovered and displayed in the Dashboard.</i></p> | |
| − | + | </div> | |
| + | </div> | ||
| + | </div> | ||
| − | [[ Discovery | | + | <div style="display:flex; justify-content:space-between; margin-top:2rem; padding:1rem; background-color:#ffffff; max-width:90%; margin: 2rem auto 0;"> |
| + | <div style="text-align:left;"> | ||
| + | [[File:prev_icon.jpg|30px|link=Discovery]] [[Discovery|Previous]] | ||
| + | </div> | ||
| + | <div style="text-align:right;"> | ||
| + | [[Migration Components|Next]] [[File:next_icon.jpg|30px|link=Migration Components]] | ||
| + | </div> | ||
| + | </div> | ||
Latest revision as of 05:57, 12 September 2025
Recovery Files with Tranzman Appliance
To set up the migration type ("Personality"), switch to the Tranzman Appliance WebGUI.
Follow these steps to add backup environments and deploy agents for migration.
Agent Deployment Steps
-
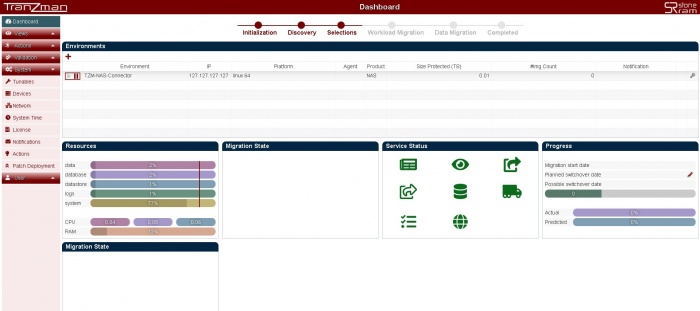
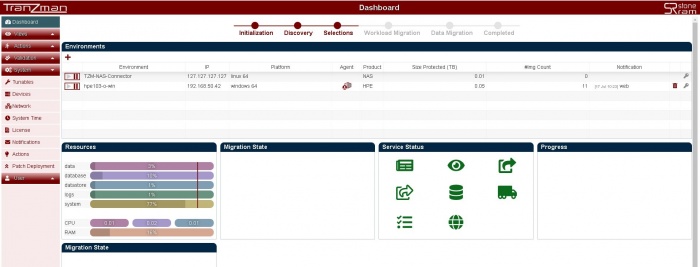
Verify the Dashboard has an environment named TZM-NAS-Connector.
The Dashboard enables you to monitor appliance resources, migration state, service status, progress, and environment states.
-
Click the + button to add the origin backup environment.
Enter the IP, select the platform of the backup server, and click Commit.
-
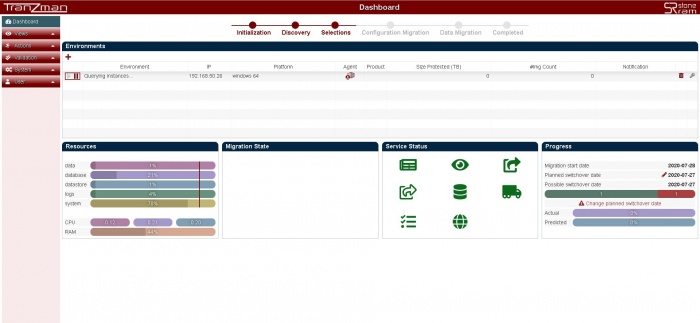
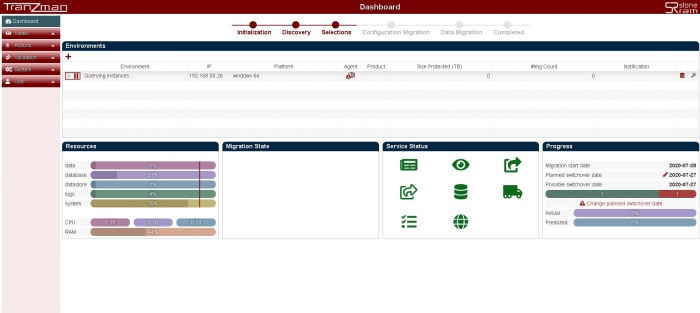
The Dashboard will show the new environment as Querying instances... with the backup server IP.
Under the Agent column, click the button to download the agent package (.bin for Linux, .exe for Windows).
-
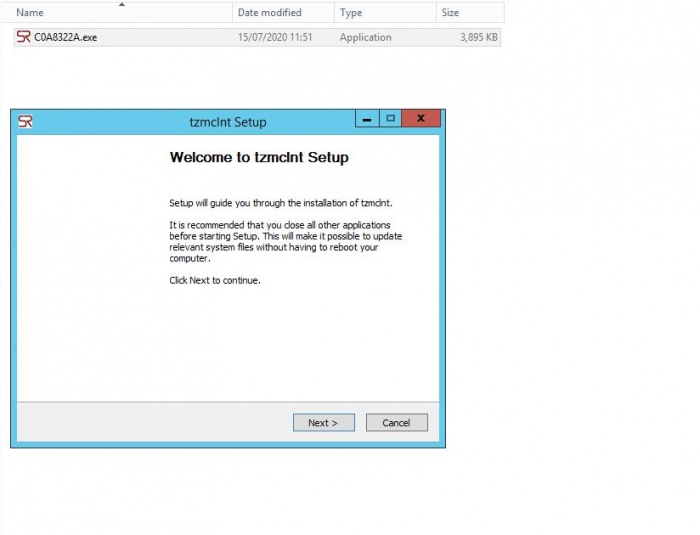
Copy the agent file to the backup server and install it.
Run the setup as administrator/root or as the user used for backup services.
Follow the on-screen instructions during installation.
Install of Agent on a Windows Server
Install of Agent on a Linux Server
[root@NBUNewMaster tmp]# chmod 755 ./C0A80591.bin [root@NBUNewMaster tmp]# ls -ltr ./C0A80591.bin -rwxr-xr-x. 1 root root 14102251 Aug 6 15:08 ./C0A80591.bin [root@NBUNewMaster tmp]# [root@NBUNewMaster tmp]# ./C0A80591.bin Running Tranzman Agent Installer Enter install path location [/opt/SRL]: Installing to /opt/SRL Looking for existing Tranzman Agent Installation in /opt/SRL Installing Tranzman Agent Starting Tranzman Agent [root@NBUNewMaster tmp]# -
Upon successful installation, all columns for the newly added environment will be populated.
Repeat these steps for all environments to be added.


🛈 After agent installation, the environment details will be automatically discovered and displayed in the Dashboard.