Difference between revisions of "Create Bootable TZM USB using Rufus"
From Tranzman Documentation
(→Creating bootable TZM media from ISO image) |
|||
| Line 1: | Line 1: | ||
| − | === | + | __TOC__ |
| + | <br> | ||
| + | <br> | ||
| + | <div style="background-color:#edf7ff; padding: 1.5rem; border-radius:8px; max-width:80%; margin: 0 auto; margin-bottom:2rem;"> | ||
| + | <h1 style="border-bottom:none; font-size:2.5em; font-weight:bold; text-align:center;">Creating Bootable TZM Media from ISO Image</h1> | ||
| + | <p style="font-size:1.2em; text-align:left;"> | ||
| + | Follow these steps to create a bootable TZM USB from an ISO image.<br> | ||
| + | A video tutorial is available at [[Create_TZM_bootable_image_from_ISO |Tutorials]]. | ||
| + | </p> | ||
| + | </div> | ||
| − | + | <div style="max-width:80%; margin: 0 auto;"> | |
| + | <div style="background-color:#fef3f7; padding:1.5rem; border-radius:8px; box-shadow:0 2px 4px rgba(0,0,0,0.06); margin-bottom:2rem;"> | ||
| + | <h2 style="border-bottom:2px solid #f8bbd0; padding-bottom:0.5rem; font-size:1.5em;">Step-by-Step Guide</h2> | ||
| + | <ol style="font-size:1.1em; margin-left:2em;"> | ||
| + | <li> | ||
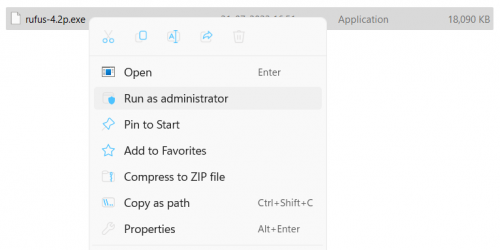
| + | Download the Rufus application and launch it with administrator privileges.<br> | ||
| + | <div style="display:inline-block; box-shadow:5px 5px 10px grey"> [[File:Run_Rufus_1_new.png | 500px]] </div> | ||
| + | </li> | ||
| + | <li> | ||
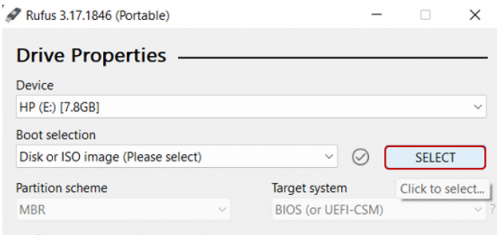
| + | Click on the <b>SELECT</b> button to choose the TZM ISO image.<br> | ||
| + | <div style="display:inline-block; box-shadow:5px 5px 10px grey"> [[File:Run_Rufus_2.png | 500px]] </div> | ||
| + | </li> | ||
| + | <li> | ||
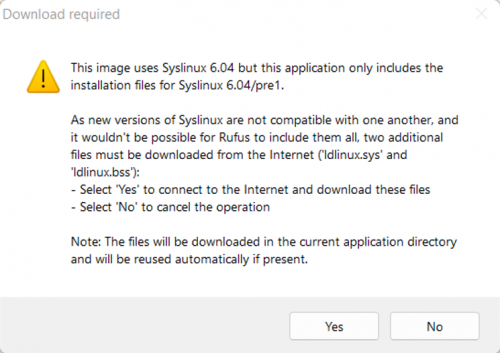
| + | Click <b>Yes</b> to let Rufus automatically modify the settings to best match the ISO.<br> | ||
| + | <div style="display:inline-block; box-shadow:5px 5px 10px grey"> [[File:Run_Rufus_3.png | 500px]] </div> | ||
| + | </li> | ||
| + | <li> | ||
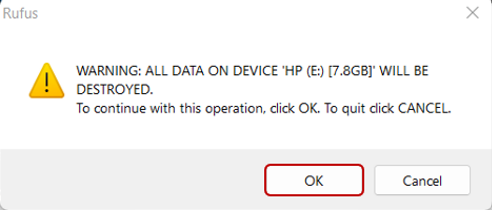
| + | Click <b>OK</b> when prompted to start formatting the USB drive.<br> | ||
| + | <div style="display:inline-block; box-shadow:5px 5px 10px grey"> [[File:Run_Rufus_4.png | 500px]] </div> | ||
| + | </li> | ||
| + | <li> | ||
| + | Click <b>CLOSE</b> once the format completes and the USB is ready for use. | ||
| + | </li> | ||
| + | </ol> | ||
| + | <div style="background-color:#f8e2b3; padding:0.2rem; border-radius:8px; box-shadow:0 2px 4px rgba(0,0,0,0.06); font-size:1em; margin: 0 auto;"> | ||
| + | <p>🛈 <i>Ensure you backup any important data from the USB drive before formatting, as this process will erase all contents.</i></p> | ||
| + | </div> | ||
| + | </div> | ||
| + | </div> | ||
| − | + | <div style="display:flex; justify-content:space-between; margin-top:2rem; padding:1rem; background-color:#ffffff; max-width:90%; margin: 2rem auto 0;"> | |
| − | <div style="display: | + | <div style="text-align:left;"> |
| − | + | [[File:prev_icon.jpg|30px|link=Installation]] [[Installation|Previous]] | |
| − | + | </div> | |
| − | + | <div style="text-align:right;"> | |
| − | + | [[Install TZM Server|Next]] [[File:next_icon.jpg|30px|link=Install TZM Server]] | |
| − | + | </div> | |
| − | + | </div> | |
| − | |||
| − | <div style=" | ||
| − | |||
| − | |||
| − | |||
| − | |||
| − | |||
| − | |||
| − | |||
| − | |||
| − | |||
| − | |||
| − | |||
| − | |||
| − | |||
| − | |||
| − | |||
Latest revision as of 18:52, 11 September 2025
Creating Bootable TZM Media from ISO Image
Follow these steps to create a bootable TZM USB from an ISO image.
A video tutorial is available at Tutorials.
Step-by-Step Guide
-
Download the Rufus application and launch it with administrator privileges.
-
Click on the SELECT button to choose the TZM ISO image.
-
Click Yes to let Rufus automatically modify the settings to best match the ISO.
-
Click OK when prompted to start formatting the USB drive.
- Click CLOSE once the format completes and the USB is ready for use.


🛈 Ensure you backup any important data from the USB drive before formatting, as this process will erase all contents.