Difference between revisions of "Install VA - Hyper-V"
| (11 intermediate revisions by 2 users not shown) | |||
| Line 1: | Line 1: | ||
| − | This is the installation guide for creating your own Tranzman Virtual Appliance under Microsoft Hyper-V. | + | == Headline == |
| − | + | This is the installation guide for creating your own Tranzman V4 Virtual Appliance under Microsoft Hyper-V. | |
| − | === | + | |
| + | ===Step 1=== | ||
Launch Hyper-V manager and '''"Create a New Virtual Machine"'''. Give the machine a unique name that will make it easy to identify, i.e. Tranzman - VA | Launch Hyper-V manager and '''"Create a New Virtual Machine"'''. Give the machine a unique name that will make it easy to identify, i.e. Tranzman - VA | ||
| − | === | + | [[File:VA-Hyper-V_NewVM.jpg]] |
| + | |||
| + | ===Step 2=== | ||
Select Generation 1 machine. | Select Generation 1 machine. | ||
| − | + | [[File:VA-Hyper-V_Generation.jpg]] | |
| − | + | ===Step 3=== | |
| − | + | Select '''16GB of RAM''' size. do not use '''Dynamic Memory''' | |
| + | |||
| + | [[File:VA-Hyper-V_RAM.jpg]] | ||
| + | |||
| + | ===Step 4=== | ||
For the NIC settings, select an '''External Virtual Switch'''. | For the NIC settings, select an '''External Virtual Switch'''. | ||
| − | === | + | [[File:VA-Hyper-V_NIC.jpg]] |
| + | |||
| + | ===Step 5=== | ||
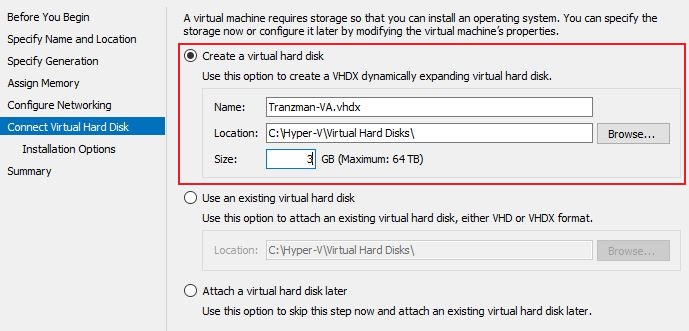
Assign two virtual hard disks as specified below. | Assign two virtual hard disks as specified below. | ||
| − | * '''1 x | + | * '''1 x 6GB HDD for OS Installation''' |
| − | * '''1 x | + | * '''1 x 512GB HDD for Data''' |
| − | + | [[File:VA-Hyper-V_OSHDD.jpg]] | |
| − | + | You will need to edit the machine later to add the second 512GB Hard Drive. | |
| − | + | ===Step 6=== | |
| − | + | At this stage, point it to the correct '''ISO image''', or leave it out to install the operating system at a later date. | |
| + | |||
| + | ===Step 7=== | ||
Press Finish at the end of the process to start the creation of the VA, and proceed to install the OS once the process completes. | Press Finish at the end of the process to start the creation of the VA, and proceed to install the OS once the process completes. | ||
| − | + | ||
| − | + | ||
| + | [[ Configuration | Jump to Configuration ]] | ||
| + | |||
| + | [[ Installation | Return to Installation]] | ||
Latest revision as of 16:33, 7 January 2025
Headline
This is the installation guide for creating your own Tranzman V4 Virtual Appliance under Microsoft Hyper-V.
Step 1
Launch Hyper-V manager and "Create a New Virtual Machine". Give the machine a unique name that will make it easy to identify, i.e. Tranzman - VA
Step 2
Select Generation 1 machine.
Step 3
Select 16GB of RAM size. do not use Dynamic Memory
Step 4
For the NIC settings, select an External Virtual Switch.
Step 5
Assign two virtual hard disks as specified below.
- 1 x 6GB HDD for OS Installation
- 1 x 512GB HDD for Data
You will need to edit the machine later to add the second 512GB Hard Drive.
Step 6
At this stage, point it to the correct ISO image, or leave it out to install the operating system at a later date.
Step 7
Press Finish at the end of the process to start the creation of the VA, and proceed to install the OS once the process completes.


