Difference between revisions of "RecoverSAP/R3"
(→Step 3) |
|||
| (11 intermediate revisions by the same user not shown) | |||
| Line 4: | Line 4: | ||
Restore the backup id file (the file with an extension of '''.anf''' or '''.pff''') from NBU to the default SAP backup location. | Restore the backup id file (the file with an extension of '''.anf''' or '''.pff''') from NBU to the default SAP backup location. | ||
| − | i.e. /oracle/<SID>/sapbackup | + | '''''i.e. /oracle/<SID>/sapbackup''''' |
| − | Example: We have the file bezmwlru.pff from NBU which needs to be restored to the SAP Oracle TS2 instance. So we restore it to the required location of '''/oracle/TS2/sapbackup/bezmwlru.pff''' | + | '''Example:''' We have the file '''bezmwlru.pff''' from NBU which needs to be restored to the SAP Oracle TS2 instance. So we restore it to the required location of '''/oracle/TS2/sapbackup/bezmwlru.pff''' |
[[File:SAP_R3_01.jpg]] | [[File:SAP_R3_01.jpg]] | ||
| Line 13: | Line 13: | ||
Restore the data and control files from NBU to the SAP Oracle client under a folder with the name of the Backup ID (create the folder under '''"/oracle/<SID>/sapbackup"''' directory. Make sure to name it without using the extension type from the Backup ID. | Restore the data and control files from NBU to the SAP Oracle client under a folder with the name of the Backup ID (create the folder under '''"/oracle/<SID>/sapbackup"''' directory. Make sure to name it without using the extension type from the Backup ID. | ||
| − | Take for example Step 1, were we restore all data files and control file to a folder on a SAP Oracle client named '''bezmwlru'''. | + | Take for example '''Step 1''', were we restore all data files and control file to a folder on a SAP Oracle client named '''bezmwlru'''. |
[[File:SAP_R3_02.jpg]] | [[File:SAP_R3_02.jpg]] | ||
| Line 19: | Line 19: | ||
===Step 3=== | ===Step 3=== | ||
{|style="padding: 5px; width: 85%;" | {|style="padding: 5px; width: 85%;" | ||
| − | | style="width: 1%;"|[[File:Warn.png|30px]]|| style="padding: 10px; width: 85%;"|'''WARNING:''' Please be aware, that the following step will overwrite any existing data files. If you do not want to overwrite files, modify the #FILE path Backup ID file '''(bezmwlru.pff)'''to the location where we want to restore the data. | + | | style="width: 1%;"|[[File:Warn.png|30px]]|| style="padding: 10px; width: 85%;"|'''WARNING:''' Please be aware, that the following step will overwrite any existing data files. If you do not want to overwrite files, modify the '''#FILE''' path Backup ID file '''(bezmwlru.pff)''' to the location where we want to restore the data. |
| | | | ||
|} | |} | ||
| Line 25: | Line 25: | ||
Modify the '''#SAVED''' path in the Backup ID file pointing to the location where your restored files are. | Modify the '''#SAVED''' path in the Backup ID file pointing to the location where your restored files are. | ||
| − | + | '''Example:''' If you are restoring the data files, and they reside under location a location of'''"/oracle/TS2/sapbackup/bezmwlru/sr3.data6"''' then replace the '''#SAVED''' parameters in the Backup ID file to match the previous location. | |
===Step 4=== | ===Step 4=== | ||
| + | Edit the file with extension ".pff" and make sure that the settings for '''backup_dev_type''' is set to '''disk''' as we are restoring the imaged from this location. | ||
| + | |||
| + | The relevant section of the file should look similar to the one below. | ||
| + | |||
| + | {| class="wikitable" style="padding-left: auto; color:#FFFFFF; background-color: black; width: 600px; FONT-FAMILY:monospace,monospace; LINE-HEIGHT:15px; white-space: pre-wrap; | ||
| + | | | ||
| + | Name Value | ||
| + | |||
| + | oracle_sid TS2 | ||
| + | oracle_home /oracle/TS2/112_64 | ||
| + | oracle_profile /oracle/TS2/112_64/dbs/initTS2.ora | ||
| + | sapdata_home /oracle/TS2 | ||
| + | sap_profile /oracle/TS2/112_64/dbs/initTS2.sap | ||
| + | backup_mode PSAPSR3 | ||
| + | backup_type offline | ||
| + | backup_dev_type disk | ||
| + | system_info orats2/orats2 sap-ora Linux 3.12.49-11-default #1 SMP Wed Nov 11 20:52:43 UTC 2015 (8d714a0) x86_64 | ||
| + | oracle_info TS2 11.2.0.3.0 8192 32 1836601 sap-ora UTF8 UTF8 1850097416 &TS2 | ||
| + | sap_info 740 SAPSR3 | ||
| + | make_info linuxx86_64 OCI_112 Apr 10 2013 | ||
| + | command_line /sapmnt/TS2/exe/uc/linuxx86_64/brbackup -t offline -d util_file -c -m PSAPSR3 -u | ||
| + | |} | ||
| + | |||
| + | ===Step 5=== | ||
| + | Make the same change as in '''Step 5''' to the '''initTS2.sap''' file. The location to this file can be found from the ".pff" file and it will be inside the location of the Oracle home. | ||
| + | |||
| + | '''Example:''' /oracle/TS2/<SID>/dbs/initTS2.sap | ||
| + | |||
| + | ===Step 6=== | ||
Run "brrestore" on the SAP Oracle Client and feed it the Backup ID file. | Run "brrestore" on the SAP Oracle Client and feed it the Backup ID file. | ||
| − | Example: brrestore to Backup ID file bezmwlru will be run as /sapmnt/TS2/exe/uc/linuxx86_64/ brrestore -b bezmwlru.pff | + | '''Example:''' brrestore to Backup ID file bezmwlru will be run as '''/sapmnt/TS2/exe/uc/linuxx86_64/ brrestore -b bezmwlru.pff'''. |
| + | |||
| + | If all file shave been edited correctly, the restore process should go through without any issues. | ||
| + | |||
---- | ---- | ||
Use this link to go back to the main [[recoverydocs]] Page. | Use this link to go back to the main [[recoverydocs]] Page. | ||
Latest revision as of 16:18, 26 November 2018
Follow the steps below to recover SAP R/3 data.
Step 1
Restore the backup id file (the file with an extension of .anf or .pff) from NBU to the default SAP backup location.
i.e. /oracle/<SID>/sapbackup
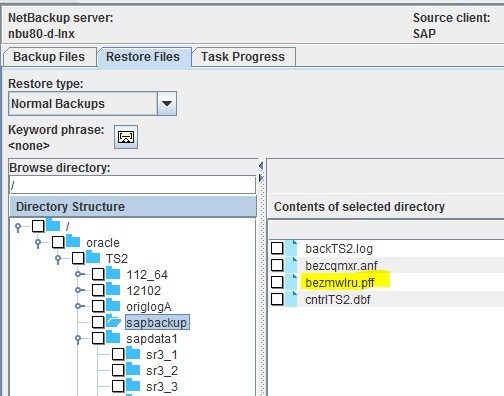
Example: We have the file bezmwlru.pff from NBU which needs to be restored to the SAP Oracle TS2 instance. So we restore it to the required location of /oracle/TS2/sapbackup/bezmwlru.pff
Step 2
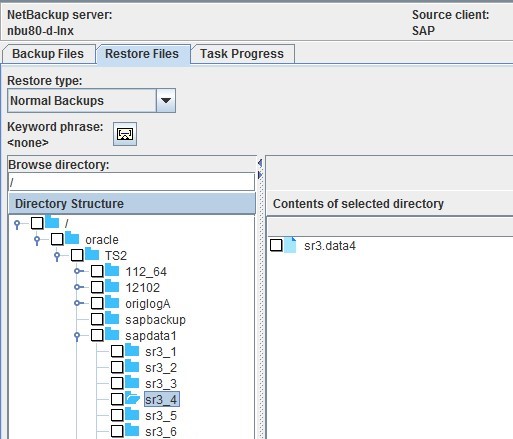
Restore the data and control files from NBU to the SAP Oracle client under a folder with the name of the Backup ID (create the folder under "/oracle/<SID>/sapbackup" directory. Make sure to name it without using the extension type from the Backup ID.
Take for example Step 1, were we restore all data files and control file to a folder on a SAP Oracle client named bezmwlru.
Step 3
Modify the #SAVED path in the Backup ID file pointing to the location where your restored files are.
Example: If you are restoring the data files, and they reside under location a location of"/oracle/TS2/sapbackup/bezmwlru/sr3.data6" then replace the #SAVED parameters in the Backup ID file to match the previous location.
Step 4
Edit the file with extension ".pff" and make sure that the settings for backup_dev_type is set to disk as we are restoring the imaged from this location.
The relevant section of the file should look similar to the one below.
|
Name Value oracle_sid TS2 oracle_home /oracle/TS2/112_64 oracle_profile /oracle/TS2/112_64/dbs/initTS2.ora sapdata_home /oracle/TS2 sap_profile /oracle/TS2/112_64/dbs/initTS2.sap backup_mode PSAPSR3 backup_type offline backup_dev_type disk system_info orats2/orats2 sap-ora Linux 3.12.49-11-default #1 SMP Wed Nov 11 20:52:43 UTC 2015 (8d714a0) x86_64 oracle_info TS2 11.2.0.3.0 8192 32 1836601 sap-ora UTF8 UTF8 1850097416 &TS2 sap_info 740 SAPSR3 make_info linuxx86_64 OCI_112 Apr 10 2013 command_line /sapmnt/TS2/exe/uc/linuxx86_64/brbackup -t offline -d util_file -c -m PSAPSR3 -u |
Step 5
Make the same change as in Step 5 to the initTS2.sap file. The location to this file can be found from the ".pff" file and it will be inside the location of the Oracle home.
Example: /oracle/TS2/<SID>/dbs/initTS2.sap
Step 6
Run "brrestore" on the SAP Oracle Client and feed it the Backup ID file.
Example: brrestore to Backup ID file bezmwlru will be run as /sapmnt/TS2/exe/uc/linuxx86_64/ brrestore -b bezmwlru.pff.
If all file shave been edited correctly, the restore process should go through without any issues.
Use this link to go back to the main recoverydocs Page.

