Difference between revisions of "Create Bootable TZM USB using Rufus"
From Tranzman Documentation
(Created page with "This is the installation guide for creating your own bootable USB for TZM install on to physical servers. __NOTOC__ ==='''Step 1'''=== Launch Rufus with administrator privil...") |
|||
| (36 intermediate revisions by 3 users not shown) | |||
| Line 1: | Line 1: | ||
| − | + | __TOC__ | |
| − | + | <br> | |
| + | <br> | ||
| + | <div style="background-color:#edf7ff; padding: 1.5rem; border-radius:8px; max-width:80%; margin: 0 auto; margin-bottom:2rem;"> | ||
| + | <h1 style="border-bottom:none; font-size:2.5em; font-weight:bold; text-align:center;">Creating Bootable TZM Media from ISO Image</h1> | ||
| + | <p style="font-size:1.2em; text-align:left;"> | ||
| + | Follow these steps to create a bootable TZM USB from an ISO image.<br> | ||
| + | A video tutorial is available at [[Create_TZM_bootable_image_from_ISO |Tutorials]]. | ||
| + | </p> | ||
| + | </div> | ||
| − | === | + | <div style="max-width:80%; margin: 0 auto;"> |
| + | <div style="background-color:#fef3f7; padding:1.5rem; border-radius:8px; box-shadow:0 2px 4px rgba(0,0,0,0.06); margin-bottom:2rem;"> | ||
| + | <h2 style="border-bottom:2px solid #f8bbd0; padding-bottom:0.5rem; font-size:1.5em;">Step-by-Step Guide</h2> | ||
| + | <ol style="font-size:1.1em; margin-left:2em;"> | ||
| + | <li> | ||
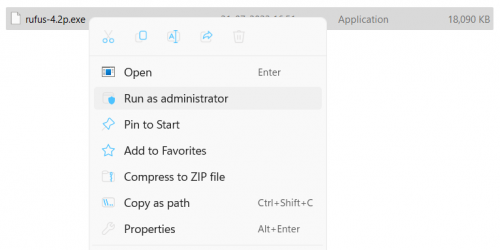
| + | Download the Rufus application and launch it with administrator privileges.<br> | ||
| + | <div style="display:inline-block; box-shadow:5px 5px 10px grey"> [[File:Run_Rufus_1_new.png | 500px]] </div> | ||
| + | </li> | ||
| + | <li> | ||
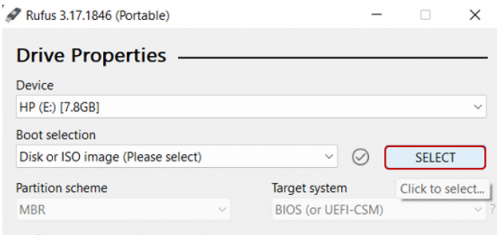
| + | Click on the <b>SELECT</b> button to choose the TZM ISO image.<br> | ||
| + | <div style="display:inline-block; box-shadow:5px 5px 10px grey"> [[File:Run_Rufus_2.png | 500px]] </div> | ||
| + | </li> | ||
| + | <li> | ||
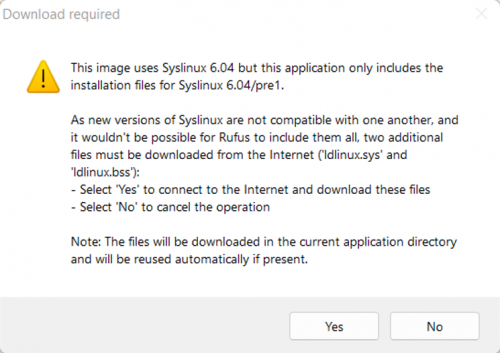
| + | Click <b>Yes</b> to let Rufus automatically modify the settings to best match the ISO.<br> | ||
| + | <div style="display:inline-block; box-shadow:5px 5px 10px grey"> [[File:Run_Rufus_3.png | 500px]] </div> | ||
| + | </li> | ||
| + | <li> | ||
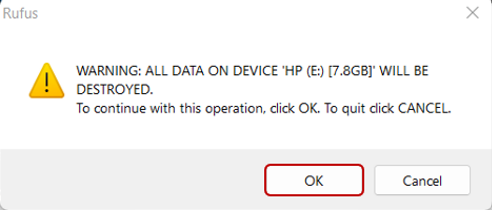
| + | Click <b>OK</b> when prompted to start formatting the USB drive.<br> | ||
| + | <div style="display:inline-block; box-shadow:5px 5px 10px grey"> [[File:Run_Rufus_4.png | 500px]] </div> | ||
| + | </li> | ||
| + | <li> | ||
| + | Click <b>CLOSE</b> once the format completes and the USB is ready for use. | ||
| + | </li> | ||
| + | </ol> | ||
| + | <div style="background-color:#f8e2b3; padding:0.2rem; border-radius:8px; box-shadow:0 2px 4px rgba(0,0,0,0.06); font-size:1em; margin: 0 auto;"> | ||
| + | <p>🛈 <i>Ensure you backup any important data from the USB drive before formatting, as this process will erase all contents.</i></p> | ||
| + | </div> | ||
| + | </div> | ||
| + | </div> | ||
| − | + | <div style="display:flex; justify-content:space-between; margin-top:2rem; padding:1rem; background-color:#ffffff; max-width:90%; margin: 2rem auto 0;"> | |
| − | + | <div style="text-align:left;"> | |
| − | + | [[File:prev_icon.jpg|30px|link=Installation]] [[Installation|Previous]] | |
| − | + | </div> | |
| − | = | + | <div style="text-align:right;"> |
| − | + | [[Install TZM Server|Next]] [[File:next_icon.jpg|30px|link=Install TZM Server]] | |
| − | + | </div> | |
| − | + | </div> | |
| − | [[ File: | ||
| − | |||
| − | = | ||
| − | |||
| − | |||
| − | |||
| − | [[ | ||
| − | |||
| − | = | ||
| − | |||
| − | |||
| − | |||
| − | [[ | ||
| − | |||
| − | |||
| − | |||
| − | |||
| − | |||
| − | [[ File: | ||
| − | |||
| − | |||
| − | |||
Latest revision as of 18:52, 11 September 2025
Creating Bootable TZM Media from ISO Image
Follow these steps to create a bootable TZM USB from an ISO image.
A video tutorial is available at Tutorials.
Step-by-Step Guide
-
Download the Rufus application and launch it with administrator privileges.
-
Click on the SELECT button to choose the TZM ISO image.
-
Click Yes to let Rufus automatically modify the settings to best match the ISO.
-
Click OK when prompted to start formatting the USB drive.
- Click CLOSE once the format completes and the USB is ready for use.


🛈 Ensure you backup any important data from the USB drive before formatting, as this process will erase all contents.