Difference between revisions of "RecoverSybase"
| Line 6: | Line 6: | ||
|} | |} | ||
__NOTOC__ | __NOTOC__ | ||
| − | ===Step 1=== | + | ==='''Step 1'''=== |
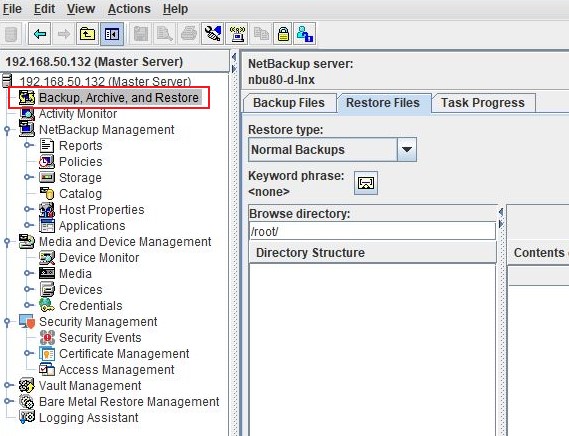
| + | Login to the NetBackup GUI and navigate to '''Backup, Archive and Restore''' section. | ||
| + | |||
| + | [[File:NBU-RestoreFiles.jpg]] | ||
| + | |||
| + | ==='''Step 2'''=== | ||
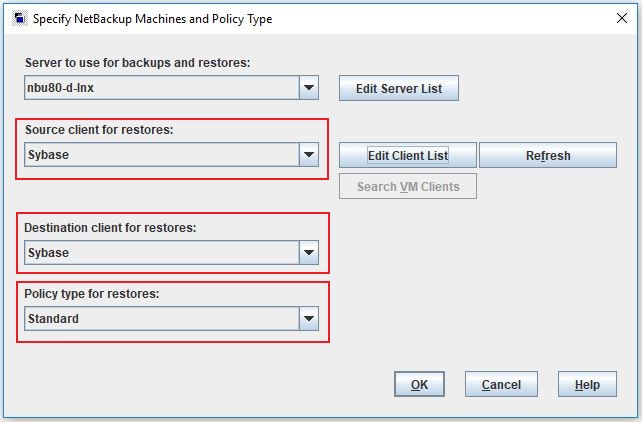
| + | Click on the '''Restore Files''' tab and select the Source, Destination Client and type of Policy to restore the Sybase backup files. | ||
| + | The '''Policy Type''' will be '''Standard'''. | ||
| + | |||
| + | [[File:Sybase-Restore Policy.jpg]] | ||
| + | |||
| + | ==='''Step 3'''=== | ||
| + | Under '''Browse Directory''' select the Sybase database backup files to restore. | ||
| + | |||
| + | [[File:Sybase-RestoreSelection.jpg]] | ||
| + | |||
| + | ==='''Step 4'''=== | ||
| + | Chose to restore to a different location, and change the target destination to a temporary location on the Sybase Server. '''i.e. C:\Backup''' | ||
| + | |||
| + | ===Step 5=== | ||
Restore the image on the SQL client as a ".dump" file. | Restore the image on the SQL client as a ".dump" file. | ||
| − | ===Step | + | ===Step 6=== |
Log in to the "isql utility" and create the database to be restored. | Log in to the "isql utility" and create the database to be restored. | ||
{| class="wikitable" style="padding-left: auto; color:#FFFFFF; background-color: black; width: 600px; FONT-FAMILY:monospace,monospace; LINE-HEIGHT:15px; white-space: pre-wrap; | {| class="wikitable" style="padding-left: auto; color:#FFFFFF; background-color: black; width: 600px; FONT-FAMILY:monospace,monospace; LINE-HEIGHT:15px; white-space: pre-wrap; | ||
| Line 17: | Line 36: | ||
|} | |} | ||
| − | ===Step | + | ===Step 7=== |
Load the dump file. | Load the dump file. | ||
{| class="wikitable" style="padding-left: auto; color:#FFFFFF; background-color: black; width: 600px; FONT-FAMILY:monospace,monospace; LINE-HEIGHT:15px; white-space: pre-wrap; | {| class="wikitable" style="padding-left: auto; color:#FFFFFF; background-color: black; width: 600px; FONT-FAMILY:monospace,monospace; LINE-HEIGHT:15px; white-space: pre-wrap; | ||
| Line 25: | Line 44: | ||
|} | |} | ||
| − | ===Step | + | ===Step 8=== |
Bring the database online using online database command. | Bring the database online using online database command. | ||
{| class="wikitable" style="padding-left: auto; color:#FFFFFF; background-color: black; width: 600px; FONT-FAMILY:monospace,monospace; LINE-HEIGHT:15px; white-space: pre-wrap; | {| class="wikitable" style="padding-left: auto; color:#FFFFFF; background-color: black; width: 600px; FONT-FAMILY:monospace,monospace; LINE-HEIGHT:15px; white-space: pre-wrap; | ||
Revision as of 13:26, 17 January 2019
Follow the steps on this page to recover a Sybase database.
| Note: The page size of the dump to be restored and of the ASE server should be matched. Run the batch file process located on "C:\SAP\ASE-16_0\install\RUN_WINSYBASE.bat" to display the page size. |
Step 1
Login to the NetBackup GUI and navigate to Backup, Archive and Restore section.
Step 2
Click on the Restore Files tab and select the Source, Destination Client and type of Policy to restore the Sybase backup files. The Policy Type will be Standard.
Step 3
Under Browse Directory select the Sybase database backup files to restore.
Step 4
Chose to restore to a different location, and change the target destination to a temporary location on the Sybase Server. i.e. C:\Backup
Step 5
Restore the image on the SQL client as a ".dump" file.
Step 6
Log in to the "isql utility" and create the database to be restored.
|
> create database pubs3 > on default = 4 |
Step 7
Load the dump file.
|
> load database pubs3 from "compress::C:\Backup\BP\pubs3.dump" > go |
Step 8
Bring the database online using online database command.
|
> online database pubs3 > go |
Use this link to go back to the main recoverydocs Page.


