Difference between revisions of "Install TZM Server in Nutanix"
From Tranzman Documentation
(Created page with " == Deploying Tranzman Appliance on Nutanix AHV == This section explains how to deploy Tranzman appliance on Nutanix server. * Upload the TZM ISO on Nutanix > Go to '''Sett...") |
|||
| (One intermediate revision by the same user not shown) | |||
| Line 1: | Line 1: | ||
| + | __NOTOC__ | ||
| + | <br> | ||
| + | <br> | ||
| + | <div style="background-color:#edf7ff; padding: 1.5rem; border-radius:8px; max-width:80%; margin: 0 auto; margin-bottom:2rem;"> | ||
| + | <h1 style="border-bottom:none; font-size:2.5em; font-weight:bold; text-align:center;">Deploying Tranzman Appliance on Nutanix AHV</h1> | ||
| + | <p style="font-size:1.2em; text-align:left;"> | ||
| + | This section explains how to deploy the Tranzman appliance on a Nutanix server using the ISO image.<br> | ||
| + | Follow the steps below to upload the ISO and create a VM in Nutanix AHV. | ||
| + | </p> | ||
| + | </div> | ||
| − | == | + | <div style="max-width:80%; margin: 0 auto;"> |
| + | <div style="background-color:#fffbf4; padding:1.5rem; border-radius:8px; box-shadow:0 2px 4px rgba(0,0,0,0.06); margin-bottom:2rem;"> | ||
| + | <h2 style="border-bottom:2px solid #ffe0b2; padding-bottom:0.5rem; font-size:1.5em;">Deployment Steps</h2> | ||
| + | <ol style="font-size:1.1em; margin-left:2em;"> | ||
| + | <li> | ||
| + | <b>Upload the TZM ISO on Nutanix</b><br> | ||
| + | Go to <b>Settings → Image Configuration → Upload Image</b>.<br> | ||
| + | <div style="display:inline-block; box-shadow:5px 5px 10px grey; margin:1em 0;">[[File:Nutanix_Image_settings.JPG | 500px]]</div> | ||
| + | <p>In the Create Image dialog, provide a <b>Name</b> for the image and choose <b>ISO</b> as Image Type.<br> | ||
| + | Select <b>Upload a file</b> and choose the TZM ISO image for upload.<br></p> | ||
| + | <div style="display:inline-block; box-shadow:5px 5px 10px grey; margin:1em 0;">[[File:Nutanix_Image_upload.JPG | 500px]]</div> | ||
| + | </li> | ||
| + | <li> | ||
| + | <b>Create VM in Nutanix</b><br> | ||
| + | Provide the VM configuration details as required.<br> | ||
| + | <div style="display:inline-block; box-shadow:5px 5px 10px grey; margin:1em 0;">[[File:Nutanix_Compute_details.JPG | 500px]]</div> | ||
| + | <p>Select <b>Boot Configuration</b> as <i>Legacy BIOS</i>.</p> | ||
| + | <div style="display:inline-block; box-shadow:5px 5px 10px grey; margin:1em 0;">[[File:Nutanix_Boot_config.JPG | 500px]]</div> | ||
| + | </li> | ||
| + | <li> | ||
| + | <b>Edit VM Disk Configuration</b><br> | ||
| + | Select the uploaded ISO image as the boot disk.<br> | ||
| + | <div style="display:inline-block; box-shadow:5px 5px 10px grey; margin:1em 0;">[[File:Nutanix_Edit_disk.JPG | 500px]]</div> | ||
| + | <div style="display:inline-block; box-shadow:5px 5px 10px grey; margin:1em 0;">[[File:Nutanix_Select_iso.JPG | 500px]]</div> | ||
| + | </li> | ||
| + | <li> | ||
| + | <b>Add Additional Disks</b><br> | ||
| + | Add two new disks: one with <b>5GB</b> and another with <b>500GB</b> size.<br> | ||
| + | <div style="display:inline-block; box-shadow:5px 5px 10px grey; margin:1em 0;">[[File:Nutanix_Add_disk.JPG | 500px]]</div> | ||
| + | </li> | ||
| + | <li> | ||
| + | <b>Add Network Adapter and VM Host Affinity</b><br> | ||
| + | <div style="display:inline-block; box-shadow:5px 5px 10px grey; margin:1em 0;">[[File:Nutanix_Add_nic.JPG | 500px]]</div> | ||
| + | <div style="display:inline-block; box-shadow:5px 5px 10px grey; margin:1em 0;">[[File:Nutanix_Add_host_affinity.JPG | 500px]]</div> | ||
| + | </li> | ||
| + | </ol> | ||
| + | <div style="background-color:#f8e2b3; padding:0.2rem; border-radius:8px; box-shadow:0 2px 4px rgba(0,0,0,0.06); font-size:1em; margin: 0 auto;"> | ||
| + | <p>🛈 <i>After VM creation, power on the VM and proceed with appliance configuration using the assigned IP address.</i></p> | ||
| + | </div> | ||
| + | </div> | ||
| + | </div> | ||
| − | + | <div style="display:flex; justify-content:space-between; margin-top:2rem; padding:1rem; background-color:#ffffff; max-width:90%; margin: 2rem auto 0;"> | |
| − | + | <div style="text-align:left;"> | |
| − | + | [[Image:prev_icon.jpg|30px|link=Installation]] [[Installation|Previous]] | |
| − | + | </div> | |
| − | + | <div style="text-align:right;"> | |
| − | + | [[Configuration|Next]] [[Image:next_icon.jpg|30px|link=Configuration]] | |
| − | + | </div> | |
| − | + | </div> | |
| − | |||
| − | |||
| − | |||
| − | |||
| − | |||
| − | |||
| − | |||
| − | |||
| − | |||
| − | |||
| − | [[ | ||
| − | |||
| − | |||
| − | |||
| − | [[ | ||
| − | |||
| − | |||
| − | |||
| − | |||
| − | |||
| − | |||
| − | |||
| − | |||
| − | |||
| − | |||
| − | || | ||
| − | |||
Latest revision as of 00:24, 12 September 2025
Deploying Tranzman Appliance on Nutanix AHV
This section explains how to deploy the Tranzman appliance on a Nutanix server using the ISO image.
Follow the steps below to upload the ISO and create a VM in Nutanix AHV.
Deployment Steps
-
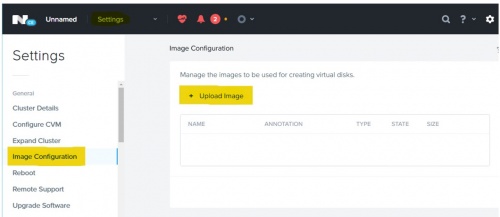
Upload the TZM ISO on Nutanix
Go to Settings → Image Configuration → Upload Image.
In the Create Image dialog, provide a Name for the image and choose ISO as Image Type.
Select Upload a file and choose the TZM ISO image for upload.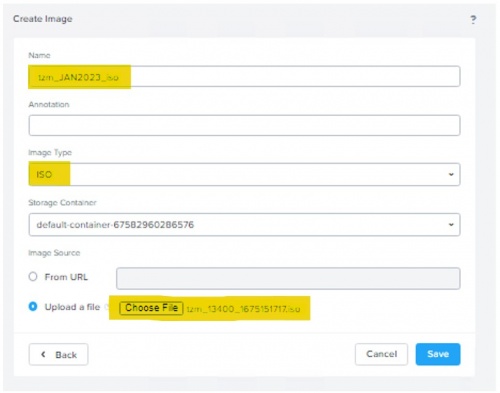
-
Create VM in Nutanix
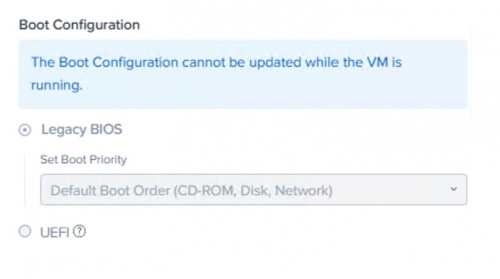
Provide the VM configuration details as required.

Select Boot Configuration as Legacy BIOS.
-
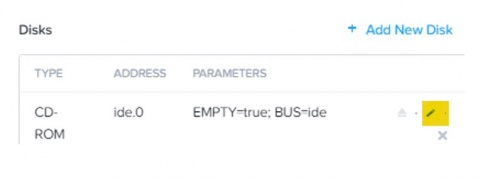
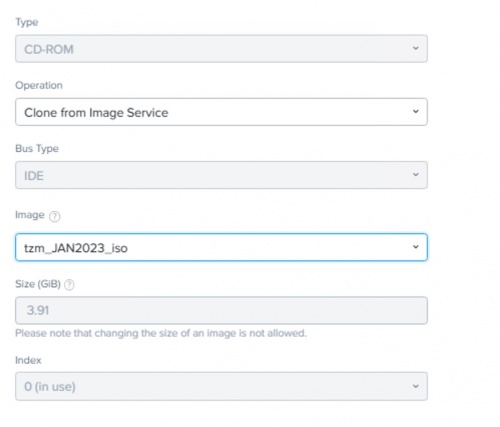
Edit VM Disk Configuration
Select the uploaded ISO image as the boot disk.
-
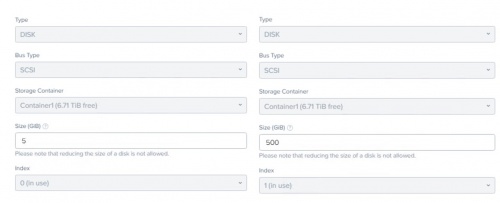
Add Additional Disks
Add two new disks: one with 5GB and another with 500GB size.
-
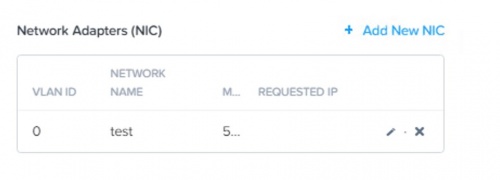
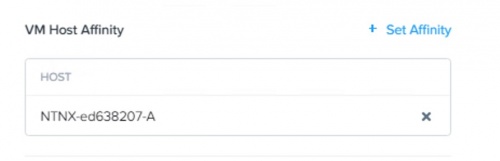
Add Network Adapter and VM Host Affinity


🛈 After VM creation, power on the VM and proceed with appliance configuration using the assigned IP address.