Difference between revisions of "Install TZM Server Using OVA"
From Tranzman Documentation
| (22 intermediate revisions by 2 users not shown) | |||
| Line 1: | Line 1: | ||
| + | __NOTOC__ | ||
| + | <br> | ||
| + | <br> | ||
| + | <div style="background-color:#edf7ff; padding: 1.5rem; border-radius:8px; max-width:80%; margin: 0 auto; margin-bottom:2rem;"> | ||
| + | <h1 style="border-bottom:none; font-size:2.5em; font-weight:bold; text-align:center;">Deploying Tranzman Appliance from OVA</h1> | ||
| + | <p style="font-size:1.2em; text-align:left;"> | ||
| + | This section explains how to install the Tranzman Server from an <b>OVA</b> template.<br> | ||
| + | The Tranzman appliance is available as ISO and OVA for download from the StoneRam fileshare.<br> | ||
| + | Deploying via OVA is simple and efficient compared to ISO installation. Below is an example of deploying OVA from ESXi. | ||
| + | </p> | ||
| + | </div> | ||
| − | == | + | <div style="max-width:80%; margin: 0 auto;"> |
| + | <div style="background-color:#fffbf4; padding:1.5rem; border-radius:8px; box-shadow:0 2px 4px rgba(0,0,0,0.06); margin-bottom:2rem;"> | ||
| + | <h2 style="border-bottom:2px solid #ffe0b2; padding-bottom:0.5rem; font-size:1.5em;">Deployment Steps</h2> | ||
| + | <ol style="font-size:1.1em; margin-left:2em;"> | ||
| + | <li> | ||
| + | Login to the ESXi host using vSphere client and click on <b>File → Deploy OVF</b> to launch the Deploy OVF Template wizard.<br> | ||
| + | Select the downloaded OVA file.<br> | ||
| + | <div style="display:inline-block; box-shadow:5px 5px 10px grey; margin:1em 0;">[[File:OVAWizard.JPG | 500px]]</div> | ||
| + | </li> | ||
| + | <li> | ||
| + | Review the OVF Template, read and accept the license agreement, and complete the steps to deploy the template.<br> | ||
| + | <div style="display:inline-block; box-shadow:5px 5px 10px grey; margin:1em 0;">[[File:Overview.JPG | 500px]]</div> | ||
| + | <div style="display:inline-block; box-shadow:5px 5px 10px grey; margin:1em 0;">[[File:AcceptLicense.JPG | 500px]]</div> | ||
| + | <div style="background-color:#f8e2b3; padding:0.2rem; border-radius:8px; box-shadow:0 2px 4px rgba(0,0,0,0.06); font-size:1em; margin: 0 auto;"> | ||
| + | <p>🛈 <i>Select <b>Thick Provision Lazy zeroed</b> in <b>Disk Format</b>.</i></p> | ||
| + | </div> | ||
| + | </li> | ||
| + | <li> | ||
| + | Select <b>Power on after deployment</b> and finish the installation.<br> | ||
| + | Wait for the Tranzman Appliance to be deployed.<br> | ||
| + | <div style="display:inline-block; box-shadow:5px 5px 10px grey; margin:1em 0;">[[File:FinishDeployment.JPG | 500px]]</div> | ||
| + | </li> | ||
| + | <li> | ||
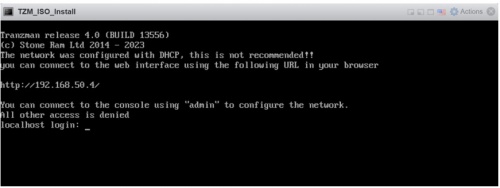
| + | Once the machine is deployed and powered on, it will look for an available NTP and DHCP server to obtain an IP address.<br> | ||
| + | The IP can be used to login to the Tranzman webUI and continue with <b>Configuration</b>.<br> | ||
| + | |||
| + | <div style="display:inline-block; box-shadow:5px 5px 10px grey; margin:1em 0;">[[File:TZM_Server_login.jpg | 500px]]</div> | ||
| + | </li> | ||
| + | </ol> | ||
| + | <div style="background-color:#f8e2b3; padding:0.2rem; border-radius:8px; box-shadow:0 2px 4px rgba(0,0,0,0.06); font-size:1em; margin: 0 auto;"> | ||
| + | <p>🛈 <i>For further configuration, refer to the <b>Configuration</b> section. If manual IP setup is required, see <b>Configure IP Network</b>.</i></p> | ||
| + | </div> | ||
| + | </div> | ||
| + | </div> | ||
| − | + | <div style="display:flex; justify-content:space-between; margin-top:2rem; padding:1rem; background-color:#ffffff; max-width:90%; margin: 2rem auto 0;"> | |
| − | + | <div style="text-align:left;"> | |
| − | + | [[File:prev_icon.jpg|30px|link=Installation]] [[Installation|Previous]] | |
| − | + | </div> | |
| − | + | <div style="text-align:right;"> | |
| − | + | [[Install_TZM_Server_in_Nutanix|Next]] [[File:next_icon.jpg|30px|link=Install_TZM_Server_in_Nutanix]] | |
| − | + | </div> | |
| − | + | </div> | |
| − | |||
| − | |||
| − | |||
| − | |||
| − | |||
| − | |||
| − | |||
| − | |||
| − | |||
| − | |||
| − | |||
| − | |||
| − | |||
| − | |||
| − | |||
| − | |||
| − | |||
| − | |||
| − | |||
| − | |||
| − | |||
| − | |||
| − | |||
| − | |||
| − | |||
| − | |||
| − | |||
| − | [= | ||
| − | |||
| − | |||
| − | |||
| − | |||
| − | |||
| − | |||
| − | |||
| − | |||
| − | |||
| − | |||
| − | |||
| − | |||
| − | |||
| − | |||
| − | |||
| − | |||
| − | |||
| − | |||
| − | |||
| − | |||
| − | |||
| − | |||
| − | |||
| − | |||
| − | |||
| − | |||
| − | |||
| − | |||
| − | |||
| − | |||
| − | |||
| − | |||
| − | |||
| − | |||
| − | |||
| − | |||
| − | |||
| − | |||
| − | |||
| − | |||
| − | |||
| − | |||
| − | |||
| − | | | ||
| − | |||
| − | |||
| − | |||
| − | |||
| − | |||
| − | |||
| − | |||
| − | |||
| − | |||
| − | |||
| − | |||
| − | |||
| − | |||
| − | |||
| − | |||
| − | |||
| − | |||
| − | |||
| − | > | ||
| − | > | ||
| − | |||
| − | |||
| − | |||
| − | |||
| − | |||
| − | |||
| − | |||
| − | |||
| − | |||
| − | |||
| − | |||
| − | |||
| − | |||
| − | |||
| − | |||
| − | |||
| − | |||
| − | |||
| − | |||
| − | |||
| − | |||
Latest revision as of 00:19, 12 September 2025
Deploying Tranzman Appliance from OVA
This section explains how to install the Tranzman Server from an OVA template.
The Tranzman appliance is available as ISO and OVA for download from the StoneRam fileshare.
Deploying via OVA is simple and efficient compared to ISO installation. Below is an example of deploying OVA from ESXi.
Deployment Steps
-
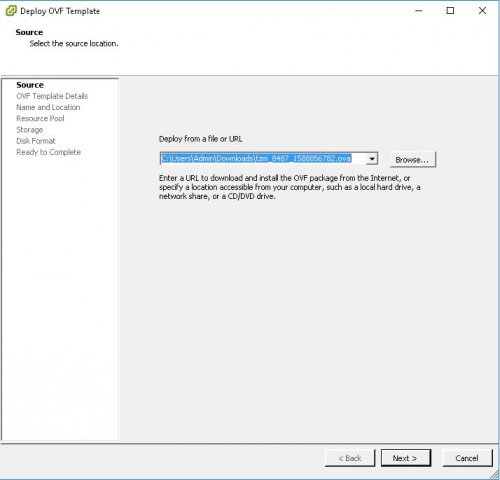
Login to the ESXi host using vSphere client and click on File → Deploy OVF to launch the Deploy OVF Template wizard.
Select the downloaded OVA file.
-
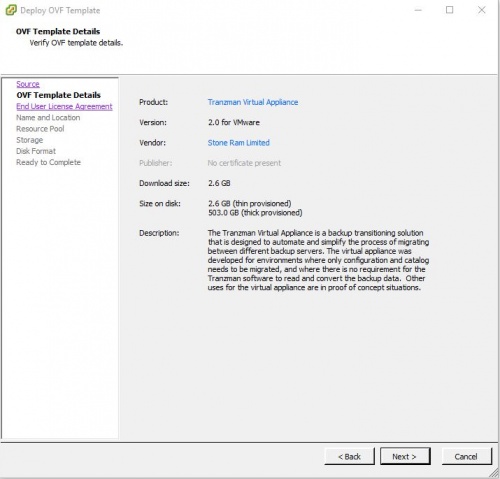
Review the OVF Template, read and accept the license agreement, and complete the steps to deploy the template.
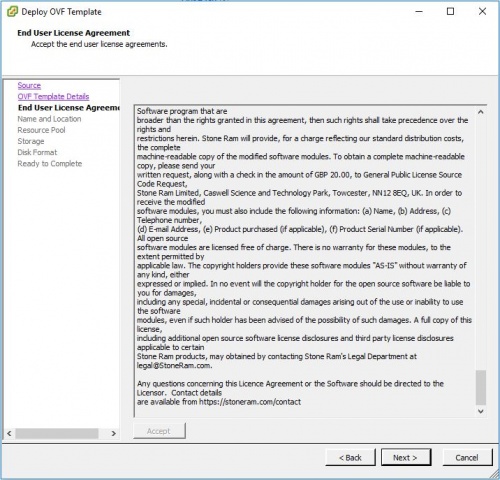
🛈 Select Thick Provision Lazy zeroed in Disk Format.
-
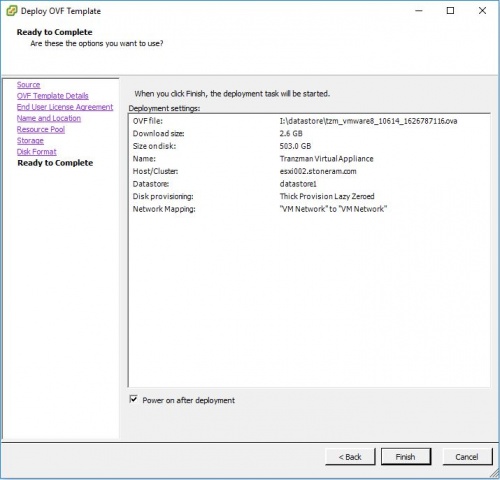
Select Power on after deployment and finish the installation.
Wait for the Tranzman Appliance to be deployed.
-
Once the machine is deployed and powered on, it will look for an available NTP and DHCP server to obtain an IP address.
The IP can be used to login to the Tranzman webUI and continue with Configuration.


🛈 For further configuration, refer to the Configuration section. If manual IP setup is required, see Configure IP Network.