Difference between revisions of "Cross Vendor Migration"
(Created page with " ==Headline== To set up the type of Migration or "Personality" switch over to the WebGUI of the Appliance ===Step 1.1=== Verify that the Dashboard should already have an En...") |
|||
| (3 intermediate revisions by the same user not shown) | |||
| Line 2: | Line 2: | ||
==Headline== | ==Headline== | ||
| − | + | Below steps should be followed to enabled the Tranzman Appliance to discover backup environments for cross Vendor Migrations. | |
| − | ===Step | + | ===Step 1=== |
| − | Verify that the Dashboard | + | Verify that the Dashboard looks like as shown in the below screenshot. |
The Dashboard enables you to check and monitor the TZM Appliance resources, migration state , service status , progress and state of Environments. | The Dashboard enables you to check and monitor the TZM Appliance resources, migration state , service status , progress and state of Environments. | ||
| − | [[File: | + | [[File:DiscoveryGreenRed.jpg|border|1100x800px]] |
| − | ===Step | + | ===Step 2=== |
| − | Click the <b>+</b> button and add the | + | Click the <b>+</b> button and add the backup environments.Enter the IP and select the platform of the backup server and hit Committ button. |
| − | [[File: | + | [[File:EnvironmentAdd.jpg|border|1100x800px]] |
| − | ===Step | + | ===Step 3=== |
The Dashboard should now give you an environment with name as <b>Querying instances...</b> and IP address of your backup environment. | The Dashboard should now give you an environment with name as <b>Querying instances...</b> and IP address of your backup environment. | ||
| Line 24: | Line 24: | ||
[[File:AgentDownload.jpg|border|1100x800px]] | [[File:AgentDownload.jpg|border|1100x800px]] | ||
| − | ===Step | + | ===Step 4=== |
Copy the file over to the backup server and install it.Make sure you either run the setup as administrator/root or as a user used to configure backup services. | Copy the file over to the backup server and install it.Make sure you either run the setup as administrator/root or as a user used to configure backup services. | ||
Follow the instructions on the screen during install. | Follow the instructions on the screen during install. | ||
| + | {|style="padding: 5px; width: 85%;" | ||
| + | | style="width: 1%;"|[[File:Note.png|30px]]|| style="padding: 10px; width: 85%;"|Install of Agent on a Windows Server | ||
| + | |} | ||
| + | [[File:AgentInstall.jpg|border|1100x900px]] | ||
| + | {|style="padding: 5px; width: 85%;" | ||
| + | | style="width: 1%;"|[[File:Note.png|30px]]|| style="padding: 10px; width: 85%;"|Install of Agent on a Linux Server | ||
| + | |} | ||
| − | + | {| class="wikitable" style="padding-left: auto; color:#FFFFFF; background-color: black; width: 600px; FONT-FAMILY:monospace,monospace; LINE-HEIGHT:15px; white-space: pre-wrap; | |
| + | | | ||
| + | [root@NBUNewMaster tmp]# chmod 755 ./C0A80591.bin | ||
| + | [root@NBUNewMaster tmp]# ls -ltr ./C0A80591.bin | ||
| + | -rwxr-xr-x. 1 root root 14102251 Aug 6 15:08 ./C0A80591.bin | ||
| + | [root@NBUNewMaster tmp]# | ||
| + | [root@NBUNewMaster tmp]# | ||
| + | [root@NBUNewMaster tmp]# ./C0A80591.bin | ||
| − | + | Running Tranzman Agent Installer | |
| − | + | Enter install path location [/opt/SRL]: | |
| + | Installing to /opt/SRL | ||
| + | Looking for existing Tranzman Agent Installation in /opt/SRL | ||
| + | Installing Tranzman Agent | ||
| + | Starting Tranzman Agent | ||
| + | [root@NBUNewMaster tmp]# | ||
| + | |} | ||
| − | |||
| − | [[File: | + | {|style="padding: 5px; width: 85%;" |
| + | | style="width: 1%;"|[[File:Note.png|30px]]|| style="padding: 10px; width: 85%;"|'''Note:-'''Repeat the above steps for all the environments to be added | ||
| + | |} | ||
| − | |||
Latest revision as of 14:14, 6 August 2020
Contents
Headline
Below steps should be followed to enabled the Tranzman Appliance to discover backup environments for cross Vendor Migrations.
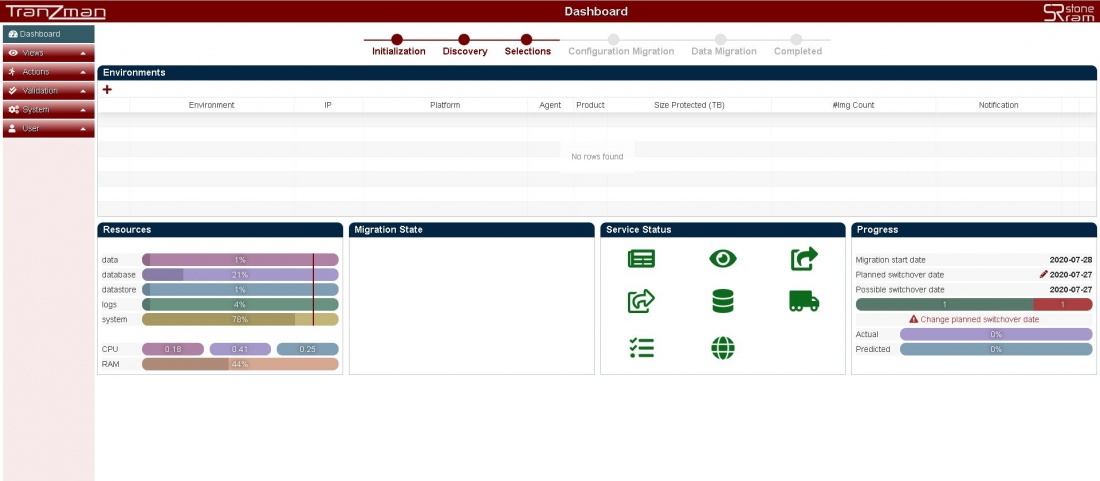
Step 1
Verify that the Dashboard looks like as shown in the below screenshot. The Dashboard enables you to check and monitor the TZM Appliance resources, migration state , service status , progress and state of Environments.
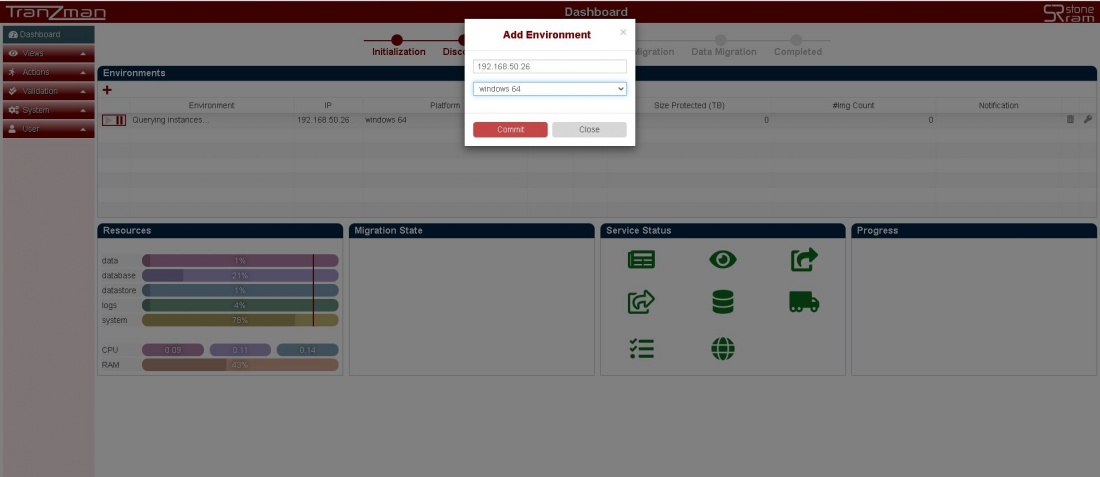
Step 2
Click the + button and add the backup environments.Enter the IP and select the platform of the backup server and hit Committ button.
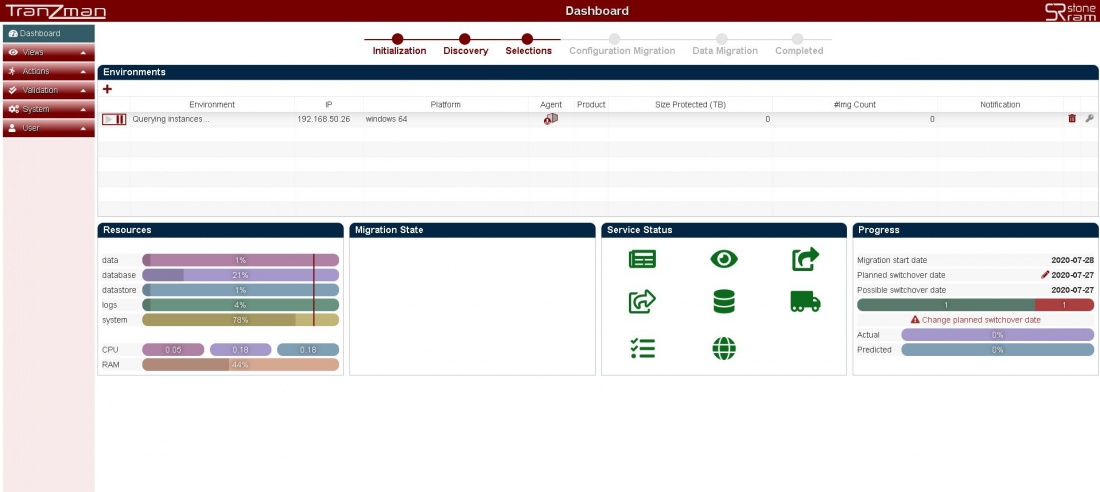
Step 3
The Dashboard should now give you an environment with name as Querying instances... and IP address of your backup environment.
Under the Agent Column hit the ![]() button , this should download you a Agent package (.bin file if Origin is *nix or .exe file if Origin is Windows).
button , this should download you a Agent package (.bin file if Origin is *nix or .exe file if Origin is Windows).
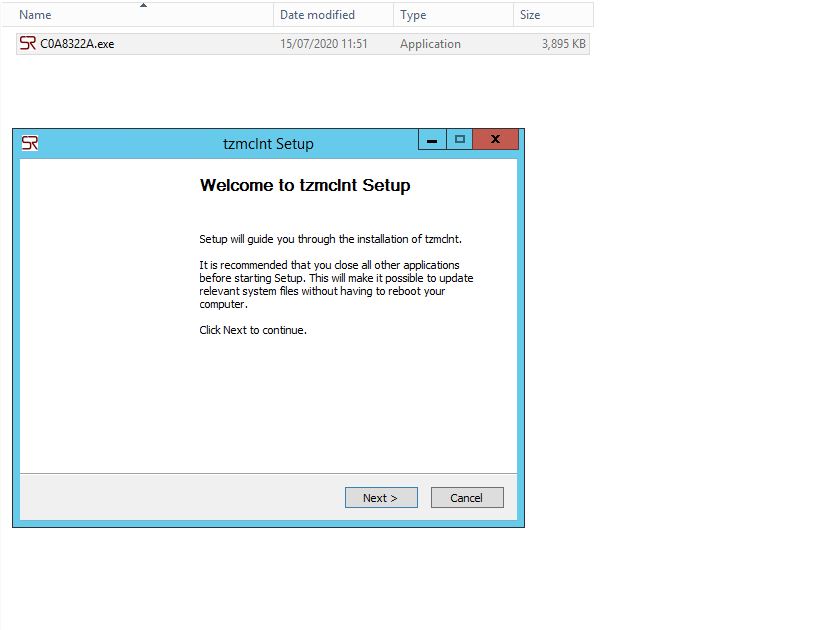
Step 4
Copy the file over to the backup server and install it.Make sure you either run the setup as administrator/root or as a user used to configure backup services. Follow the instructions on the screen during install.
| Install of Agent on a Windows Server |
| Install of Agent on a Linux Server |
|
[root@NBUNewMaster tmp]# chmod 755 ./C0A80591.bin [root@NBUNewMaster tmp]# ls -ltr ./C0A80591.bin -rwxr-xr-x. 1 root root 14102251 Aug 6 15:08 ./C0A80591.bin [root@NBUNewMaster tmp]# [root@NBUNewMaster tmp]# [root@NBUNewMaster tmp]# ./C0A80591.bin Running Tranzman Agent Installer Enter install path location [/opt/SRL]: Installing to /opt/SRL Looking for existing Tranzman Agent Installation in /opt/SRL Installing Tranzman Agent Starting Tranzman Agent [root@NBUNewMaster tmp]# |
| Note:-Repeat the above steps for all the environments to be added |


