Difference between revisions of "Recover VMWare"
| Line 18: | Line 18: | ||
==='''Step 4'''=== | ==='''Step 4'''=== | ||
| − | Choose to restore to a different location, and change the target destination to a temporary location on the NetBackup Server itself or to a shared location. In our case we used the location '''NBU_restore/VMWare'''. | + | Choose to restore to a different location, and change the target destination to a temporary location on the NetBackup Server itself or to a shared location. In our case we used the location '''/NBU_restore/VMWare'''. |
[[File:VMWare-RestoreDirectory.jpg]] | [[File:VMWare-RestoreDirectory.jpg]] | ||
==='''Step 5'''=== | ==='''Step 5'''=== | ||
| − | Re-create the folder for the Virtual Machine in the Datastore of an ESXi host, '''i.e. Datastore01/CentOS6.8''' | + | Re-create the folder for the Virtual Machine in the Datastore of an ESXi host, '''i.e. /Datastore01/CentOS6.8''' |
[[File:VMWare-CreateDirectory.jpg]] | [[File:VMWare-CreateDirectory.jpg]] | ||
| + | |||
| + | ==='''Step 6'''=== | ||
| + | Copy contents from the temporary restore location ('''/NBU_restore/VMWare''') to the root of the newly created folder on the ESXi host as shown on the picture below. | ||
| + | |||
| + | [[File:VMWare-CopiedContents.jpg]] | ||
| + | |||
| + | ==='''Step 7'''=== | ||
| + | Use a text editor to examine the contents of the VMDK file, and look for the name of the '''"flat.vmdk"''' file. | ||
| + | |||
| + | In our case it is named '''"CentOS6.8-flat.vmdk"''', copy/ make a note of this name. | ||
| + | |||
| + | ==='''Step 7'''=== | ||
| + | Notice that the hard drive files would have been renamed to '''scsi0_0''', this file needs to be renamed to the value of the '''"flat.vmdk"'''. '''i.e. CentOS6.8-flat.vmdk''' | ||
| + | |||
| + | |||
| + | |||
---- | ---- | ||
Use this link to go back to the main [[recoverydocs]] Page. | Use this link to go back to the main [[recoverydocs]] Page. | ||
Revision as of 17:00, 23 January 2019
This page has detailed steps on how to recover VMWare machines that have been imported into NetBackup.
Step 1
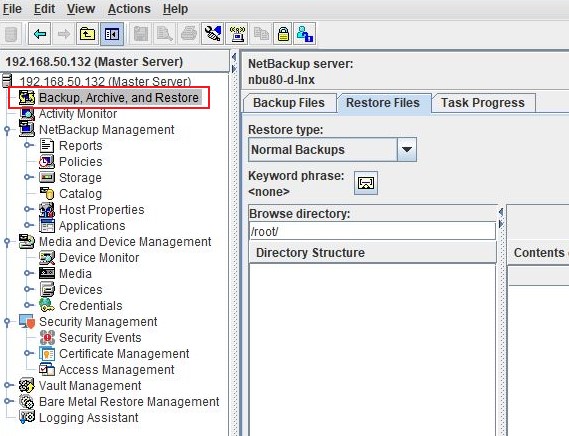
Login to the NetBackup GUI and navigate to Backup, Archive and Restore section.
Step 2
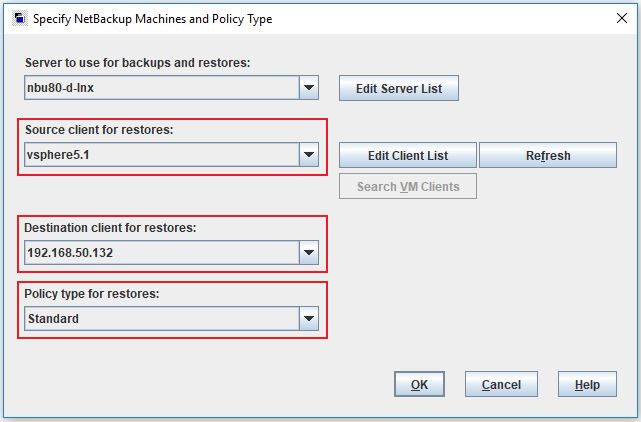
Click on the Restore Files tab and select the Source Client, Destination and type of Policy to restore the VMWare backup files. The Policy Type will be Standard as we are just restoring them as files.
Step 3
Under Browse Directory select the Virtual Machine files to restore under the images folder.
Step 4
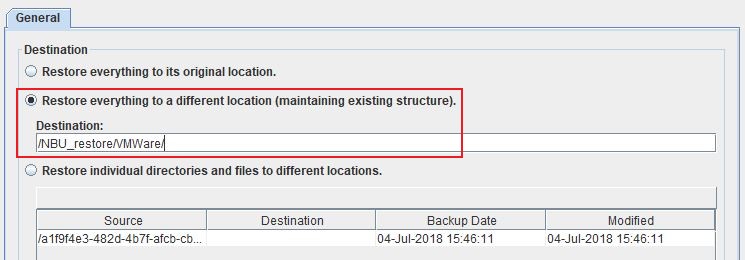
Choose to restore to a different location, and change the target destination to a temporary location on the NetBackup Server itself or to a shared location. In our case we used the location /NBU_restore/VMWare.
Step 5
Re-create the folder for the Virtual Machine in the Datastore of an ESXi host, i.e. /Datastore01/CentOS6.8
Step 6
Copy contents from the temporary restore location (/NBU_restore/VMWare) to the root of the newly created folder on the ESXi host as shown on the picture below.
Step 7
Use a text editor to examine the contents of the VMDK file, and look for the name of the "flat.vmdk" file.
In our case it is named "CentOS6.8-flat.vmdk", copy/ make a note of this name.
Step 7
Notice that the hard drive files would have been renamed to scsi0_0, this file needs to be renamed to the value of the "flat.vmdk". i.e. CentOS6.8-flat.vmdk
Use this link to go back to the main recoverydocs Page.


