Difference between revisions of "RecoverExchange"
| Line 13: | Line 13: | ||
==='''Step 3'''=== | ==='''Step 3'''=== | ||
| − | Under '''Directory Structure''' navigate the selection until the wanted '''EDB''' files to restore are found. | + | Under '''Directory Structure''' navigate the selection until the wanted '''EDB''' files to restore are found. Log files can also be restored if needed. |
[[File:NBU-Exchange-Selections.jpg]] | [[File:NBU-Exchange-Selections.jpg]] | ||
Latest revision as of 11:32, 15 January 2019
The following method has been tested with the versions of Exchange 2007,2010,2013 for recovering the Database Files and getting the server back up and running.
Step 1
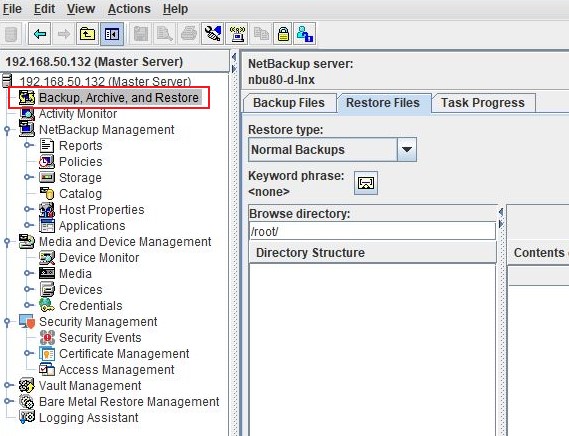
Login to the NetBackup GUI and navigate to Backup, Archive and Restore section.
Step 2
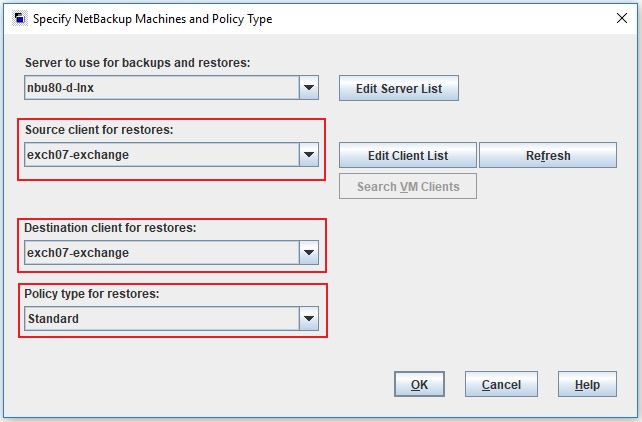
Click on the Restore Files tab and select the Source, Destination Client and type of Policy to restore the Exchange backup files. The Policy Type will be Standard.
Step 3
Under Directory Structure navigate the selection until the wanted EDB files to restore are found. Log files can also be restored if needed.
Then restore this selection to the Exchange server to a temporary folder, i.e. D:\Temp\Recovered_Database.edb
Step 4
Open a Command Line windows, navigate to the Bin folder within the Exchange install location and launch the tool "ESEUTIL.EXE" followed by the /p switch. Without this step, the file won’t be able to be mounted.
|
D:\Program Files\Exchange Server\Bin>eseutil.exe /p D:\Temp\Recovered_Database.edb |
Step 5
After the file has been scanned by "ESEUTIL.EXE" move/copy it to the same location where the current EDB file resides.
Step 6
Open the Exchange Management Console, and Dismount the current Database, under Server Configuration > Mailbox > Database Management.
Step 7
Change the extension of the dismounted database to .OLD and rename the recovered_DB.edb to the same name as the original database.
Step 8
Mount the new database. Exchange services may need to be restarted.
Step 9
Check that data is present by login into WebMail or Outlook as a user, then check that all of their emails are present.
Use this link to go back to the main recoverydocs Page.


