Difference between revisions of "Virtual Agent"
From Tranzman Documentation
| (8 intermediate revisions by the same user not shown) | |||
| Line 1: | Line 1: | ||
| + | __TOC__ | ||
| + | <br> | ||
| + | <br> | ||
| + | <div style="background-color:#edf7ff; padding: 1.5rem; border-radius:8px; max-width:80%; margin: 0 auto; margin-bottom:2rem;"> | ||
| + | <h1 style="border-bottom:none; font-size:2.5em; font-weight:bold; text-align:center;">Creating a Tranzman Virtual Agent from Recordings</h1> | ||
| + | <p style="font-size:1.2em; text-align:left;"> | ||
| + | Tranzman recordings can be used as a <b>Virtual Agent</b> to perform a dry run of a Transition (up to selections).<br> | ||
| + | The Virtual Agent replicates the process of a real Transition scenario, helping to understand selection and mapping of configurations.<br> | ||
| + | Selections can be exported or imported onto a production Transition.<br> | ||
| + | <br> | ||
| + | Virtual Agents can be created from recordings on <b>Disk</b>, <b>Tape</b>, or via <b>Tranzman Shares over SMB</b>. All methods are detailed below. | ||
| + | </p> | ||
| + | </div> | ||
| − | === | + | <div style="max-width:80%; margin: 0 auto;"> |
| − | + | <div style="background-color:#fef3f7; padding:1.5rem; border-radius:8px; box-shadow:0 2px 4px rgba(0,0,0,0.06); margin-bottom:2rem;"> | |
| − | + | <h2 style="border-bottom:2px solid #f8bbd0; padding-bottom:0.5rem; font-size:1.5em;">Create Virtual Agent from Recordings on Disk</h2> | |
| − | + | <ol style="font-size:1.1em; margin-left:2em;"> | |
| + | <li>Generate recordings using <b>tzm_recorder</b>. See [[ Tranzman_Recorder| Using Recorder ]] for details.</li> | ||
| + | <li>Use the <b>-export_db</b> flag to generate recordings for Virtual Agents.<br> | ||
| + | <table style="width:60%;color:white;background-color:black;font-family:monospace,monospace;border-radius:5px;box-shadow: 5px 5px 10px grey; margin:1em 0;"> | ||
| + | <tr><td><font style="color:blue">> </font> tzm_recorder.exe -export_db</td></tr> | ||
| + | </table> | ||
| + | </li> | ||
| + | <li>This creates a zip file (e.g., <b>TZM_recording_1606735043.zip</b>). Copy it to the system with Tranzman GUI access.</li> | ||
| + | <!-- <li> --> | ||
| + | <div style="background-color:#f8e2b3; padding:0.2rem; border-radius:8px; box-shadow:0 2px 4px rgba(0,0,0,0.06); font-size:1em; margin: 0 auto;"> | ||
| + | <p>🛈 <i>Below steps are based on TZM Recorder run on a NetBackup Backup Server.</i></p> | ||
| + | </div> | ||
| + | <!-- </li> --> | ||
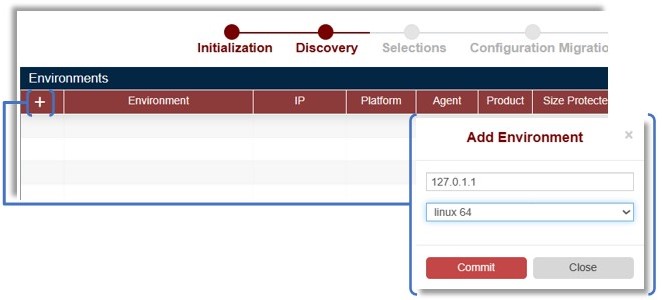
| + | <li>From Tranzman dashboard, click <b>+</b>. Enter a loopback IP (for virtual agent), select platform, and click <b>commit</b>.<br> | ||
| + | [[File:virtual_agent_add_env.jpg|700px]] | ||
| + | </li> | ||
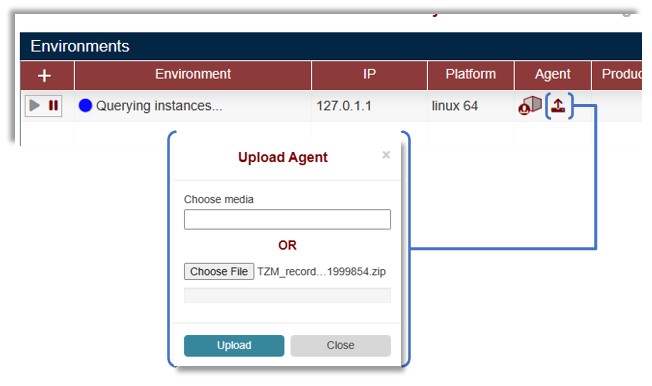
| + | <li>Click <b>Upload Recordings</b> to upload the zip file.<br> | ||
| + | [[File:virtual_agent_upload_rec.jpg|700px]] | ||
| + | </li> | ||
| + | <li>Creation may take a few minutes. A successful upload triggers the Init job and four Query jobs (<b>QueryProduct, QueryConfig, QueryImages, QueryMedia</b>).<br> | ||
| + | [[File:virtual_agent_init_job.jpg|700px]] | ||
| + | </li> | ||
| + | <li>Once complete, environment details will be visible.<br> | ||
| + | [[File:virtual_agent_add_status.jpg|700px]] | ||
| + | </li> | ||
| + | <li>The environment is now ready for Selections and Pre-Assessment.</li> | ||
| + | </ol> | ||
| + | </div> | ||
| − | Virtual | + | <div style="background-color:#edf7ff; padding:1.5rem; border-radius:8px; box-shadow:0 2px 4px rgba(0,0,0,0.06); margin-bottom:2rem;"> |
| + | <h2 style="border-bottom:2px solid #bbdefb; padding-bottom:0.5rem; font-size:1.5em;">Create Virtual Agent from Recordings on Tape</h2> | ||
| + | <ol style="font-size:1.1em; margin-left:2em;"> | ||
| + | <li>Uncompress recordings before backing up to tape.<br> | ||
| + | Use <b>-no_zip</b> argument to create unzipped recordings.<br> | ||
| + | <table style="width:60%;color:white;background-color:black;font-family:monospace,monospace;border-radius:5px;box-shadow: 5px 5px 10px grey; margin:1em 0;"> | ||
| + | <tr><td><font style="color:blue">> </font> tzm_recorder.exe -export_db -no_zip</td></tr> | ||
| + | </table> | ||
| + | <p>See [[ Tranzman_Recorder| Using Recorder ]] for details.</p> | ||
| + | </li> | ||
| + | <li>Backup the recording folder to a dedicated tape. Share the Tape Library with Tranzman Server ([[ Devices | Devices Page ]]).</li> | ||
| + | <div style="background-color:#f8e2b3; padding:0.2rem; border-radius:8px; box-shadow:0 2px 4px rgba(0,0,0,0.06); font-size:1em; margin: 0 auto;"> | ||
| + | <p>🛈 <i>Below steps are based on TZM Recorder run on a Data Protector Backup Server.</i></p> | ||
| + | </div> | ||
| + | <li>On Tranzman dashboard, click <b>+</b>, enter loopback IP, select platform.<br> | ||
| + | [[File:virtual_agent_add_env.jpg|700px]] | ||
| + | </li> | ||
| + | <li>Click <b>commit</b> and <b>Upload Recordings</b>.<br> | ||
| + | [[File:virtual_agent_upload_rec_dp.jpg|700px]] | ||
| + | </li> | ||
| + | <li>In <b>Choose media</b>, enter the mediaID of the tape and click <b>Upload</b>. Creation starts and triggers Init and Query actions.<br> | ||
| + | [[File:virtual_agent_init_job_dp.jpg|700px]] | ||
| + | </li> | ||
| + | <li>Once complete, dashboard fields are populated with environment details.<br> | ||
| + | [[File:virtual_agent_dashboard.jpg|700px]] | ||
| + | </li> | ||
| + | </ol> | ||
| + | </div> | ||
| + | <div style="background-color:#fffbf4; padding:1.5rem; border-radius:8px; box-shadow:0 2px 4px rgba(0,0,0,0.06); margin-bottom:2rem;"> | ||
| + | <h2 style="border-bottom:2px solid #ffe0b2; padding-bottom:0.5rem; font-size:1.5em;">Create Virtual Agent from Recordings Using Tranzman Shares Over SMB</h2> | ||
| + | <ol style="font-size:1.1em; margin-left:2em;"> | ||
| + | <li>Open a share from Tranzman Appliance ([[ Tranzman Shares | Tranzman Shares]]).</li> | ||
| + | <li>Run the recorder tool on the backup server and create the recording (uncompressed). See [[ Using Recorder | Using Recorder ]].</li> | ||
| + | <li>On Tranzman dashboard, click <b>+</b>, enter loopback IP, select platform.<br> | ||
| + | [[File:virtual_agent_add_env.jpg|700px]] | ||
| + | </li> | ||
| + | <li>Share open creates a directory in <b>/data</b> path.<br> | ||
| + | <table style="width:60%;color:white;background-color:black;font-family:monospace,monospace;border-radius:5px;box-shadow: 5px 5px 10px grey; margin:1em 0;"> | ||
| + | <tr><td><font style="color:blue">> </font> ls /data/7F000101/<br>data images jobs process run tools</td></tr> | ||
| + | </table> | ||
| + | </li> | ||
| + | <li>Copy recordings to the directory using the mounted share.<br> | ||
| + | <table style="width:60%;color:white;background-color:black;font-family:monospace,monospace;border-radius:5px;box-shadow: 5px 5px 10px grey; margin:1em 0;"> | ||
| + | <tr><td><font style="color:blue">> </font> ls 7F000101/<br>data images jobs process TZM_recording_1606735043 run tools</td></tr> | ||
| + | </table> | ||
| + | </li> | ||
| + | <li>Rename the folder to <b>recording</b>.<br> | ||
| + | <table style="width:60%;color:white;background-color:black;font-family:monospace,monospace;border-radius:5px;box-shadow: 5px 5px 10px grey; margin:1em 0;"> | ||
| + | <tr><td><font style="color:blue">> </font> mv TZM_recording_1606735043/ recording/<br>ls 7F000101/<br>data images jobs process recording run tools</td></tr> | ||
| + | </table> | ||
| + | </li> | ||
| + | <li>Dashboard fields are updated for the respective recordings uploaded.</li> | ||
| + | </ol> | ||
| + | <div style="background-color:#f8e2b3; padding:0.7em; border-radius:8px; box-shadow:0 2px 4px rgba(0,0,0,0.06); margin-top:1em;"> | ||
| + | <p>This is another method to create Tranzman Virtual Agent.</p> | ||
| + | </div> | ||
| + | </div> | ||
| − | + | <div style="display:flex; justify-content:space-between; margin-top:2rem; padding:1rem; background-color:#ffffff; max-width:90%; margin: 2rem auto 0;"> | |
| − | + | <div style="text-align:left;"> | |
| − | + | [[File:prev_icon.jpg|30px|link=Tranzman_Recorder]] [[Tranzman_Recorder|Previous]] | |
| − | + | </div> | |
| − | + | <div style="text-align:right;"> | |
| − | < | + | [[Installation|Next]] [[File:next_icon.jpg|30px|link=Installation]] |
| − | + | </div> | |
| − | + | </div> | |
| − | |||
| − | |||
| − | |||
| − | |||
| − | |||
| − | |||
| − | |||
| − | |||
| − | |||
| − | |||
| − | |||
| − | |||
| − | |||
| − | |||
| − | |||
| − | |||
| − | |||
| − | |||
| − | |||
| − | |||
| − | |||
| − | |||
| − | |||
| − | |||
| − | |||
| − | |||
| − | |||
| − | |||
| − | |||
| − | |||
| − | |||
| − | |||
| − | |||
| − | < | ||
| − | |||
| − | |||
| − | |||
| − | |||
| − | |||
| − | |||
| − | |||
| − | |||
| − | |||
| − | |||
| − | |||
| − | |||
| − | |||
| − | |||
| − | |||
| − | |||
| − | |||
| − | |||
| − | |||
| − | |||
| − | |||
| − | |||
| − | |||
| − | |||
| − | |||
| − | |||
| − | |||
| − | = | ||
| − | |||
| − | |||
| − | |||
| − | |||
| − | |||
| − | |||
| − | |||
| − | |||
| − | |||
| − | |||
| − | |||
| − | |||
| − | |||
| − | |||
| − | |||
| − | |||
| − | |||
| − | |||
| − | </ | ||
| − | |||
| − | |||
| − | |||
| − | |||
| − | < | ||
| − | |||
| − | |||
| − | |||
| − | |||
| − | |||
| − | |||
| − | |||
| − | |||
| − | |||
| − | |||
| − | |||
| − | |||
| − | |||
| − | |||
| − | |||
| − | |||
| − | |||
Latest revision as of 16:27, 11 September 2025
Contents
Creating a Tranzman Virtual Agent from Recordings
Tranzman recordings can be used as a Virtual Agent to perform a dry run of a Transition (up to selections).
The Virtual Agent replicates the process of a real Transition scenario, helping to understand selection and mapping of configurations.
Selections can be exported or imported onto a production Transition.
Virtual Agents can be created from recordings on Disk, Tape, or via Tranzman Shares over SMB. All methods are detailed below.
Create Virtual Agent from Recordings on Disk
- Generate recordings using tzm_recorder. See Using Recorder for details.
- Use the -export_db flag to generate recordings for Virtual Agents.
> tzm_recorder.exe -export_db - This creates a zip file (e.g., TZM_recording_1606735043.zip). Copy it to the system with Tranzman GUI access.
- From Tranzman dashboard, click +. Enter a loopback IP (for virtual agent), select platform, and click commit.
- Click Upload Recordings to upload the zip file.
- Creation may take a few minutes. A successful upload triggers the Init job and four Query jobs (QueryProduct, QueryConfig, QueryImages, QueryMedia).

- Once complete, environment details will be visible.

- The environment is now ready for Selections and Pre-Assessment.
🛈 Below steps are based on TZM Recorder run on a NetBackup Backup Server.


Create Virtual Agent from Recordings on Tape
- Uncompress recordings before backing up to tape.
Use -no_zip argument to create unzipped recordings.
> tzm_recorder.exe -export_db -no_zip See Using Recorder for details.
- Backup the recording folder to a dedicated tape. Share the Tape Library with Tranzman Server ( Devices Page ).
- On Tranzman dashboard, click +, enter loopback IP, select platform.
- Click commit and Upload Recordings.

- In Choose media, enter the mediaID of the tape and click Upload. Creation starts and triggers Init and Query actions.

- Once complete, dashboard fields are populated with environment details.

🛈 Below steps are based on TZM Recorder run on a Data Protector Backup Server.


- Open a share from Tranzman Appliance ( Tranzman Shares).
- Run the recorder tool on the backup server and create the recording (uncompressed). See Using Recorder .
- On Tranzman dashboard, click +, enter loopback IP, select platform.
- Share open creates a directory in /data path.
> ls /data/7F000101/
data images jobs process run tools - Copy recordings to the directory using the mounted share.
> ls 7F000101/
data images jobs process TZM_recording_1606735043 run tools - Rename the folder to recording.
> mv TZM_recording_1606735043/ recording/
ls 7F000101/
data images jobs process recording run tools - Dashboard fields are updated for the respective recordings uploaded.
This is another method to create Tranzman Virtual Agent.