Difference between revisions of "Tranzman DR"
| (7 intermediate revisions by the same user not shown) | |||
| Line 5: | Line 5: | ||
|} | |} | ||
| − | + | Please sell below sections for '''Backup''' and '''Restore''' of TZM Appliance. | |
| − | |||
| − | Please sell below sections for Backup and Restore of TZM Appliance. | ||
__NOTOC__ | __NOTOC__ | ||
=Backup= | =Backup= | ||
| Line 15: | Line 13: | ||
===Step 1=== | ===Step 1=== | ||
| − | Go to | + | Go to '''Tranzman DR''' under '''System''' on Tranzman webpage. |
[[File:BackupStep1.JPG | border|1100x800px]] | [[File:BackupStep1.JPG | border|1100x800px]] | ||
| Line 22: | Line 20: | ||
===Step 2=== | ===Step 2=== | ||
| − | Select the media(tape) or the Disk Library you want to do your backup to | + | Select the media(tape) or the Disk Library you want to do your backup to. |
[[File:BackupStep2.JPG | border|1100x800px]] | [[File:BackupStep2.JPG | border|1100x800px]] | ||
| Line 29: | Line 27: | ||
===Step 3=== | ===Step 3=== | ||
| − | Click on Backup and wait until it says Success. | + | Click on Backup, Confirm and wait until it says Success. |
[[File:BackupStep3.JPG | border|1100x800px]] | [[File:BackupStep3.JPG | border|1100x800px]] | ||
| − | If it says success so you have backed up your | + | If it says success so you have successfully backed up your Tranzman Catalog. |
| Line 40: | Line 38: | ||
In case of TZM DR once you have redeployed the TZM Appliance, please follow the below steps to restore the Tranzman Catalog. | In case of TZM DR once you have redeployed the TZM Appliance, please follow the below steps to restore the Tranzman Catalog. | ||
| + | |||
===Step 1=== | ===Step 1=== | ||
| + | |||
| + | Go to '''Tranzman DR''' under '''System''' on Tranzman webpage. | ||
| + | |||
| + | [[File:BackupStep1.JPG | border|1100x800px]] | ||
| + | |||
===Step 2=== | ===Step 2=== | ||
| + | |||
| + | Select the media(tape) or the Disk Library you have done your Tranzman Catalog backup to. | ||
| + | |||
| + | [[File:BackupStep2.JPG | border|1100x800px]] | ||
| + | |||
===Step 3=== | ===Step 3=== | ||
| + | |||
| + | Click on Restore, Confirm and wait until it says Success. | ||
| + | |||
| + | [[File:BackupStep3.JPG | border|1100x800px]] | ||
| + | |||
| + | |||
| + | [[ Tranzman| Return to Overview ]] | ||
Latest revision as of 09:47, 15 April 2021
Tranzman's itself disaster recovery process is fairly simple. All it needs is a destination(disk or media) where it can do cyclic backups and then when it comes to restore just a click on webpage would do it.
| Note: Work is in progress for making the Tranzman Backups cyclic (frequency based).At present you have to do the backups manually at periodic intervals. |
Please sell below sections for Backup and Restore of TZM Appliance.
Backup
Appliance Backup is a simple step on Tranzman WebPage. Follow the simple steps below and your Tranzman Catalog should be backed up.
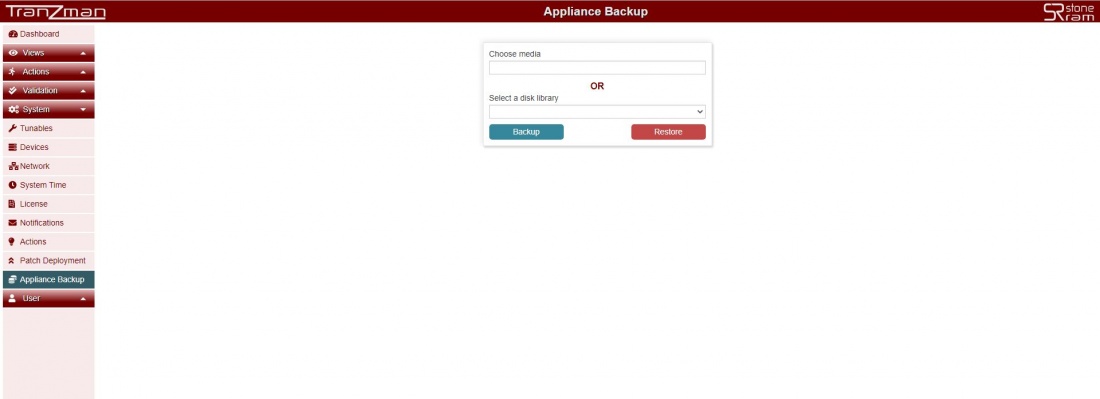
Step 1
Go to Tranzman DR under System on Tranzman webpage.
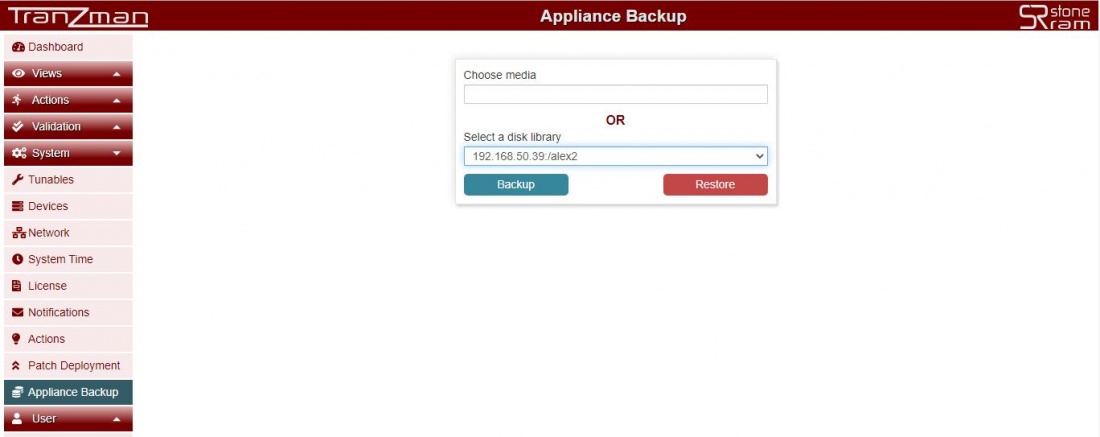
Step 2
Select the media(tape) or the Disk Library you want to do your backup to.
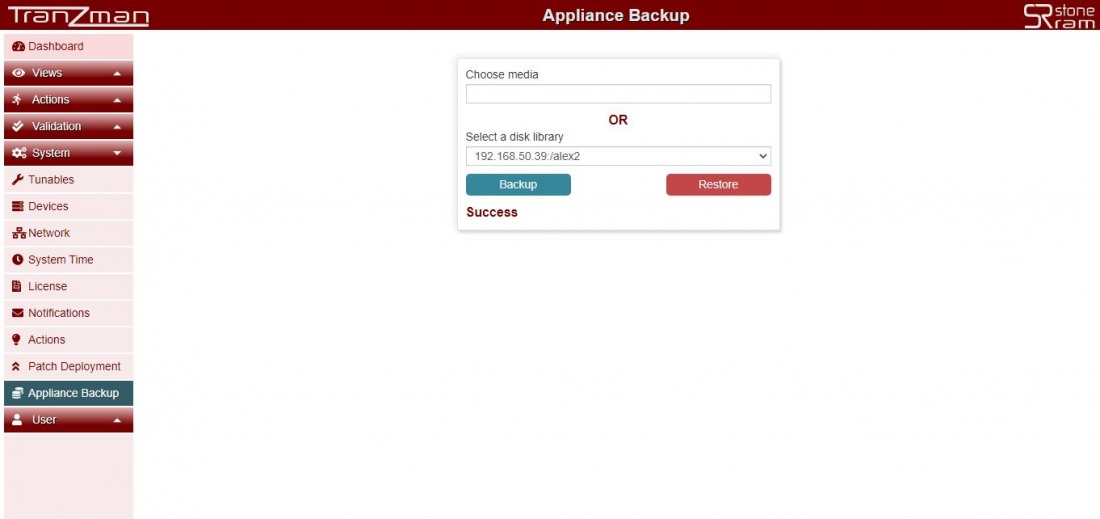
Step 3
Click on Backup, Confirm and wait until it says Success.
If it says success so you have successfully backed up your Tranzman Catalog.
Restore
In case of TZM DR once you have redeployed the TZM Appliance, please follow the below steps to restore the Tranzman Catalog.
Step 1
Go to Tranzman DR under System on Tranzman webpage.
Step 2
Select the media(tape) or the Disk Library you have done your Tranzman Catalog backup to.
Step 3
Click on Restore, Confirm and wait until it says Success.


