Difference between revisions of "Virtual Agent"
| (8 intermediate revisions by the same user not shown) | |||
| Line 10: | Line 10: | ||
Please enter the command like shown below. | Please enter the command like shown below. | ||
| + | Please enter the command like shown below. | ||
| + | |||
| + | {| class="wikitable" style="padding-left: auto; color:#FFFFFF; background-color: black; width: 600px; FONT-FAMILY:monospace,monospace; LINE-HEIGHT:15px; white-space: pre-wrap; | ||
{| class="wikitable" style="padding-left: auto; color:#FFFFFF; background-color: black; width: 600px; FONT-FAMILY:monospace,monospace; LINE-HEIGHT:15px; white-space: pre-wrap; | {| class="wikitable" style="padding-left: auto; color:#FFFFFF; background-color: black; width: 600px; FONT-FAMILY:monospace,monospace; LINE-HEIGHT:15px; white-space: pre-wrap; | ||
| Line 126: | Line 129: | ||
== Create Virtual Agent from Recordings Using Tranzman Shares Over SMB == | == Create Virtual Agent from Recordings Using Tranzman Shares Over SMB == | ||
| − | This steps requires to open shares from Tranzman Appliance. Please follow the [[ Tranzman Shares | Tranzman Shares]] and open the shares accordingly. | + | This steps requires to open shares from Tranzman Appliance. Please follow the instructions on [[ Tranzman Shares | Tranzman Shares]] and open the shares accordingly. |
| − | |||
| − | |||
| − | |||
| − | |||
| − | + | Once done run the recorder tool on the backup server and create the recording. | |
| + | Create a recording in unzipped format by following the steps here [[ Using Recorder | Using Recorder ]] but before running the tzm_recorder executable add couple of flags with that command. | ||
Please enter the command like shown below. | Please enter the command like shown below. | ||
| Line 141: | Line 141: | ||
tzm_recorder.exe -export_db -no_zip | tzm_recorder.exe -export_db -no_zip | ||
|} | |} | ||
| + | |||
| + | Above should give you a recording output in uncompressed format. e.g. '''TZM_recording_1606735043''' | ||
| − | ===Step | + | ===Step 1=== |
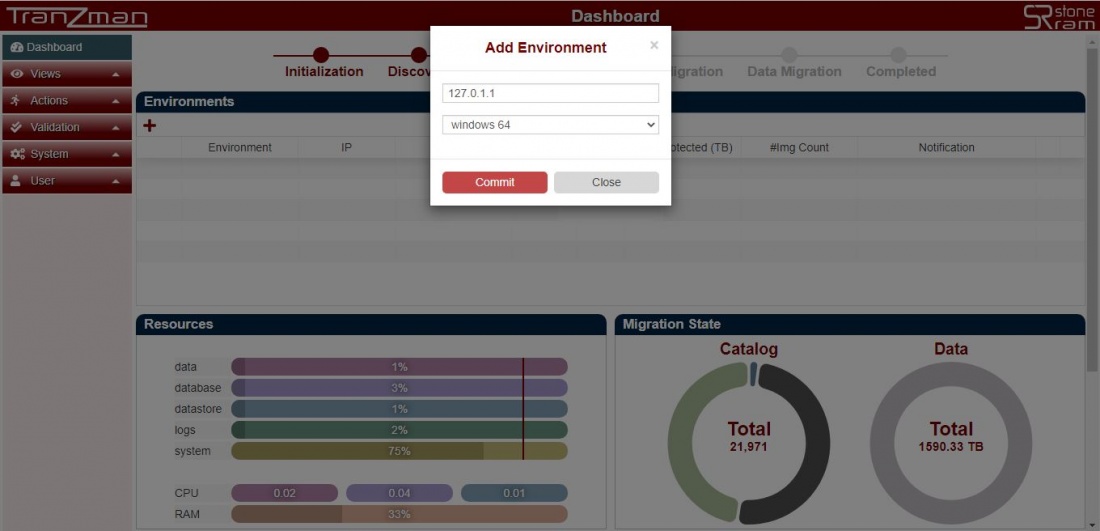
From Tranzman dashboard , click on <b>+</b> , enter any IP from Loopback IP Addresses(localhost address) and select platform of the recordings. | From Tranzman dashboard , click on <b>+</b> , enter any IP from Loopback IP Addresses(localhost address) and select platform of the recordings. | ||
[[File:Step1.jpg|border|1100x800px]] | [[File:Step1.jpg|border|1100x800px]] | ||
| + | |||
| + | |||
| + | ===Step 2=== | ||
| + | |||
| + | Previous step should have created a folder in the /data path. | ||
| + | |||
| + | {| class="wikitable" style="padding-left: auto; color:#FFFFFF; background-color: black; width: 600px; FONT-FAMILY:monospace,monospace; LINE-HEIGHT:15px; white-space: pre-wrap; | ||
| + | | | ||
| + | ls /data/7F000101/ | ||
| + | data images jobs process run tools | ||
| + | |} | ||
| + | |||
| + | Copy the recordings generated in step 1 to that folder using the mounted share. | ||
| + | |||
| + | e.g. | ||
| + | |||
| + | {| class="wikitable" style="padding-left: auto; color:#FFFFFF; background-color: black; width: 600px; FONT-FAMILY:monospace,monospace; LINE-HEIGHT:15px; white-space: pre-wrap; | ||
| + | | | ||
| + | ls 7F000101/ | ||
| + | data images jobs process TZM_recording_1606735043 run tools | ||
| + | |} | ||
| + | |||
| + | |||
| + | ===Step 3=== | ||
| + | |||
| + | Rename the copied folder to recording. | ||
| + | mv TZM_recording_1606735043 recording | ||
| + | |||
| + | e.g. | ||
| + | |||
| + | {| class="wikitable" style="padding-left: auto; color:#FFFFFF; background-color: black; width: 600px; FONT-FAMILY:monospace,monospace; LINE-HEIGHT:15px; white-space: pre-wrap; | ||
| + | | | ||
| + | mv TZM_recording_1606735043/ recording/ | ||
| + | ls 7F000101/ | ||
| + | data images jobs process recording run tools | ||
| + | |} | ||
| + | |||
| + | |||
| + | ===Step 4=== | ||
| + | |||
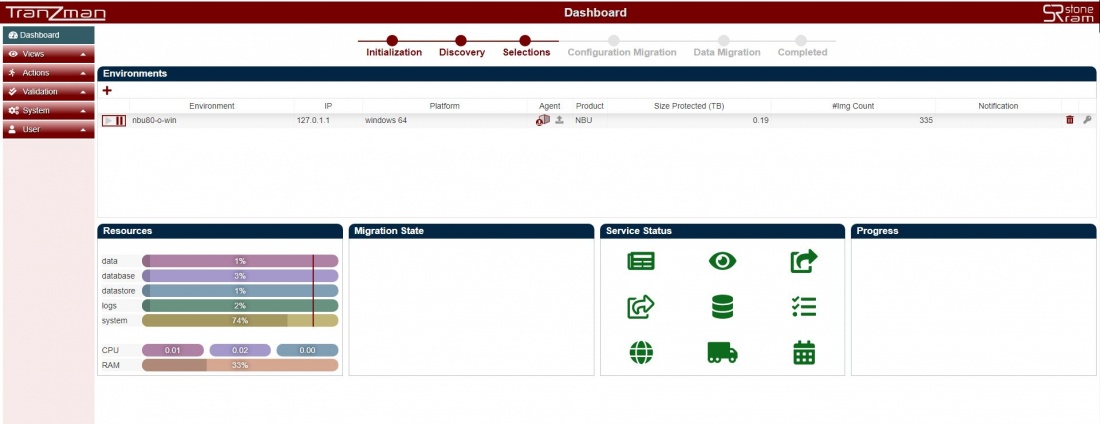
| + | By now if step 3 is successfull then you should see all the columns on the dashboard being populated for the respective recordings uploaded. | ||
| + | Example shown below. | ||
| + | |||
| + | |||
| + | [[File:Tape_step4.jpg|border|1100x800px]] | ||
| + | |||
| + | |||
| + | So this is another method of creating a Virtual Agent using Tranzman Shares. | ||
[[ Recorder | Back to Overview ]] | [[ Recorder | Back to Overview ]] | ||
Latest revision as of 10:41, 1 March 2021
The Tranzman Recorder is a FREE tool that can be used to collect information that can be used to scope a migration or assessment engagement, and to collect information that can be used to analyse the environment. The tool can be used to create a recording and use that as a virtual agent for backup migrations and recoveries.
Virtual agent could be created using the recording's on a disk or on a tape. Please follow the respective approach as required.
Create Virtual Agent from Recordings on Disk
To create a recording please follow the steps here Using Recorder . But while running the tzm_recorder executable add a flag of export_db.
Please enter the command like shown below. Please enter the command like shown below.
|
tzm_recorder.exe -export_db |
Following above steps will give you .zip file e.g. TZM_recording_1606735043.zip. Copy the output to a location visible to Tranzman Server GUI.
| Note: Below steps are based on TZM Recorder ran on a NetBackup Backup Server. |
Step 1
From Tranzman dashboard , click on + , enter any IP from Loopback IP Addresses(localhost address) and select platform of the recordings.
Step 2
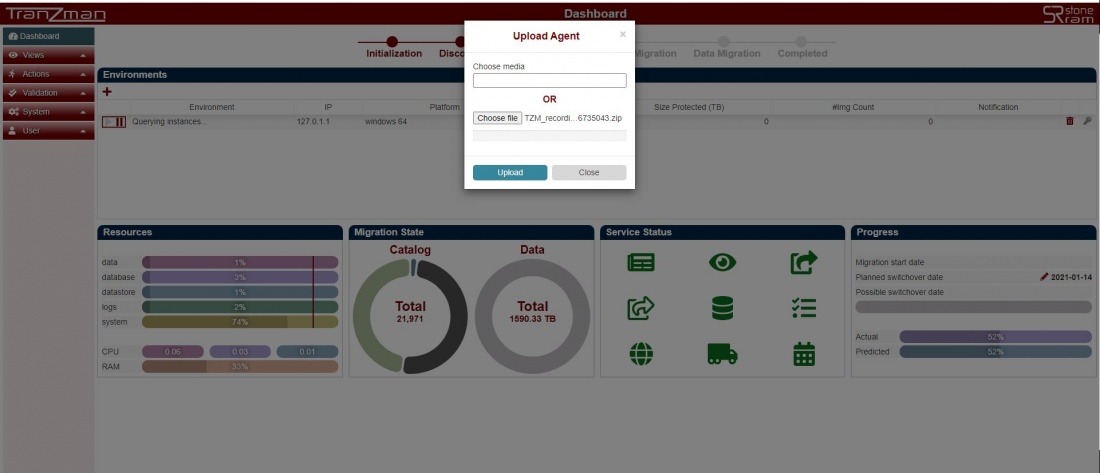
Hit the Commit button and click the upload button against the entry created.
Step 3
Clink on Choose file and select the recordings taken. Once done, click on upload. This should start the process of creation of virutal agent. Wait for few minutes before the whole process completes. A successfull upload should trigger the Init job and other Query jobs like QueryProduct, QueryConfig, QueryImages, QueryMedia.
Step 4
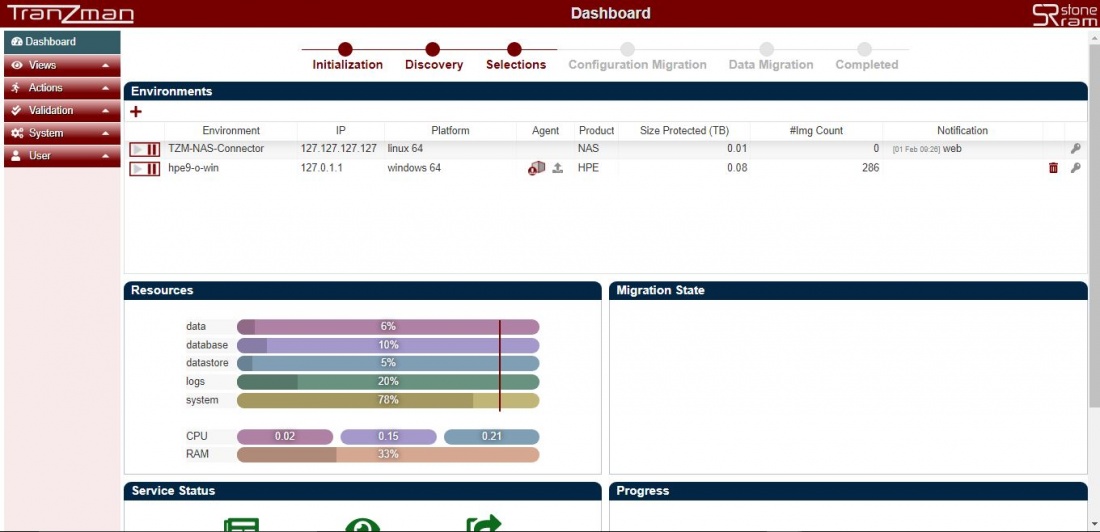
By now if step 3 is successfull then you should see all the columns on the dashboard being populated for the respective recordings uploaded. Example shown below.
So this is how basically a TZM Recorder could be used to create a Virtual Agent for Migrations/Recoveries , from recordings on a disk.
Create Virtual Agent from Recordings on Tape
Now Virtual Agent could also be created using a recording backed up to tapes. This is really helpful in situations where actual recording is huge in size and could not be transferred or shared across network.
But rather than backing up the zip file TZM_recording_1606735043.zip we have to create a recording in uncompressed format.
For creating a recording in unzipped format please follow the steps here Using Recorder but before running the tzm_recorder executable add couple of flags with that command.
Please enter the command like shown below.
|
tzm_recorder.exe -export_db -no_zip |
Above should give you a recording output in uncompressed format. e.g. TZM_recording_1606735043
Backup the recording to a dedicated tape. Once done, share the Tape Library with Tranzman Server. You could follow Devices Page for sharing the Tape Library with Tranzman Server.
| Note: Below steps are based on TZM Recorder ran on a Data Protector Backup Server. |
Step 1
From Tranzman dashboard , click on + , enter any IP from Loopback IP Addresses(localhost address) and select platform of the recordings.
Step 2
Hit the Commit button and click the upload button against the entry created.
Step 3
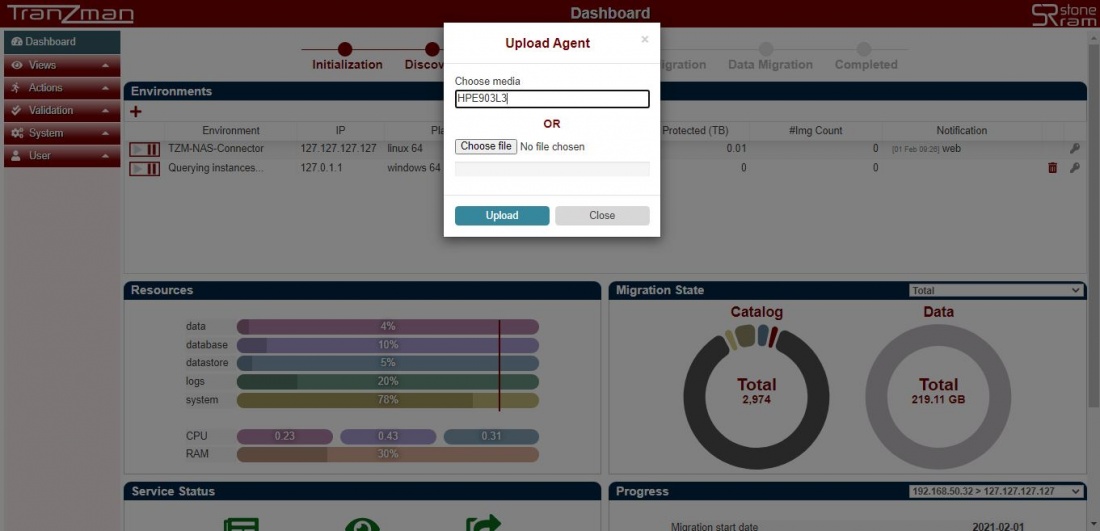
In Choose media section enter the mediaID of the tape used for backing up the recorders and click on upload.This should start the process of creation of virutal agent. Wait for few minutes before the whole process completes. A successfull upload should trigger the Init job and other Query jobs like QueryProduct, QueryConfig, QueryImages, QueryMedia.
Step 4
By now if step 3 is successfull then you should see all the columns on the dashboard being populated for the respective recordings uploaded. Example shown below.
So this is how basically a TZM Recorder could be used to create a Virtual Agent for Migrations/Recoveries , from recordings on a tape.
This steps requires to open shares from Tranzman Appliance. Please follow the instructions on Tranzman Shares and open the shares accordingly.
Once done run the recorder tool on the backup server and create the recording.
Create a recording in unzipped format by following the steps here Using Recorder but before running the tzm_recorder executable add couple of flags with that command.
Please enter the command like shown below.
|
tzm_recorder.exe -export_db -no_zip |
Above should give you a recording output in uncompressed format. e.g. TZM_recording_1606735043
Step 1
From Tranzman dashboard , click on + , enter any IP from Loopback IP Addresses(localhost address) and select platform of the recordings.
Step 2
Previous step should have created a folder in the /data path.
|
ls /data/7F000101/ data images jobs process run tools |
Copy the recordings generated in step 1 to that folder using the mounted share.
e.g.
|
ls 7F000101/ data images jobs process TZM_recording_1606735043 run tools |
Step 3
Rename the copied folder to recording. mv TZM_recording_1606735043 recording
e.g.
|
mv TZM_recording_1606735043/ recording/ ls 7F000101/ data images jobs process recording run tools |
Step 4
By now if step 3 is successfull then you should see all the columns on the dashboard being populated for the respective recordings uploaded. Example shown below.
So this is another method of creating a Virtual Agent using Tranzman Shares.
