Difference between revisions of "Configure Storage"
From Tranzman Documentation
| (23 intermediate revisions by 3 users not shown) | |||
| Line 1: | Line 1: | ||
| − | |||
| − | |||
| − | |||
__NOTOC__ | __NOTOC__ | ||
| − | + | <br> | |
| − | + | <br> | |
| − | + | <div style="background-color:#edf7ff; padding: 1.5rem; border-radius:8px; max-width:80%; margin: 0 auto; margin-bottom:2rem;"> | |
| − | + | <h1 style="border-bottom:none; font-size:2.5em; font-weight:bold; text-align:center;">Configuring Disks & Volumes After Tranzman Appliance Installation</h1> | |
| − | + | <p style="font-size:1.2em; text-align:left;"> | |
| − | + | After installing the Tranzman Appliance, disk and volume configuration is required.<br> | |
| − | + | The OS disk uses the smaller partition, while the larger partition (default 500GB) is used for data staging during migration.<br> | |
| − | + | This staging area temporarily stores converted images and transient data. | |
| − | > | + | </p> |
| − | + | </div> | |
| − | |||
| − | |||
| − | |||
| − | |||
| − | |||
| − | |||
| − | |||
| − | |||
| − | |||
| − | |||
| − | |||
| − | |||
| − | |||
| − | |||
| − | > | ||
| − | |||
| − | < | ||
| − | |||
| − | |||
| − | |||
| − | |||
| − | |||
| − | |||
| − | |||
| − | |||
| − | |||
| − | |||
| − | |||
| − | |||
| − | |||
| − | > | ||
| − | |||
| − | |||
| − | |||
| − | |||
| − | |||
| − | |||
| − | > | ||
| − | |||
| − | |||
| − | |||
| − | |||
| − | |||
| − | |||
| − | |||
| − | |||
| − | |||
| − | + | <div style="max-width:80%; margin: 0 auto;"> | |
| − | + | <div style="background-color:#fffbf4; padding:1.5rem; border-radius:8px; box-shadow:0 2px 4px rgba(0,0,0,0.06); margin-bottom:2rem;"> | |
| − | + | <h2 style="border-bottom:2px solid #ffe0b2; padding-bottom:0.5rem; font-size:1.5em;">Volume Configuration Steps</h2> | |
| − | > | + | <ol style="font-size:1.1em; margin-left:2em;"> |
| − | + | <li> | |
| + | On the <b>Volumes</b> page, the disk added for staging (e.g., <b>sdb</b>) will be listed.<br> | ||
| + | Select the disk and click <b>Configure</b>.<br> | ||
| + | <div style="display:inline-block; box-shadow:5px 5px 10px grey; margin:1em 0;">[[File:Volumes1.JPG |700px]]</div> | ||
| + | </li> | ||
| + | <li> | ||
| + | A new window will appear, allowing you to set the size of each partition.<br> | ||
| + | In most cases, the default values are recommended.<br> | ||
| + | After making changes, click <b>Commit</b>.<br> | ||
| + | <div style="display:inline-block; box-shadow:5px 5px 10px grey; margin:1em 0;">[[File:Volumes2.JPG |700px]]</div> | ||
| + | </li> | ||
| + | <li> | ||
| + | The appliance will configure the disk with the selected partition sizes and redirect you to the <b>Network Configuration</b> page.<br> | ||
| + | Continue with network setup as prompted. | ||
| + | </li> | ||
| + | </ol> | ||
| + | <div style="background-color:#f8e2b3; padding:0.2rem; border-radius:8px; box-shadow:0 2px 4px rgba(0,0,0,0.06); font-size:1em; margin: 0 auto;"> | ||
| + | <p>🛈 <i>Default partition sizes are suitable for most environments. Adjust only if specific requirements exist.</i></p> | ||
| + | </div> | ||
| + | </div> | ||
| + | </div> | ||
| − | + | <div style="display:flex; justify-content:space-between; margin-top:2rem; padding:1rem; background-color:#ffffff; max-width:90%; margin: 2rem auto 0;"> | |
| + | <div style="text-align:left;"> | ||
| + | [[Image:prev_icon.jpg|30px|link=Configure_Personality]] [[Configure_Personality|Previous]] | ||
| + | </div> | ||
| + | <div style="text-align:right;"> | ||
| + | [[Image:next_icon.jpg|30px|link=Configure_Network]] [[Configure_Network|Next]] | ||
| + | </div> | ||
| + | </div> | ||
Latest revision as of 03:08, 12 September 2025
Configuring Disks & Volumes After Tranzman Appliance Installation
After installing the Tranzman Appliance, disk and volume configuration is required.
The OS disk uses the smaller partition, while the larger partition (default 500GB) is used for data staging during migration.
This staging area temporarily stores converted images and transient data.
Volume Configuration Steps
-
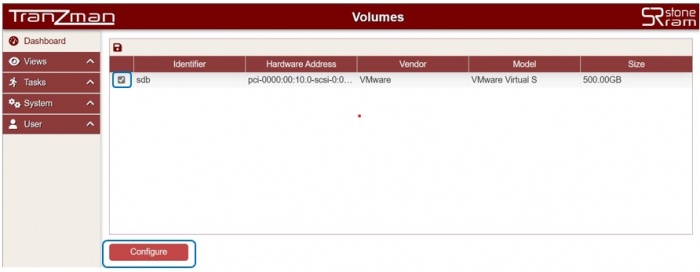
On the Volumes page, the disk added for staging (e.g., sdb) will be listed.
Select the disk and click Configure.
-
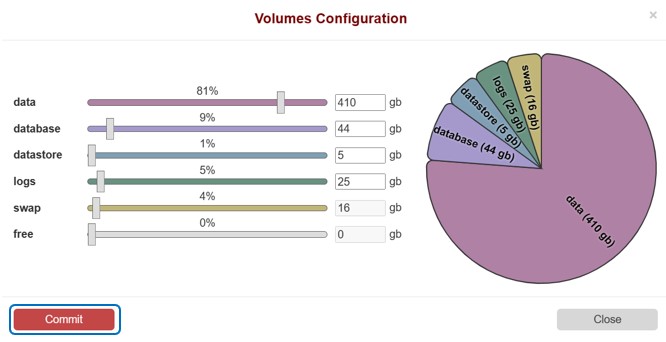
A new window will appear, allowing you to set the size of each partition.
In most cases, the default values are recommended.
After making changes, click Commit.
-
The appliance will configure the disk with the selected partition sizes and redirect you to the Network Configuration page.
Continue with network setup as prompted.


🛈 Default partition sizes are suitable for most environments. Adjust only if specific requirements exist.