Difference between revisions of "Configure Personality"
From Tranzman Documentation
| (7 intermediate revisions by the same user not shown) | |||
| Line 1: | Line 1: | ||
| − | == | + | __NOTOC__ |
| + | <br> | ||
| + | <br> | ||
| + | <div style="background-color:#edf7ff; padding: 1.5rem; border-radius:8px; max-width:80%; margin: 0 auto; margin-bottom:2rem;"> | ||
| + | <h1 style="border-bottom:none; font-size:2.5em; font-weight:bold; text-align:center;">Tranzman Migration Personality Selection</h1> | ||
| + | <p style="font-size:1.2em; text-align:left;"> | ||
| + | Tranzman supports multiple migration types to suit different backup environments.<br> | ||
| + | The first step in appliance configuration is to define the migration "Personality" using the Tranzman webUI. | ||
| + | </p> | ||
| + | </div> | ||
| − | + | <div style="max-width:80%; margin: 0 auto;"> | |
| + | <div style="background-color:#fffbf4; padding:1.5rem; border-radius:8px; box-shadow:0 2px 4px rgba(0,0,0,0.06); margin-bottom:2rem;"> | ||
| + | <h2 style="border-bottom:2px solid #ffe0b2; padding-bottom:0.5rem; font-size:1.5em;">Personality Types</h2> | ||
| + | <ul style="font-size:1.1em; margin-left:2em;"> | ||
| + | <li> | ||
| + | <b>Same Vendor Transitioning</b><br> | ||
| + | Migrate data between the same backup products (e.g. NetBackup to NetBackup).<br> | ||
| + | <div style="display:inline-block; box-shadow:5px 5px 10px grey; margin:1em 0;">[[File:Personality_svm.JPG | 700px]]</div> | ||
| + | </li> | ||
| + | <li> | ||
| + | <b>Cross Vendor Transitioning</b><br> | ||
| + | Migrate data between different backup products (e.g. TSM to NetBackup).<br> | ||
| + | <div style="display:inline-block; box-shadow:5px 5px 10px grey; margin:1em 0;">[[File:Personality_cvm.JPG | 700px]]</div> | ||
| + | </li> | ||
| + | <li> | ||
| + | <b>Data Recovery to Files (Recovery Without Vendor)</b><br> | ||
| + | Index and recover backup data without the original backup software or catalog.<br> | ||
| + | Useful for legacy data preserved only for restore purposes.<br> | ||
| + | <div style="display:inline-block; box-shadow:5px 5px 10px grey; margin:1em 0;">[[File:Personality_rwv.JPG | 700px]]</div> | ||
| + | </li> | ||
| + | </ul> | ||
| + | <div style="background-color:#f8e2b3; padding:0.2rem; border-radius:8px; box-shadow:0 2px 4px rgba(0,0,0,0.06); font-size:1em; margin: 0 auto;"> | ||
| + | <p>🛈 <i>After selecting the migration type ("Personality") and entering the customer name, click <b>Commit</b> to proceed to the next configuration step.</i></p> | ||
| + | </div> | ||
| + | </div> | ||
| − | === | + | <div style="background-color:#fef3f7; padding:1.5rem; border-radius:8px; box-shadow:0 2px 4px rgba(0,0,0,0.06); margin-bottom:2rem;"> |
| − | Open a | + | <h2 style="border-bottom:2px solid #f8bbd0; padding-bottom:0.5rem; font-size:1.5em;">How to Set Personality in Tranzman webUI</h2> |
| + | <ol style="font-size:1.1em; margin-left:2em;"> | ||
| + | <li> | ||
| + | Open a web browser and navigate to the appliance's IP address (or hostname). | ||
| + | </li> | ||
| + | <li> | ||
| + | The initial page displays options to set the "Personality" and enter the "Customer" name. | ||
| + | </li> | ||
| + | <li> | ||
| + | Select the appropriate migration type and enter the customer organisation name. | ||
| + | </li> | ||
| + | <li> | ||
| + | Click <b>Commit</b> to save and continue to the next configuration item (e.g. <b>Volumes</b>). | ||
| + | </li> | ||
| + | </ol> | ||
| + | </div> | ||
| + | </div> | ||
| − | + | <div style="display:flex; justify-content:space-between; margin-top:2rem; padding:1rem; background-color:#ffffff; max-width:90%; margin: 2rem auto 0;"> | |
| − | + | <div style="text-align:left;"> | |
| − | + | [[Image:prev_icon.jpg|30px|link=Installation]] [[Installation|Previous]] | |
| − | + | </div> | |
| − | + | <div style="text-align:right;"> | |
| − | + | [[Image:next_icon.jpg|30px|link=Configure_Storage]] [[Configure_Storage|Next]] | |
| − | + | </div> | |
| − | + | </div> | |
| − | |||
| − | |||
| − | [[ | ||
| − | |||
| − | |||
| − | |||
| − | |||
| − | |||
| − | |||
| − | |||
| − | |||
| − | [[ | ||
| − | |||
| − | [[ | ||
Latest revision as of 00:27, 12 September 2025
Tranzman Migration Personality Selection
Tranzman supports multiple migration types to suit different backup environments.
The first step in appliance configuration is to define the migration "Personality" using the Tranzman webUI.
Personality Types
-
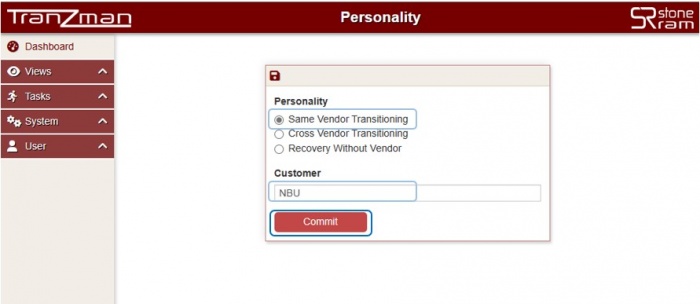
Same Vendor Transitioning
Migrate data between the same backup products (e.g. NetBackup to NetBackup).
-
Cross Vendor Transitioning
Migrate data between different backup products (e.g. TSM to NetBackup).

-
Data Recovery to Files (Recovery Without Vendor)
Index and recover backup data without the original backup software or catalog.
Useful for legacy data preserved only for restore purposes.
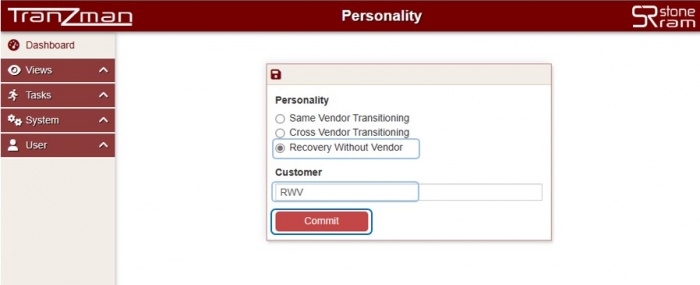


🛈 After selecting the migration type ("Personality") and entering the customer name, click Commit to proceed to the next configuration step.
How to Set Personality in Tranzman webUI
- Open a web browser and navigate to the appliance's IP address (or hostname).
- The initial page displays options to set the "Personality" and enter the "Customer" name.
- Select the appropriate migration type and enter the customer organisation name.
- Click Commit to save and continue to the next configuration item (e.g. Volumes).