Difference between revisions of "Configure Network"
From Tranzman Documentation
| (18 intermediate revisions by 3 users not shown) | |||
| Line 1: | Line 1: | ||
| − | + | __NOTOC__ | |
| + | <br> | ||
| + | <br> | ||
| + | <div style="background-color:#edf7ff; padding: 1.5rem; border-radius:8px; max-width:80%; margin: 0 auto; margin-bottom:2rem;"> | ||
| + | <h1 style="border-bottom:none; font-size:2.5em; font-weight:bold; text-align:center;">Network Configuration for Tranzman Appliance</h1> | ||
| + | <p style="font-size:1.2em; text-align:left;"> | ||
| + | By default, Tranzman Appliance uses DHCP for network configuration.<br> | ||
| + | You can switch to static configuration using the Network Configuration page. | ||
| + | </p> | ||
| + | </div> | ||
| − | === | + | <div style="max-width:80%; margin: 0 auto;"> |
| − | + | <div style="background-color:#fffbf4; padding:1.5rem; border-radius:8px; box-shadow:0 2px 4px rgba(0,0,0,0.06); margin-bottom:2rem;"> | |
| − | + | <h2 style="border-bottom:2px solid #ffe0b2; padding-bottom:0.5rem; font-size:1.5em;">Network Configuration Steps</h2> | |
| − | + | <ul style="font-size:1.1em; margin-left:2em;"> | |
| − | > | + | <li> |
| − | > | + | <b>Static Configuration:</b><br> |
| − | + | Select the <b>Static</b> radio button.<br> | |
| + | Configure <b>IP Address</b>, <b>Netmask</b>, <b>Fully Qualified Name</b>, <b>Gateway</b>, <b>Tranzman Agent Secure Port</b>, <b>Tranzman Agent Legacy Port</b>, <b>1st DNS</b>, <b>2nd DNS</b>.<br> | ||
| + | <div style="display:inline-block; box-shadow:5px 5px 10px grey; margin:1em 0;">[[File:Network_static.JPG |700px]]</div> | ||
| + | </li> | ||
| + | <li> | ||
| + | <b>DHCP Configuration:</b><br> | ||
| + | Configure <b>Fully Qualified Name</b>, <b>Tranzman Agent Secure Port</b>, <b>Tranzman Agent Legacy Port</b>, <b>1st DNS</b>, <b>2nd DNS</b>.<br> | ||
| + | <div style="display:inline-block; box-shadow:5px 5px 10px grey; margin:1em 0;">[[File:Network_dhcp.JPG |700px]]</div> | ||
| + | </li> | ||
| + | <li> | ||
| + | Click <b>Commit</b> to update the configuration.<br> | ||
| + | On success, you will be redirected to the <b>System Time</b> page for appliance date/time configuration. | ||
| + | </li> | ||
| + | </ul> | ||
| + | <div style="background-color:#f8e2b3; padding:0.2rem; border-radius:8px; box-shadow:0 2px 4px rgba(0,0,0,0.06); font-size:1em; margin: 0 auto;"> | ||
| + | <p>🛈 <i>It is not recommended to modify the Tranzman Agent Ports without StoneRam assistance.</i></p> | ||
| + | </div> | ||
| + | </div> | ||
| + | </div> | ||
| − | + | <div style="display:flex; justify-content:space-between; margin-top:2rem; padding:1rem; background-color:#ffffff; max-width:90%; margin: 2rem auto 0;"> | |
| − | + | <div style="text-align:left;"> | |
| − | + | [[Image:prev_icon.jpg|30px|link=Configure_Storage]] [[Configure_Storage|Previous]] | |
| − | + | </div> | |
| − | + | <div style="text-align:right;"> | |
| − | + | [[Configure_System_Time|Next]] [[Image:next_icon.jpg|30px|link=Configure_System_Time]] | |
| − | + | </div> | |
| − | + | </div> | |
| − | |||
| − | |||
| − | |||
| − | |||
| − | |||
| − | |||
| − | |||
| − | |||
| − | < | ||
| − | |||
| − | |||
| − | |||
| − | | | ||
| − | |||
| − | | | ||
| − | |||
| − | |||
| − | |||
| − | |||
| − | |||
| − | |||
| − | |||
| − | |||
| − | | | ||
| − | |||
| − | |||
| − | |||
| − | |||
| − | |||
| − | |||
| − | |||
| − | |||
| − | |||
| − | |||
| − | |||
| − | |||
| − | |||
| − | |||
| − | | | ||
| − | |||
| − | |||
| − | |||
Latest revision as of 03:14, 12 September 2025
Network Configuration for Tranzman Appliance
By default, Tranzman Appliance uses DHCP for network configuration.
You can switch to static configuration using the Network Configuration page.
Network Configuration Steps
-
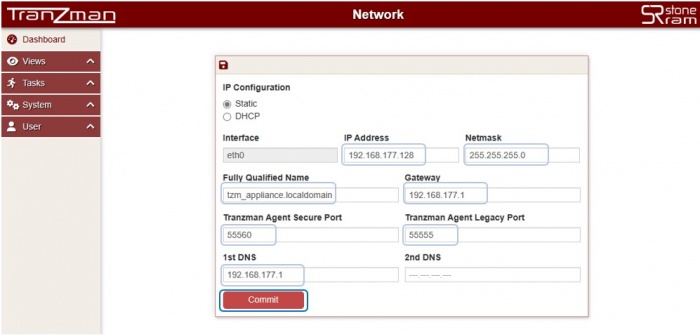
Static Configuration:
Select the Static radio button.
Configure IP Address, Netmask, Fully Qualified Name, Gateway, Tranzman Agent Secure Port, Tranzman Agent Legacy Port, 1st DNS, 2nd DNS.
-
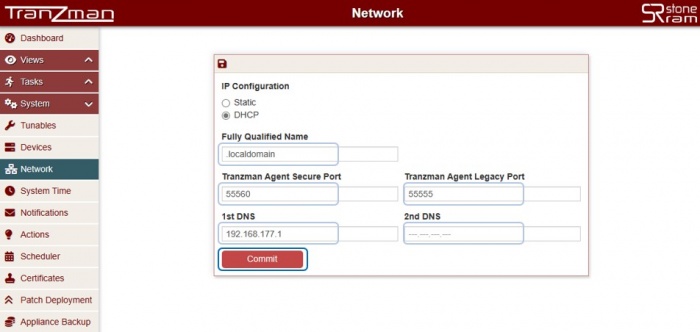
DHCP Configuration:
Configure Fully Qualified Name, Tranzman Agent Secure Port, Tranzman Agent Legacy Port, 1st DNS, 2nd DNS.
-
Click Commit to update the configuration.
On success, you will be redirected to the System Time page for appliance date/time configuration.


🛈 It is not recommended to modify the Tranzman Agent Ports without StoneRam assistance.