Difference between revisions of "RecoverDomino"
(→Step 4) |
|||
| (5 intermediate revisions by the same user not shown) | |||
| Line 3: | Line 3: | ||
For a successful rebuild, it is essential to know the information listed below. | For a successful rebuild, it is essential to know the information listed below. | ||
__NOTOC__ | __NOTOC__ | ||
| − | {|style="wikitable" border="1" style="color:black; | + | {|style="wikitable" border="1" style="color:black; |
|! style="background-color:#750000;color:#ffffff;"|'''File Name''' | |! style="background-color:#750000;color:#ffffff;"|'''File Name''' | ||
|! style="background-color:#750000;color:#ffffff;"|'''Location''' | |! style="background-color:#750000;color:#ffffff;"|'''Location''' | ||
| Line 39: | Line 39: | ||
|- | |- | ||
|} | |} | ||
| + | ==='''Step 1'''=== | ||
| + | Login to the NetBackup GUI and navigate to '''Backup, Archive and Restore''' section. | ||
| − | + | [[File:NBU-RestoreFiles.jpg]] | |
| − | |||
| − | ===Step 2=== | + | ==='''Step 2'''=== |
| − | Move all the data files from the | + | Click on the '''Restore Files''' tab and select the Source, Destination Client and type of Policy to restore the Domino backup files. |
| + | The '''Policy Type''' will be '''Standard'''. | ||
| + | |||
| + | [[File:Domino-RestorePolicy.jpg]] | ||
| + | |||
| + | ==='''Step 3'''=== | ||
| + | Under '''Browse Directory''' select the Domino database backup files to restore. | ||
| + | |||
| + | [[File:Domino-RestoreSelection.jpg]] | ||
| + | |||
| + | ==='''Step 4'''=== | ||
| + | Choose to restore to a different location, and change the target destination to a temporary location on the Domino Server. '''''i.e. C:\Temp''''' | ||
| + | |||
| + | [[File:Domino-RestoreDirectory.jpg]] | ||
| + | |||
| + | ==='''Step 5'''=== | ||
| + | Create the '''"\domino"''' and '''"\domino\data"''' directories on the new server. | ||
| + | |||
| + | In this document we use the default install locations, which under Windows it can be found under; | ||
| + | |||
| + | ''"C:\Program Files\IBM\Domino"'' | ||
| + | |||
| + | ==='''Step 6'''=== | ||
| + | Move all the data files from the restored temporary location to the appropriate place on the new computer. The location of the data directory is identified in the '''NOTES.INI''' setting '''"Directory=<Location of Server>"''', which can be viewed by opening it with a simple text editor. | ||
Data files include: | Data files include: | ||
| Line 55: | Line 79: | ||
* All templates (files with the filename extension .NTF) | * All templates (files with the filename extension .NTF) | ||
| − | ===Step | + | ==='''Step 7'''=== |
| − | Move all user mail files. By default, the user mail files are stored in the "Domino\Data\Mail" directory. | + | Move all user mail files. By default, the user mail files are stored in the '''"Domino\Data\Mail"''' directory. |
| − | ===Step | + | ==='''Step 8'''=== |
Move all other databases that were created on the original Domino server. | Move all other databases that were created on the original Domino server. | ||
| − | ===Step | + | ==='''Step 9'''=== |
Install the Domino server software on the new computer by following the instructions in the Domino server installation guide. | Install the Domino server software on the new computer by following the instructions in the Domino server installation guide. | ||
During the install of the Domino server software, use the original '''SERVER.ID''', '''ADMIN.ID''' and '''CERT.ID''' files. Remember to use the same Domino server and Domain names. | During the install of the Domino server software, use the original '''SERVER.ID''', '''ADMIN.ID''' and '''CERT.ID''' files. Remember to use the same Domino server and Domain names. | ||
| − | ===Step | + | ==='''Step 10'''=== |
When the Domino installation begins, you may see a message indicating that Microsoft Windows Registry needs to modify some settings that are still present from the previous installation. Click Yes to correct this and start the Domino server once installation is complete. | When the Domino installation begins, you may see a message indicating that Microsoft Windows Registry needs to modify some settings that are still present from the previous installation. Click Yes to correct this and start the Domino server once installation is complete. | ||
Latest revision as of 14:30, 17 January 2019
Follow the steps on this page to recover a Domino Server Database
For a successful rebuild, it is essential to know the information listed below.
| File Name | Location |
| NOTES.INI | Domino Program Directory |
| NAMES.NSF | Domino\Data Directory |
Any other directory databases (if your environment uses them):
|
Domino\Data Directory |
| LOG.NSF | Domino\Data Directory |
| CERTLOG.NSF | Domino\Data Directory |
| *.NTF (any templates you have modified) | Domino\Data\*.NTF |
| *.ID | Domino\Data\*.ID |
| Mail Files | Domino\Data\Mail\*.* |
| Diagnostic Files | \Domino\Data\IBM_TECHNICAL_SUPPORT\*.* |
Step 1
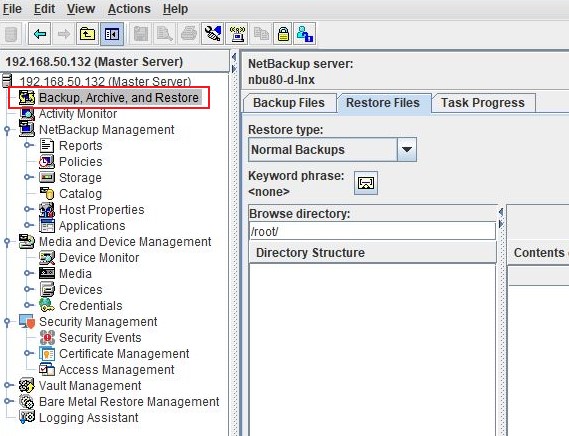
Login to the NetBackup GUI and navigate to Backup, Archive and Restore section.
Step 2
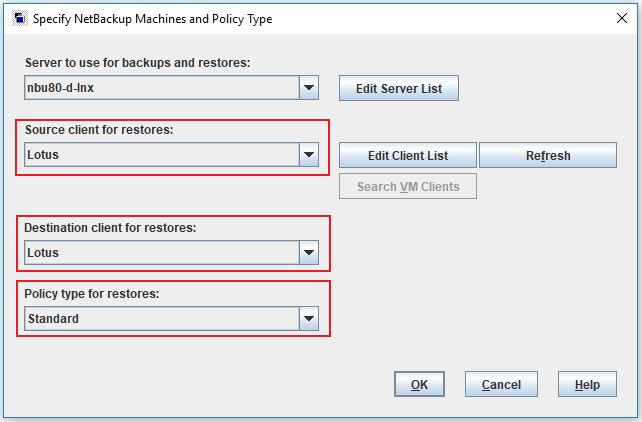
Click on the Restore Files tab and select the Source, Destination Client and type of Policy to restore the Domino backup files. The Policy Type will be Standard.
Step 3
Under Browse Directory select the Domino database backup files to restore.
Step 4
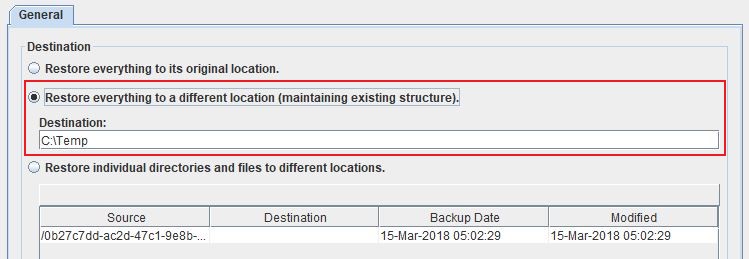
Choose to restore to a different location, and change the target destination to a temporary location on the Domino Server. i.e. C:\Temp
Step 5
Create the "\domino" and "\domino\data" directories on the new server.
In this document we use the default install locations, which under Windows it can be found under;
"C:\Program Files\IBM\Domino"
Step 6
Move all the data files from the restored temporary location to the appropriate place on the new computer. The location of the data directory is identified in the NOTES.INI setting "Directory=<Location of Server>", which can be viewed by opening it with a simple text editor.
Data files include:
- Any file with the filename extension of ".NSF"
- Server ID file
- Administrator ID file
- Certificate ID file
- Domino Directory for the server (NAMES.NSF)
- ADMIN4.NSF (Administration Requests Database)
- All templates (files with the filename extension .NTF)
Step 7
Move all user mail files. By default, the user mail files are stored in the "Domino\Data\Mail" directory.
Step 8
Move all other databases that were created on the original Domino server.
Step 9
Install the Domino server software on the new computer by following the instructions in the Domino server installation guide. During the install of the Domino server software, use the original SERVER.ID, ADMIN.ID and CERT.ID files. Remember to use the same Domino server and Domain names.
Step 10
When the Domino installation begins, you may see a message indicating that Microsoft Windows Registry needs to modify some settings that are still present from the previous installation. Click Yes to correct this and start the Domino server once installation is complete.
| Note: For single database restores copy paste the database on to the data directory and restart the domino server. |
Use this link to go back to the main recoverydocs Page.


