Difference between revisions of "RecoverMSSQL"
| (10 intermediate revisions by the same user not shown) | |||
| Line 1: | Line 1: | ||
The following method has been tested with the versions of Microsoft SQL 2008,2012 & 2014 for recovering the Database Files and getting the server back up and running. | The following method has been tested with the versions of Microsoft SQL 2008,2012 & 2014 for recovering the Database Files and getting the server back up and running. | ||
| + | __NOTOC__ | ||
| + | ==='''Step 1'''=== | ||
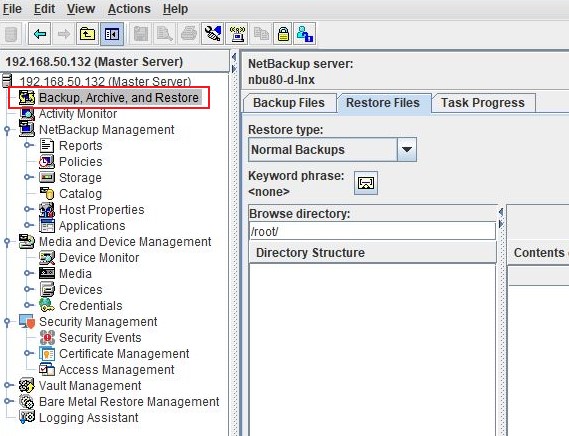
| + | Login to the NetBackup GUI and navigate to '''Backup, Archive and Restore''' section. | ||
| − | + | [[File:NBU-RestoreFiles.jpg]] | |
| − | + | ==='''Step 2'''=== | |
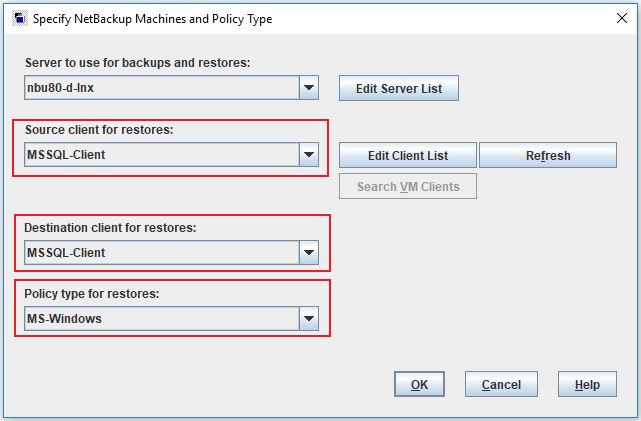
| − | + | Click on the '''Restore Files''' tab and select the Source, Destination Client and type of Policy to restore the Exchange backup files. | |
| + | The '''Policy Type''' will be '''MS-Windows'''. | ||
| − | + | [[File:MSSQL-RestoreSelection.jpg]] | |
| − | + | ==='''Step 3'''=== | |
| + | Under '''Browse Directory''' select the SQL instance and database backup files to restore. | ||
| − | [[File: | + | [[File:MSSQL-BrowseDirectory.jpg]] |
| − | '''Step | + | ==='''Step 4'''=== |
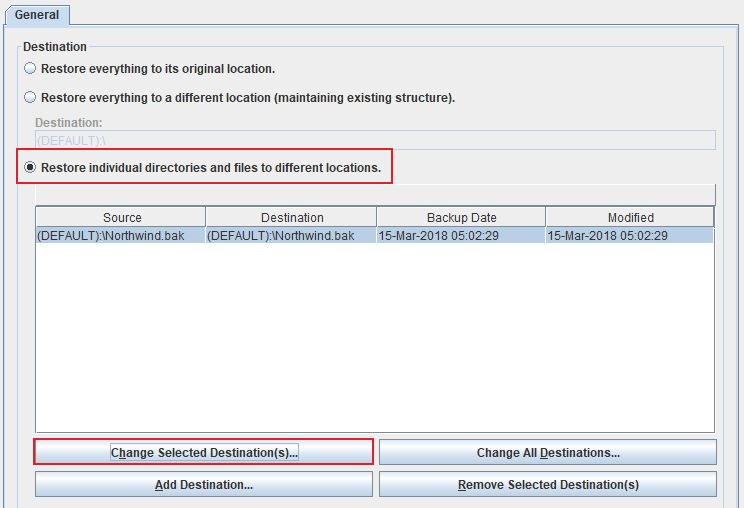
| + | Chose to restore to a different location, and change the target destination to a temporary location on the SQL Server. | ||
| − | + | [[File:MSSQL-RestoreDirectory.jpg]] | |
| + | |||
| + | ==='''Step 5'''=== | ||
| + | Initiate the restore process from NetBackup. Example of a temporary location can be '''"C:\Temp\DB_Name.bak"'''. | ||
| + | |||
| + | ==='''Step 6'''=== | ||
| + | Log in to MS SQL Management Studio, right click on Databases and choose '''Restore Database'''. | ||
[[File:MSSQL_Restore_DB_01.jpg]] | [[File:MSSQL_Restore_DB_01.jpg]] | ||
| − | '''Step | + | ==='''Step 7'''=== |
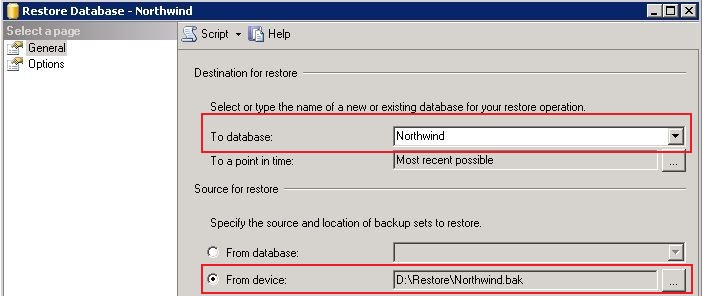
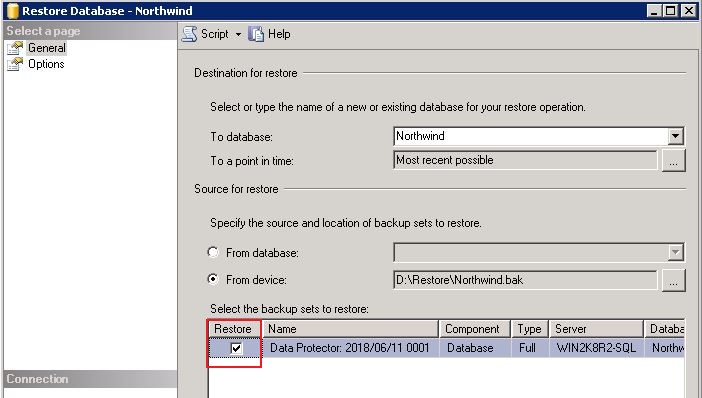
| − | For the source select From Device | + | Select desired database from the drop down menu as the destination. For the source select '''From Device''' and use the '''BAK''' file on the temporary location. Make sure to select the '''Restore''' checkbox as in the picture below. |
[[File:MSSQL_Restore_DB_02.jpg]] | [[File:MSSQL_Restore_DB_02.jpg]] | ||
| − | '''Step | + | ==='''Step 8'''=== |
| − | |||
| − | |||
| − | |||
| − | |||
| − | |||
| − | |||
| − | |||
| − | ''' | + | Select '''OK''' and this will restore the contents from the BAK file to the desired Database. |
| − | + | ---- | |
| + | Use this link to go back to the main [[recoverydocs]] Page. | ||
Latest revision as of 14:22, 16 January 2019
The following method has been tested with the versions of Microsoft SQL 2008,2012 & 2014 for recovering the Database Files and getting the server back up and running.
Step 1
Login to the NetBackup GUI and navigate to Backup, Archive and Restore section.
Step 2
Click on the Restore Files tab and select the Source, Destination Client and type of Policy to restore the Exchange backup files. The Policy Type will be MS-Windows.
Step 3
Under Browse Directory select the SQL instance and database backup files to restore.
Step 4
Chose to restore to a different location, and change the target destination to a temporary location on the SQL Server.
Step 5
Initiate the restore process from NetBackup. Example of a temporary location can be "C:\Temp\DB_Name.bak".
Step 6
Log in to MS SQL Management Studio, right click on Databases and choose Restore Database.
Step 7
Select desired database from the drop down menu as the destination. For the source select From Device and use the BAK file on the temporary location. Make sure to select the Restore checkbox as in the picture below.
Step 8
Select OK and this will restore the contents from the BAK file to the desired Database.
Use this link to go back to the main recoverydocs Page.
