Difference between revisions of "RecoverDB2"
| (One intermediate revision by the same user not shown) | |||
| Line 1: | Line 1: | ||
== Headline == | == Headline == | ||
| − | + | For restoring the DB2 data recovered as files using Tranzman below steps need to be followed | |
In the following example, we have a database called '''SAMPLE'''. The recovery logs are included in the backup image, the database is restored, and then the database is rolled forward to the end of backup timestamp. | In the following example, we have a database called '''SAMPLE'''. The recovery logs are included in the backup image, the database is restored, and then the database is rolled forward to the end of backup timestamp. | ||
| − | + | ||
===Step 1=== | ===Step 1=== | ||
Login to the NetBackup GUI navigate to Backup, Archive and Restore. | Login to the NetBackup GUI navigate to Backup, Archive and Restore. | ||
Latest revision as of 15:25, 7 August 2020
Contents
Headline
For restoring the DB2 data recovered as files using Tranzman below steps need to be followed
In the following example, we have a database called SAMPLE. The recovery logs are included in the backup image, the database is restored, and then the database is rolled forward to the end of backup timestamp.
Step 1
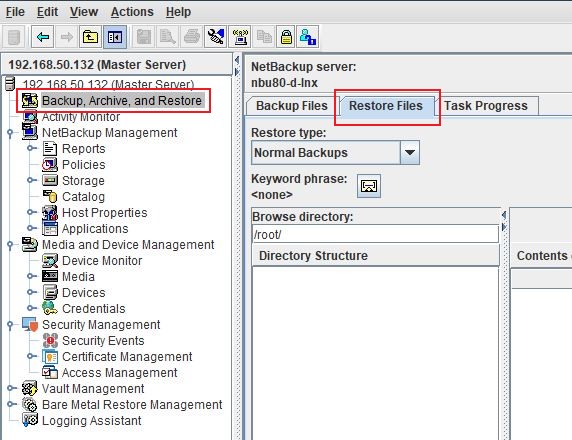
Login to the NetBackup GUI navigate to Backup, Archive and Restore.
Step 2
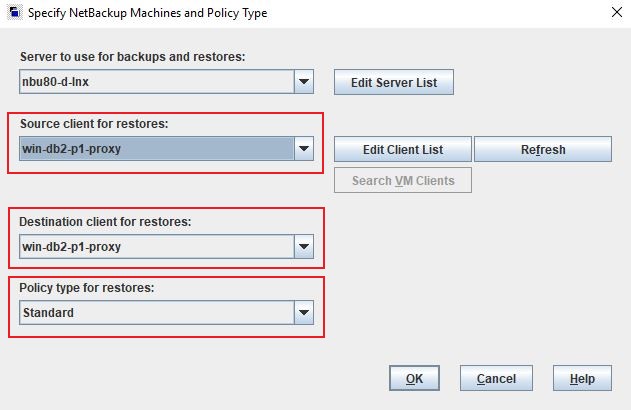
Click on the Restore Files tab and select the Source, Destination Client and type of Policy to restore the DB2 backup files.
Step 3
Restore the image on the DB2 client as a file.
| Note: Set Policy Type to standard, as the restore will be as flat files as opposed to DB2. |
Step 4
Set a valid date range to look for the backup image. Make sure to change the Browse Directory to the "/" location, else the contents may not populate.
Step 5
Select the image to recover, and start the restore process back to a location on the client machine.
Step 6
Recovered filename will have a naming convention as shown below.
e.g. SAMPLE.0.DB2.NODE0000.CATN000.20180523164142.001
- Database Name = Sample
- Instance Name = DB2
- Timestamp = 20180523164142
- Catalog Name = CATN000
Step 7
Restore the database. The example below restores the database SAMPLE from location in "C:\Backup"
|
db2 => restore database sample from "C:\backup" taken at 20180919172832 with 2 buffers buffer 1024 parallelism 1 without prompting SQL2540W Restore is successful, however a warning "2539" was encountered during Database Restore while processing in No Interrupt mode. |
Step 8
Roll the logs forward to the end of the backup to make sure the database is in a consistent state.
|
db2 => rollforward db sample to end of backup
DB20000I The ROLLFORWARD command completed successfully. |
Note : If log files are not included in backup images, the rollforward recovery needs to be done as per the method used for backing up logs.
Use this link to go back to the main recoverydocs Page.


